Showing posts with label Valentine's Day. Show all posts

Monday, February 13, 2023

Jewelrymaking: Filigree Silver Heart Valentine's Earrings


I often buy supplies for my stash without having a specific project in mine. In this case, JoAnn was having a great sale on beads when I bought the silver heart beads I used in this project. Something like 70% off during one of their sales last year. So when I decided I wanted some Valentine's themed earrings...into my stash I went!


Supplies:

  • Silver Heart Beads (JoAnn or Bead Stores)
  • Head Pins and Jump Rings
  • Black Crystal Beads 
  • Hammered Links (Bead Landing,Michaels)
  • Floral Charms and Earring Backs for Clips
  • Jewelry or Strong Bond Glue 


Since these beads were such a great deal on sale, of course I bought two sets! I chose the filigree design for my earrings. Since I wear clip-on earrings, I chose some floral charms (Shipwreck Beads) big enough to accommodate my clip earring backs. 


I like the Loctite Gel Superglue. It's low odor and holds as strong as jewelry glue. Put a little dab on the earring back and then position on the back of the floral charm. If you have pieced ears, skip this step and use a fish hook ear wire. 


I love these little clamps I found at Dollar Tree which are the perfect size for small projects. I always clamp my glued earring backs to ensure the strongest bond.


Next, I grabbed a couple of pins from my supplies, along with some black Czech glass beads. I strung the black and heart beads on the pins and made a closed loop.


To put things all together, I used some hammered silver links and jump rings I had on hand to connect the earring clips and the heart pins.


Connect the jump ring to the link and then using regular jump rings, attach the heart pins and floral sections.


The best part is, these don't scream Valentine's Day to me so I can wear them whenever but they also work for V-Day!  Come back to see what  I did with the remaining beads! 

Sharing At: 


Tuesday, February 7, 2023

Papercrafting: Black White Gold and Pink Valentine's Cards


I will always LOVE making Valentine's cards for family and special friends. Over the years, like other holidays, these have become part of people's Valentine's decor which makes my own HEART soar. This year, I grabbed some graphic metallic papers from my supply shelves and kept them fairly simple by using this image from Cricut Design Space and going with a color palette of black, white, gold, silver and metallic pink!

Supplies:
  • Patterned Scrapbook Papers 
  • Glitter Scrapbook Paper
  • Metallic Cardstock 65 lb
  • White 110lb Cardstock 
  • Digital Cutting Machine
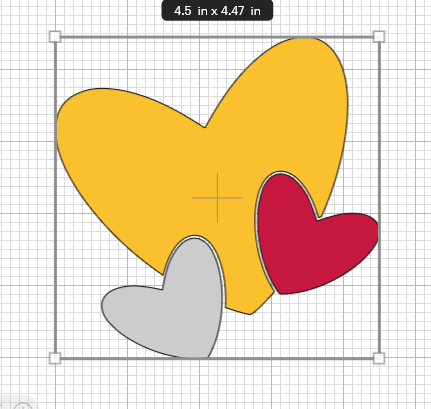
 and Images
  • Foam Tape
  • Self Adhesive Rhinestones 


I neglected to take in process pictures but the process is pretty straightforward. 


I browsed Cricut Design Space for an image I liked and found this one. I subscribe so I was just able to add to my canvas. One thing I like to do in Design Space is change the image as close to the colors I want to cut which helps me remember what to cut! This image cuts in three pieces. 

I sized the grouped image to fit my card, then cut out each section. The main heart from gold glitter paper; the other two hearts from silver and metallic pink papers. 


For the card base, I cut white 110lb cardstock (Recollections) 10x7 to make a 5x7 card. I use my Martha Steward scoring board and bone folder to get a crisp fold. Then I cut the metallic papers 6.75x4.75 and the patterned metallic papers 6.5x4.5. Layered these as shown on the card and then attached the heart pieces using foam tape. The smaller hearts nestle in the cutout spaces of the larger heart. 


To finish, I added black and iridescent self-adhesive rhinestones to the smaller hearts. 

Not to leave out those who will be celebrating LOVE day with their furbabies, I made a couple of pet-themed cards too! 


Similar to the other cards, I found an image in Design Space and cut out using the same papers and finished the paw with self-adhesive rhinestones!


Sharing At:


Tuesday, January 31, 2023

Valentine's Day Easy Cloche


I use this cloche I found after Christmas one year at Pottery Barn for seasonal decor. OK non-seasonal decor too but...

Getting my Valentine's decorating going this week and made this very easy vignette from things I had on hand. 

Supplies
  • Heart Shaped Picks (I found these last year at Walmart and forgot to use them)
  • Small Clay Pot
  • Glass Votive Holder (Dollar Tree)
  • Scrap Vinyl
  • Heart Shaped Confetti


Since I like to use this for different things, I grabbed a glass candle holder I had in my craft closet to use as the centerpiece of the cloche. I knew I wanted to use the confetti and this kept it neat. 

I also had a small clay pot in my stash which fit perfectly (upside down) inside the glass candle holder. I painted it white with one coat of acrylic paint. 


Sometimes I'm smart enough to keep things from previous projects like this silver heart that remained after cutting a vinyl project last year. You could easily just cut a heart or use a sticker. Put this on my painted clay pot. 


Then, I added my picks with the stems cut to fit under the cloche dome. 


To finish, I sprinkled heart-shaped confetti around the clay pot and put the dome on!  


Easy to switch out for its next use!

Sharing At: 


Tuesday, February 2, 2021

Valentine's Day: Pink, Grey, Cream Valentine's Cards


Less than two weeks until Galentine's and Valentine's Day! When you love making cards, it's easy to make them for those you love. 

I tend towards non-traditional colors because I'm contrary like that. This year, I went with a color palette of Black and White, Cream and Grey and Pink. I backed into my palette when I found some great stickers at Dollar Tree last month. 

With these COVID variants, we're going out even less than before which wasn't that much to start and it will be another cozy home celebration for us. 

Supplies: 
  • Cardstock (Recollections 110lb Michaels)
  • Scrapbook Paper (American Crafts and Pink Paislee)
  • Focal Sticker (Dollar Tree)
  • Paper Trimmer
  • Adhesive 


I found this sheet of wood stickers at Dollar Tree. I love the natural hearts and although I'm not much of a pink person, I really wanted to use those too because I knew I had the perfect papers in my stash! 


I did some on cream cardstock with coordinating grey and cream papers. I had scraps from cutting the cards to size (5x7) so I ran them through a damask embossing folder that matched the pattern of the paper. Makers hate waste!. I kept these simple because the papers were so pretty so just adhered the natural heart to a white scrap, matted with a grey scrap and done! 


I'm physically unable to avoid black and white. It's true! My doctor confirms. OK no, but...it's my thing. So for this one, I used a striped silver on silver paper, American Crafts XOXO paper, the pink hearts and done!


For the pink cards, white cardstock, coordinating papers by Pink Paislee, more natural hearts and done! 


Those of you who know you're getting one will just have to see which one you get! 😛


Wednesday, February 14, 2018

Valentine's Lettering and Doodles

Happy Valentine's Day ! Hope your day is filled with love and of course chocolate! I didn't do much in the way of crafting but sharing some lettering / doodling I did in the spirit of the day! 

All of these were hand drawn originals by me, then digitally colored. 


Tuesday, January 31, 2017

Valentine's Lanterns


Disclosure: This is a sponsored post. Products in this post were provided to me. Project and opinions are mine.

Yikes. How is it almost Valentine's Day already?  Time to get busy with some new decorations right? Fortunately I get to work with Oriental Trading Company and with their selection of  decor and craft items, was able to come up with some new  pieces I now have up not only for Valentine's Day  but as part of my decor all year round! 

Since I tend towards neutrals and metallics, I fell in love ( no pun intended) with these silver metal lanterns. I decided I'd make some altered candles to put inside them but since I knew I wouldn't light them, I chose battery operated flameless candles. They look great lit or unlit and no risk of burning down the house! 


Never one to leave anything plain, I used a Love Letter background stamp to make candle wraps for the candles. 


I stamped on plain white cardstock then tore the edges and went over with a metallic gold rub-on to give them an aged look. Adhered them to the candles with a strong double sided tape. 


Still not content to leave my candlewraps alone, I cut a couple of hearts from some scrap glitter vinyl. And of course, STILL not content, had to embellish some more! What goes better with hearts than more hearts and keys? 


I adhered the large keys with foam dots,  wrapped gold and white Baker's twine around each candle a few times  ( this also keeps the keys in place) and finished with heart charms and a rolled paper rose made w/ scraps from my stamped candlewraps. We makers don't wastestuff  do we?!


Once my candles were done, of course I needed to add some embellishments to the lanterns themselves. Using scrap glitter paper , more Baker's twine,  charms , and paper roses did the trick! 


When lit, the candles give of a calming soft glow. I miss just sitting and looking at the twinkling lights of the Christmas tree. I think I've found a solution! 

Supplies Used ( unless otherwise stated all are from Oriental Trading Co) 
  • Metal Lanterns
  • Flameless Candles
  • Heart and Key Charms
  • Gold and White Baker's Twine
  • White Scrapbook Paper
  • Love Letter Background Stamp
  • Gold metallic rub on (my stash)
  • Strong double sided tape ( my stash) 
Happy (almost) Love Month!!