Thursday, November 30, 2023

BFF Open House


Happy Friday and December Eve Creative Peeps! I hope you all had a wonderful Thanksgiving. Ours was small...me, Mr. Chocolate, and the Mumster but it was wonderful. And now, the mad rush begins or accelerates, depending on where you are in the process. I'm at the begin part. The accelerate part begins this weekend! 

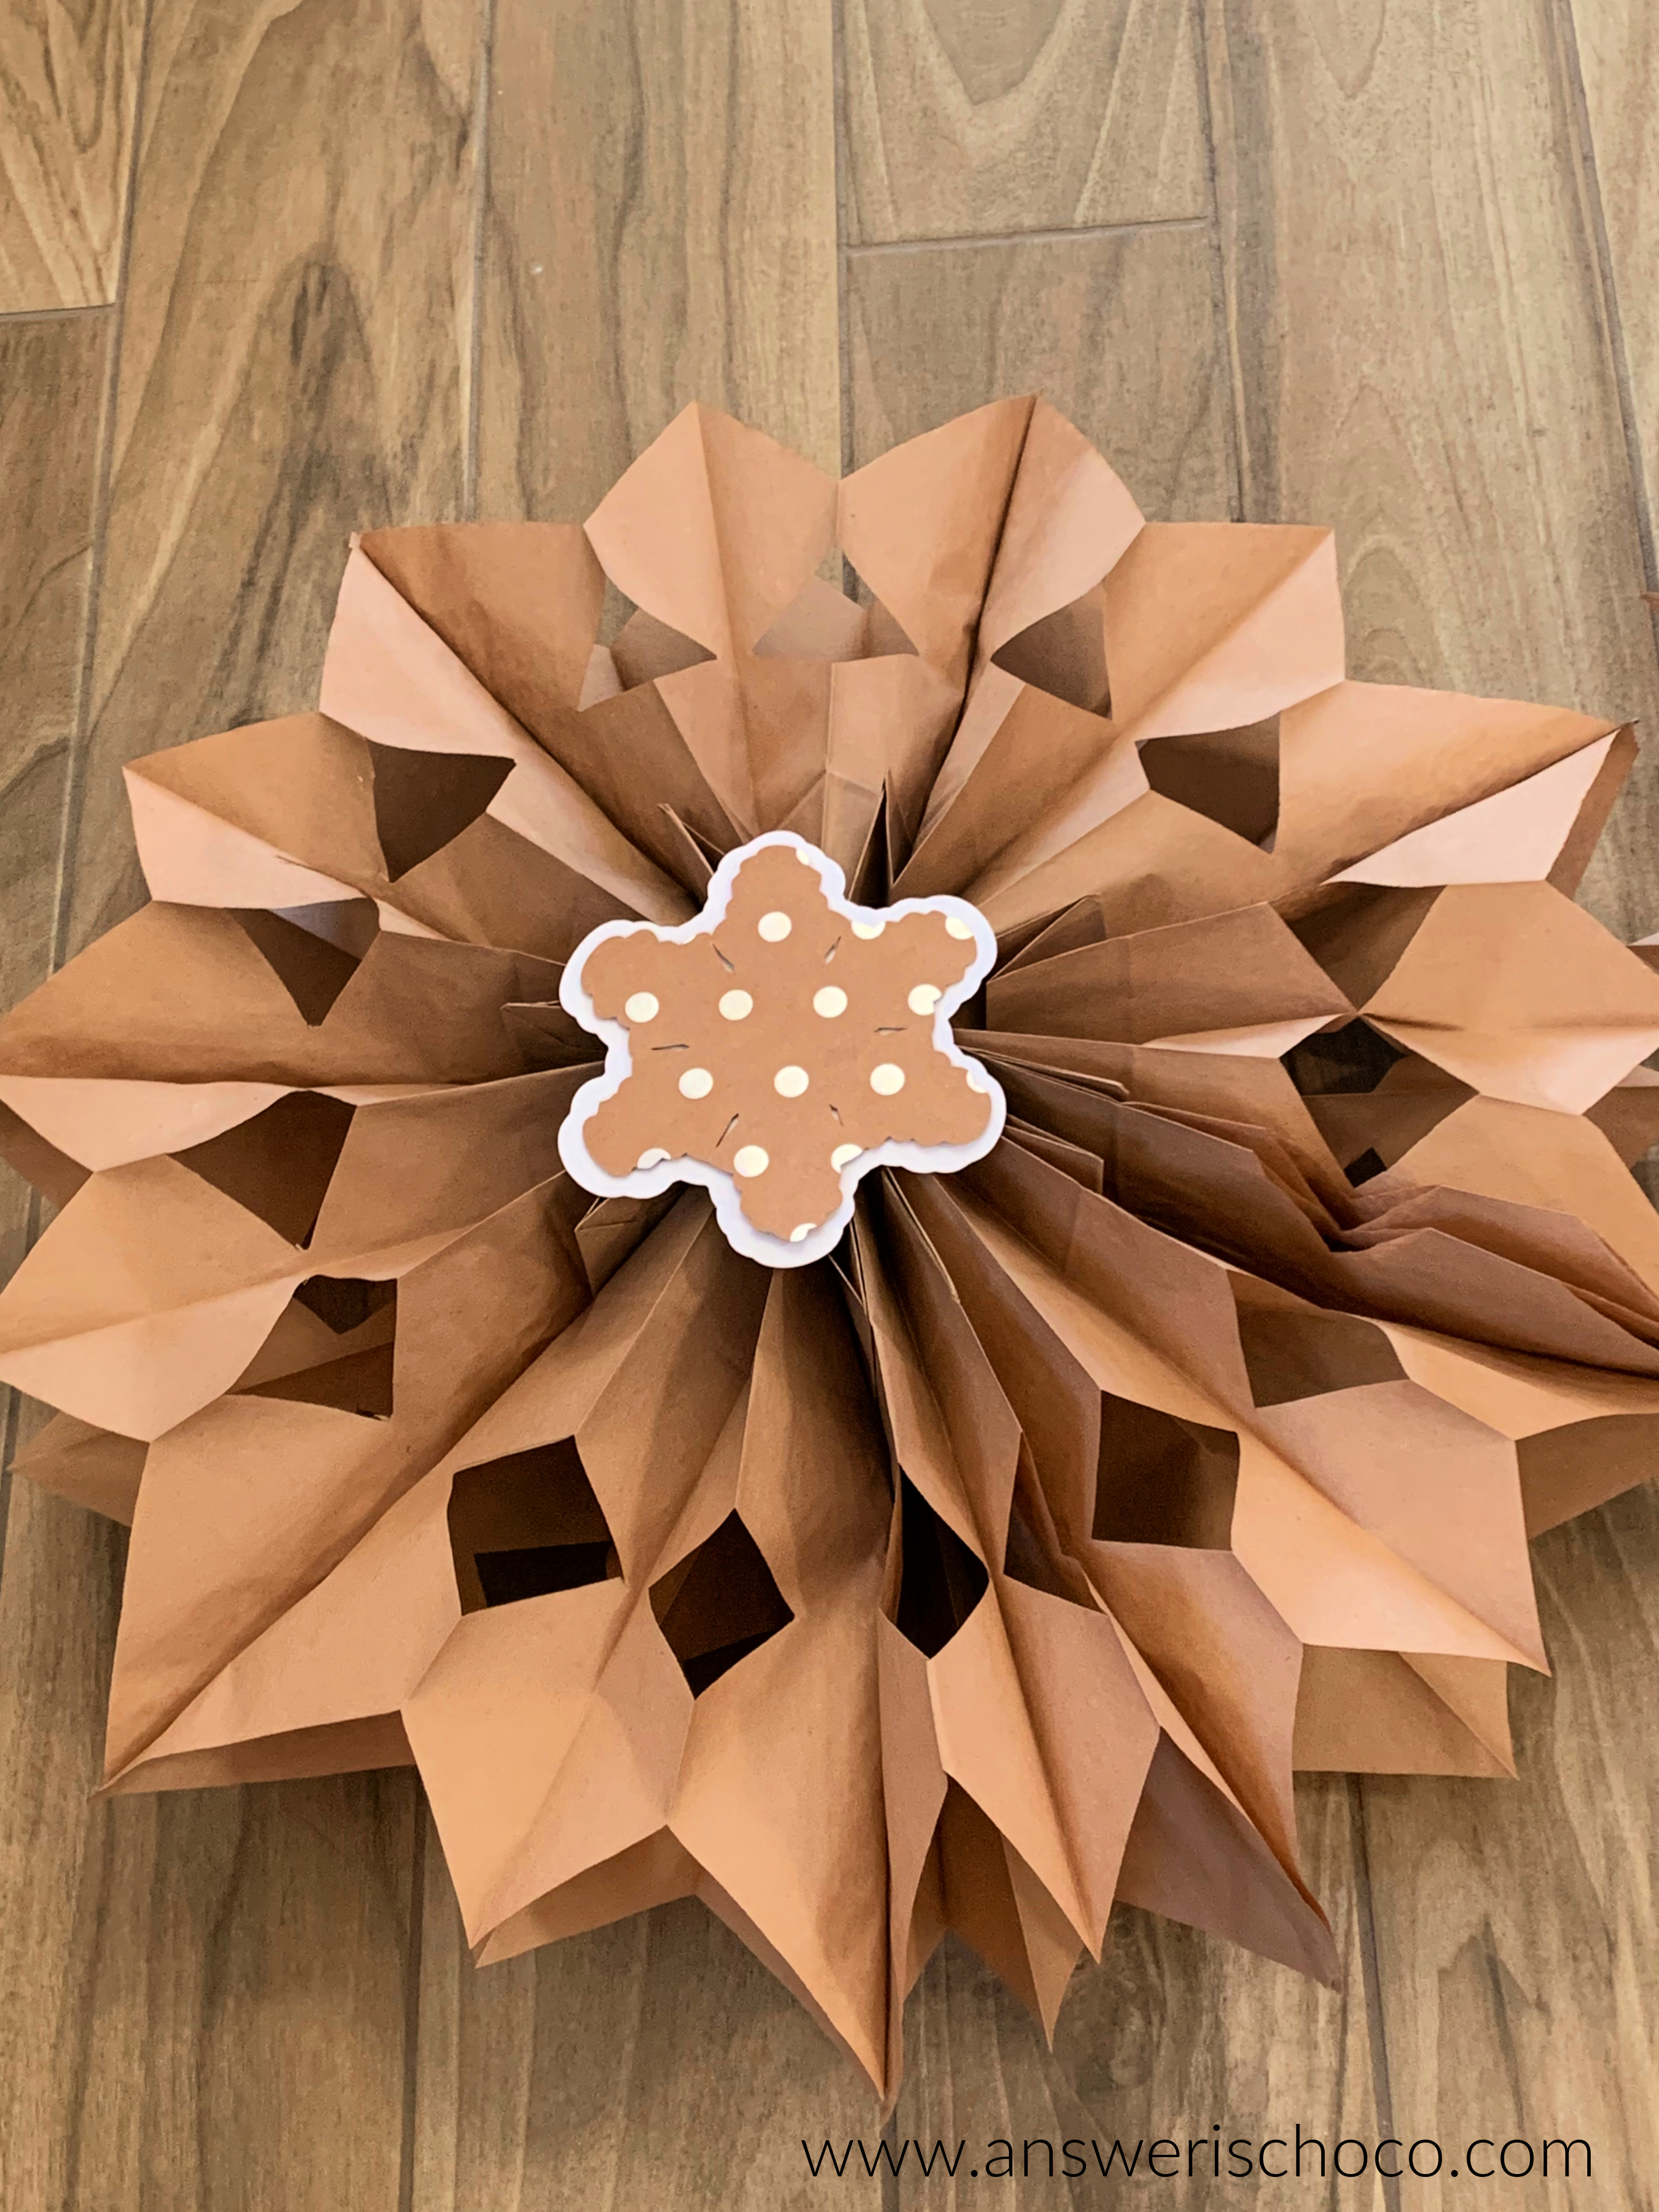
I'm having fun with some things I pinned last year after I'd already decorated. I shared my take on Paper Bag Snowflakes and will be making more as soon as I pick up some more glue sticks! I also have a fun Dollar Tree project I'll share early next week. 

I'd say you're all in the accelerate phase for sure given how many awesome Christmas projects you linked up. I hope you're visiting each other. So much creativity! Here are a few that caught my eye. 


Crazy Little Lovebirds shared this pretty Dollar Tree Sled idea. Love the whole vignette. 


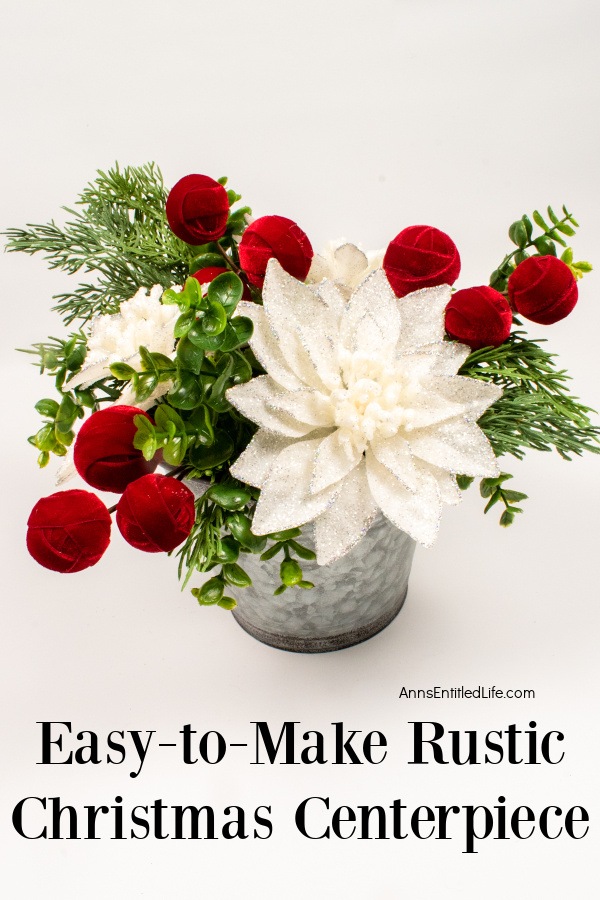
Ann's Entitled Life shared this pretty and Easy to Make Rustic Centerpiece. Whip up a few! 


Penny's Treasures transformed a corner of her kitchen into a Gingerbread Wonderland. So much to see! 


Finally, Organized Island shared this Rumchata Hot Chocolate...a perfect way to cap off a busy day of Elfing! 

Thanks to all who linked up and can't wait to see what you've been up to this week! 


You are invited to the Inlinkz link party!

Click here to enter

Wednesday, November 29, 2023

Papercrafting: Paper Bag Snowflakes UPDATED


I saw these making the rounds last Christmas decorating season after I was done and definitely wanted to try making some this year. There are a gazillion tutorials on Pinterest and You Tube so I'm not going through a step by-step but rather sharing some tips I learned while making them. 

Supplies: 
  • Brown Paper Lunch Bags (Can also use white or other colors but these are easily found)
  • Hot Glue Gun and Glue Sticks
  • Sharp Scissors
  • Scrapbook Papers

The best part of these is how inexpensive they are and the bang for the buck! I already had these on hand from Walmart. Dollar stores are a great place to find them as well. I used 9 bags which was the most consistent number of bags I ran across looking at tutorials. 

I saw some tutorials that said it didn't matter whether your bags were "flappy side" up or down as long as you used the same side. I tried both ways but had success with "flappy side" down. If you are wondering what I'm talking about, the "flappy side" is where the bottom of the bag folds up to lay flat in the package.


Flip your first bag over and run a line of hot glue across the bottom and another up/down the middle to connect and make a T.


I also saw where some people glued all of the bags together before cutting and others that started with three bags, cut your design, layer the next three, use the first three as your guideline then cut, finish with the final three. 


The design possibilities are ENDLESS but I kept it simple so I could get the technique down. Decorative edge scissors and hole punches would also add character. 

I did a simple cut by trimming the edges of the bags to a point and adding triangle cuts on the sides. You can measure or do freehand. 


Once all nine are glued together it looks like this from the side:


Once the nine bags are stacked, glued, and cut, open like a pinwheel and glue the two unglued sides together. I was working to get this done before the glue cooled so no pics. 


You can stop here but I wanted to add some snowflake medallions because I'm extra like that. I chose an image from Cricut Design Space and cut out a patterned layer and a solid white layer, then mounted the patterned layer to the white layer with foam tape and then hot glued to the center of the star/snowflake.


I made these to hang on our fireplace wall. We don't have a mantel but I wanted something festive for this area. I just started decorating (I am an absolutely AFTER Thanksgiving decorator and usually not until December). I got some very cool wood bead garland I'm planning to add here but I needed to know I could do these first! 


They're hanging on the panels that are on either side of the fireplace. Mr. Chocolate gave me one of his "This woman is nuts" looks since I woke up early this morning and did them and he knows they weren't there when he went to bed last night. 

Sharing At:


Thursday, November 23, 2023

BFF Open House Happy Thanksgiving


Happy Thanksgiving and Friday Eve all! Getting this party started early before we all fall into our food comas. Wishing all of my American Creative Peeps a Happy Thanksgiving. Despite all that is terrifying in the world, I'm thankful to have a day to celebrate the attitude of gratitude and be thankful for the people we love and good things in our lives. 

Are you going out shopping tomorrow? I may venture to Michaels but that's about it. With so much online shopping and Black Friday deals available, I'll be here at my desk! 

It's full on to the December holidays now with Hanukkah coming early this year on Dec. 7 and Christmas rolling in like that boulder after Indy in Raiders of the Lost Ark. No surprise that so many of you are already ready so let's take a look at some ideas shared at last week's party!


These Yarn Wrapped Framed Trees from Steph Creates are a fresh take! Rustic yet glam. 

This Couple's Advent Calendar from The House on Silverado is a wonderful way to remember to make the season special for you and your special someone. 


The Apple Street  Cottage shared a Fun and Festive Pom Pom Wreath, complete with fairy lights!


Finally, you have to check out these Iced Christmas Oreo Cookies (with a surprise inside) from Fat Dad Foodie


Thank you to all of you who linked up. To new party peeps, welcome. To those who are regulars, thank you. This party and seeing what you create each week are among my blessings. Creativity has gotten me through the hardest of times and knowing so many other Creatives are out there is joyous. Wishing all of my American peeps, a Happy Thanksgiving!


You are invited to the Inlinkz link party!

Click here to enter

Thursday, November 16, 2023

BFF Open House


Happy Friday Eve all, and THIS IS NOT A DRILL...one week until American Thanksgiving. While never a big Black Friday shopper, it seems really anticlimactic anymore with BF sales starting before Halloween it seems. Yet somehow, I haven't even started my holiday shopping. 

Thankful. I had a lovely surprise when I linked up to Wednesday's Vintage Charm Party over at Our Hopeful Home and found my Paint Poured Pumpkins featured! 

This week I shared the Tablescape and Decor for which I made those, as well as the Thanksgiving Cards I made for family and friends. 

Before we go into full on December Holidays, let's take a look at a few ideas from last week's party honoring the season of Thankfulness. 


Steph Creates shared this Stacked Pumpkin Welcome sign.Check sales to make for next year or there's still a week! 


The Apple Street Cottage shared these Chalkboard Place Cards that will make any table more special.


Hunny I'm Home share these beutiful and FREE Thanksgiving Printables. Printables are a great way to up your decor game and impress your guests or as a hostess gift. Print, frame, done! 


With Cornucopias being such a Thanksgiving staple, add these Edible Cornucopias from 3 Winks Design to your table for some additional fun. Love the chocolate! 

Thank you to all who linked up. Wishing my US friends a calm and peaceful week ahead with all f the shopping, cleaning, cooking that precedes a holiday. 


You are invited to the Inlinkz link party!

Click here to enter

Wednesday, November 15, 2023

Papercrafting: 2023 Thanksgiving Cards in Pink Copper Gold and White


I make Thanksgiving cards for friends and family to show my thankfulness about having them in our lives. Some years I set out to buy specific paper stacks based on color but this year I went through a bunch of stacks I already have (imagine that!) and pulled out coordinating papers from different stacks or from my loose papers. I found myself drawn to these colors which may not be traditional but neither am I! 


I had a bunch of these gold foiled transparencies from stocking up on past sales. I love how stylishe they make projects look! So those became the background panel for the cards, cut at 4.75 by 6.75. To maximize the yield from my 12x12 patterned papers, I cut these panels 4x6 and got 6 panels per sheet. 

I'm a Creative Fabrica subscriber so I downloaded this beautiful Floral Pumpkin to use as the focal for my cards. 


I imported into Cricut Design Space, sized, and cut my layers. This is where Mr. Chocolate usually appears in my craft room to say "Too much work!". 


I attached layer 2 to layer 1 with foam tape, layer 3 to layer to with my tape runner, and layer 4 to layer 3 with spray adhesive. 


You can see that some of the cards had a solid base layer in different colors, others had a patterned base but they're ll the same construction and color palette. 


To finish, I attached iridescent sequins with dimensional glue, and then tiny rhinestones to the center of those. 


I hope the recipients like them! 

Sharing At: