Monday, July 29, 2024

July-O-Ween: Stacked Poison Boxes


I struggled with what to call these because this was one of those projects that didn't really have a plan other than "how my brain works". I had two more plain wood shadow boxes from my Framed Skeleton Hand Shadow Boxes and this idea just came to me.

Supplies:
  • Wood Shadow Boxes (Dollar Tree)
  • Craft Smart Multi Surface Paint (Michaels)
  • Halloween Scrapbook Paper (Stash)
  • Halloween Labels (Stash)
  • Fillable Ornament (Stash)
  • Mod Podge
  • Epsom Salt
  • Halloween Glitter
  • Hot Glue and Glue Gun


For this project I used the smaller two boxes. I painted them black with my go to  CraftSmart MultiSurface paint (Michaels), then sized and cut scrapbook paper I had in my stash to fit inside. 


I used Mod Podge to adhere the scrapbook papers but didn't coat the top of the paper. 


I had this package of Poison Label Stickers I picked up at Michaels on sale years ago after season. There were 5 sheets of them and I still have two complete sheets and a couple of partial ones! 


I attached a couple to gold foil cardstock scraps and trimmed. 


Then I attached foam tape to the back of each label and attached them inside the boxes. Now it's time to "pick your poison"! I mixed up some Epsom Salt and Halloween glitter to make mine.


Of course I made more than I needed but I have an idea for the remainder. I spooned a little on top f each label, then glued one half of a fillable ornament using hot glue. 


I debated about putting some vinyl on the domes saying "Break In Case of Emergency" and may sti add a sign with that. 


I used a combination of thick tacky glue and hot glue to attach the boxes, then finished by adding more of the same black roses I used in my Skeleton Hands project. Elegant and Spooky is my jam! 


Sharing At:


Thursday, July 25, 2024

BFF Open House


Happy Friday Eve all and THIS IS NOT A DRILL...Today marks 5 months until Christmas! You know that time only speeds up from here. Between back to school then Halloween, Thanksgiving, Hanukkah etc. A rolling stone gathers no moss unless it's needed for a craft project! 

I'm trying to get ahead of the seasons for no reason in particular other than every year I tell myself I'm going to and don't. So this week I shared some Halloween fun with these Framed Skeleton Hand Shadowboxes and will share another project next week.


But before we speed the calendar up even more, let's take a look at some of the fun projects shared at last week's party! 


Speaking of moss, Master Pieces of My Life shared a great post with ideas how to use lots of different kinds of Moss in Home Decor. It's a great way to transition between seasons and bring some natural elements inside.


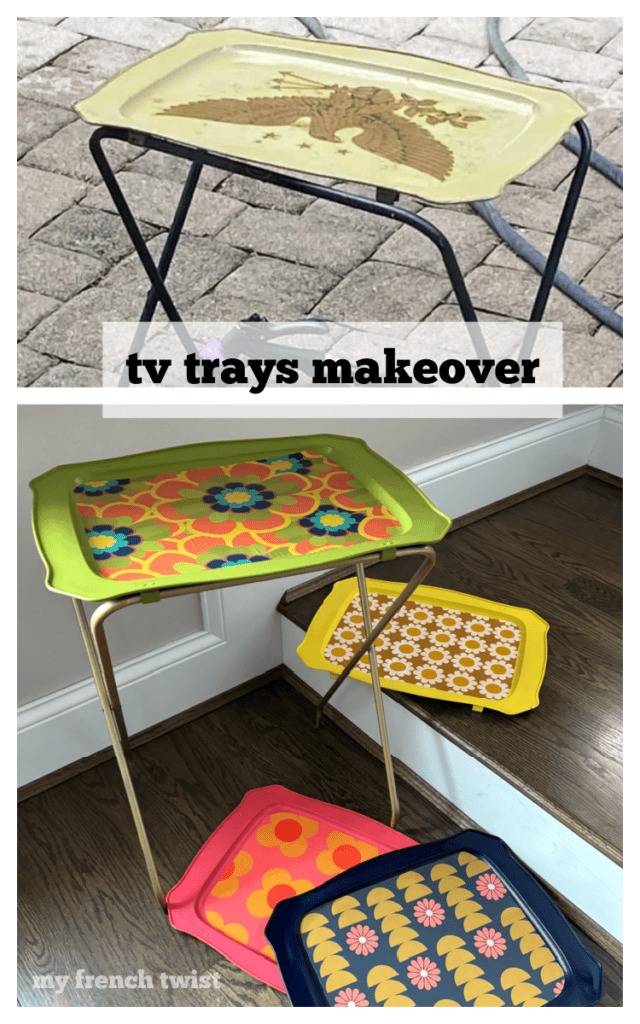
My French Twist shared a modern twist on a mid-century staple with these Vintage TV Tray Makeovers. Perfect for indoors or out.


24 Hour Family shared a FREE Cricut SVG file that is perfect for Disney Fans like me. I'm permanently in my Disney era! 


Finally and after all it is still Summer, Hunny I'm Home DIY share these adorable Beach Graham Cracker Snacks that scream Summertime! 

Thanks to everyone who linked up and can't wait to see what you have to share this week! With the Olympics starting tomorrow, GO TEAM USA


You are invited to the Inlinkz link party!

Click here to enter

Monday, July 22, 2024

July-O-Ween: Framed Skeleton Shadow Boxes


I know it's supposed to be June-O-Ween and Christmas in July but July-O-Ween is going to have to do! I said I wanted to get ahead of the seasons and this still qualifies so there!

Supplies:
  • Wood Boxes (Dollar Tree)
  • Halloween Scrapbook Paper (Stash)
  • Ornate Frames (Stash)
  • Skeleton Hands (Stash)
  • Multi Surface Craft Paint (Michaels)
  • Mod Podge
  • Hot Glue
  • Glue Gun

I found these little wood boxes at Dollar Tree in various sizes so I bought two of the large and one each of the medium and the small. 


This idea came to me as I was inventorying my Halloween Craft Stash. I had these ornate frames from one of those they were too good to pass up on clearance trips to Michaels and I had some Skeleton Hands from Dollar Tree in there too. Grabbed some Halloween scrapbook papers and started to play.


I painted the two large boxes with Black Multisurface Satin paint (CraftSmart) and cut the scrapbookpapers to size to fit inside. I also dry brushed the boxes with silver paint.


I love this Multi Surface paint and it works just as well as more expensive brands. I painted the Skeleton Hands with silver and dry brushed some onto the frames. 


This is after one coat on the hands. I did a second. When dry, I used hot glue to attach each hand to a frame, then glued to frame into the box. 


The frames already had a little gold on them so I let that peek through the silver dry brushing. I also picked up some black roses from Dollar Tree and popped two from their stems to glue atop each box. 


I'm impatient so the Mod Podge was still drying in a couple of spots shown here. 


Boo!

Sharing At:


Thursday, July 18, 2024

BFF Open House


Happy Friday Eve All! July is chugging along and is it me or is Halloween stuff hitting stores even earlier this year? JoAnn and Michaels have tons of stuff in store and online and I just read something about Target getting theirs so I have to pop in and peek! Michaels has a great deal going on right now with 40% off all regular online prices. Ask me how I know? 😂

This week I shared some gifts I sent along with Mr. Chocolate for his dad and a friend. They live at the ocean which was the inspiration for them. Ocean Inspired Jewelry Gifts


Speaking of the ocean, Coastal Bohemian shared a great post with Ten Things to Do With Driftwood. It's Summer Beach season in so many places so take advantage of free craft supplies! 


Two loves in one. A great Printable and Coffee! From Hunny I'm Home DIY


Simple Everyday Mom shared a fun thing to do with littles and grands with this Panda Handprint Craft!


It's a S'More. It's a Cookie. It's a S'Mookie! From Recipes Simple , Peanut Butter S'Mores Cookies

Great ideas as always and I can't wait to see what you've got in store this week. 


You are invited to the Inlinkz link party!

Click here to enter

Monday, July 15, 2024

Jewelry Making: Ocean Inspired Jewelry Gifts


Mr. Chocolate is going to visit his dad for a couple of weeks and FIL Chocolate has a lovely woman companion for whom I wanted to send something along. They're both widowed and neither are interested in getting remarried but it's been so great for us to know that he has someone to do things with. 

They live on the Washington Coast so when I looked in my bead stash, I went with colors inspired by that. 


Supplies
  • Bead Landing Blue Green Swirl Glass Beads (Michaels)
  • Bead Landing White Glass Beads (Michaels)
  • Bead Landing Silver Spacer Beads (Michaels)
  • Silver Bead Caps, Head Pins (usbeadwarehouse.com)
  • Stretch Magic Cord (Michaels)
  • Jump Rings
  • Ear Wires
  • Jewelry Pliers 
I'm one of those Makers who buys things on sale without necessarily having a project in mind but let's come back to that point later! I didn't do a lot of in process pictures but these are very straightforward basic jewelry making projects. 


For the earrings, I strung a white bead, then a swirl bead, and bead cap onto a decorative head pin then made a closed loop and attached to a fish hook ear wire. For the bracelet, I always cut the stretch cord longer than I need because for me it makes knotting easier and I've had to re-do one too many a bracelet when I don't. So if you track costs to the penny this may be wasteful to you but my frustration level is worth it! 

I love these clamps I got at Dollar Tree (automotive supplies) that I use on one end of the cord to keep the beads from falling off. Then used another bead cap, white bead, bead cap, swirl bead, spacer bead until sized to approx 7 inches, my standard women's bracelet size.


The colors and swirls remind me of ocean waves so I think they'll be perfect "at the ocean". After I showed these to Mr. Chocolate, he asked if I would make something for his dad too. Twist my arm!


The best thing about being a hoarder, I mean Maker, is having choices in my stash. Living where I do and having now been through two bead show seasons (Tucson is a world leader in bead and gemstone shows) I'd picked up some Fancy Mixed Jasper that I thought worked colorwise. I used the same silver spacer beads and chose a silver bead as the focal bead. 

But why are there two bracelets shown? Because that's how things go in Casa Chocolate. I'll nake something as a gift. Mr. Chocolate sees it and says "I want one". And that's exactly what happened here so twist my arm! I made him one too! 

This really reminds me of all the colors you can see on the Washington coast. Heathers, and evergreens and the ocean that sometimes looks green, the overcast skies etc. 

I love that gemstones all have a story.