Thursday, April 28, 2011

Mounds Brownie Cupcakes Inspired by Confessions of a Cookbook Queen

 I saw the most amazing sounding recipe recently on the blog Confessions of a Cookbook Queen. If you haven’t visited her, GO but don’t do it on an empty stomach or a full bladder! She’ll have some tantalizing recipes and she’s funny as heck.
Photobucket
The recipe was for Almond Joy Brownie Bites. For me the only thing better than chocolate, or chocolate and peanut butter, is chocolate with coconut! So these went immediately onto my Recipes To Try board on Pinterest.  If you haven’t used Pinterest  you should. That’s a whole ‘nother post.

I ended up modifying the original recipe because *gasp* , I didn’t have any melting chocolate. No chocolate chips. Nada. How that happened I don’t know but I think it has something to do with peanut butter cups.

Improvisation time. Started out with a box of brownie mix which I made according to directions and spooned into a muffin tin lined with cupcake liners.
Brownie Batter
I mixed 1 can of sweetened condensed milk and enough flaked coconut together to be able to form truffle sized balls. I put one of each of those in each cupcake
Mounds Brownie Cupcake
and then covered with the remaining batter
Brownie Cupcake Covered
Baked @ 350 for 27 minutes ( because that’s what I usually bake regular brownies at when I use a mix) and let cool. Normally I would have made a ganache topping but didn’t have any cream and did I mention I was out of chocolate chips because of peanut butter cups? That’s what the emergency can of frosting in the pantry is for. I melted about 1/2 can of frosting in the microwave and then spooned over each cupcake
Frosted Brownie Cupcake
Frosted Brownie Cupcake Side
And here’s the ooey gooey inside:
Mounds Brownie Cupcake Center
And as soon as I re-stock my chocolate chips, I’ll try the original recipe!

Tuesday, April 26, 2011

Royal Wedding Printable

Are you planning on watching the Royal Wedding ? We're going to DVR it because it's on in the wee hours and while we're not obsessed with royalty, we like this couple and wish them all the best and like one of my BFFs teases me "it's yet another reason to have cake".

So for kicks and giggles, I made a variation of the "Keep Calm" sign.  It seemed fitting since the Keep Calm phenom is British in origin. I made two versions; one with the couple's initials and one without. I used "C" vs "K" since the bride's formal name is Catherine. Sized to 8x10. Click on image to bring to full size. Right click to "Save As".


Here are some other fun and free Royal Wedding printables from Design Editor


Saturday, April 23, 2011

Happy Birthday Mumster

For those of you who are new readers, “The Mumster” is my mom. Today is her birthday ( don’t worry M, not gonna tell how young you are) but what’s the point of having a blog if you can’t use it to say:
HAPPY BIRTHDAY
to your mom? Especially since she reads my blog faithfully. Thanks Mom. Not just for that, but for all the things you know I am thankful to you for. For being such a great mom and Grandmom and friend and confidante and supporter and , and and….

By now, she will have received her card, so I’ll share it here. Thank you KandCO for making these gorgeous 3D Iris stickers since the Mumster lurves irises and I love K&CO. Win Win! Knew these were going on her card the minute I saw them!
KandCo Iris Card
They’re  from Tim Coffey’s Cottage Garden series. Whenever I see irises I think of my mom. I’m not sure if she loves purple because she loves irises or if she loves irises because she loves purple. Did I mention she loves purple?
Kand Co Birthday Card
And while she’s not a member of the Red Hat Society, she could totally be the poster child for the poem they use:
WHEN I AM AN OLD WOMAN I SHALL WEAR PURPLE
With a red hat which doesn't go, and doesn't suit me.
And I shall spend my pension on brandy and summer gloves
And satin sandals, and say we've no money for butter.
I shall sit down on the pavement when I'm tired
And gobble up samples in shops and press alarm bells
And run my stick along the public railings
And make up for the sobriety of my youth.
I shall go out in my slippers in the rain
And pick the flowers in other people's gardens
And learn to spit
You can wear terrible shirts and grow more fat
And eat three pounds of sausages at a go
Or only bread and pickle for a week
And hoard pens and pencils and beermats and things in boxes
But now we must have clothes that keep us dry
And pay our rent and not swear in the street
And set a good example for the children.
We must have friends to dinner and read the papers.
But maybe I ought to practice a little now?
So people who know me are not too shocked and surprised
When suddenly I am old, and start to wear purple.

Taken from the book
When I Am An Old Woman I Shall Wear Purple
Edited by Sandra Martz
Papier Mache Press--Watsonville, California 1987
By no means do I consider you an old woman Mumster…I wish I had some of your energy, but I’m glad you wear purple and do what you like and set a great example for me as a mom. Thank you for not spitting though!

Love,
YOPF ( which is and will remain an inside joke)

Thursday, April 21, 2011

How Did I Not Do These Chocolate Printables Before?

I was out the other day and saw a bumper sticker with this saying and thought: "Woman, how on earth have you of all people NOT made a printable of this?"

I mean seriously! So I did and here they are. What was I thinking? Er, or not thinking.


If you use, link back and show whatcha did! Click to bring to full resolution; right click to Save As.

Interest in Pinterest?

When I made my Social Networking Subway Art printables, I included “PIN” as one of the words. I received a few comments that people were unfamiliar with it ( my bad!). It relates to one of the coolest ( I think) sites on the internet…Pinterest! What the heck is it you ask? AMAZING, I answer.

OK really it’s an online bulletin board where you can “pin” (aka bookmark) all the great things you find while visiting your favorite blogs and websites! But I already use bookmarks you say. Yes, but this allows you to pin pictures much like you would to a memo board as well as create multiple boards. For example, I have an “Inspiring Ideas To Try” board:
Inspiring Ideas Board
And a "Recipes To Try" Board:
Recipes To Try Board
Along with others for Grad Party Ideas, Printables, etc. You can group your pins however you want and you can add a tool to your bookmarks bar so that when you’re on a blog or site with something you want to pin, you click on that tool : Pin It and you can pin from wherever you are.

Your pins will always capture the source location so you can go back to wherever you originally found the idea from your pin board. But wait…there’s more!

You can also follow your favorite bloggers pinboards! So when they find something super cool you can re-pin it to your own board and those who follow you can do the same. You don’t have to follow someone in order to re-pin a pin. But wait…there’s more more!

As soon as you’ve pinned something to a board, you can Tweet it or post it to Facebook with a single click! OK I’m letting my Geek flag fly a little here but I think it’s pretty cool.

I knew zippo about it before I started pinning so I’ve learned through trial and error. I’m sure there’s tons I don’t know! You do need an invite so the first 6 people who comment that they want invites ( leave your email if it’s not linked to your blog!) I’ll send invites to! It’s all free and I’m sharing it because I love playing with it…nothing more!

Tuesday, April 19, 2011

Easter Cards and Supporting Japan

Around the time I started thinking about my Easter cards for this year, I saw that Paper Source was donating a portion of their proceeds from the sale of the handmade Japanese papers they carry to organizations assisting with the relief effort.

I have always been drawn to Japanese washi papers so I knew I would enjoy incorporating some into my cards while supporting Paper Source’s efforts.

I created a focal point for my cards using my PrintShop Deluxe program to go with this gorgeous cherry blossom paper I picked up at Paper Source:
Paper Source Japanese Paper

Easter Cards (2)
I went to my stash and pulled out some other coordinating papers and embellishments including some of the twine I got from The Twinery when they were also donating some of their proceeds to Japan’s relief efforts.
Easter Card Twinery
Each card I made has some combination of the washi paper and the focal image. Some are embellished with twine, others with coordinating K&CO self adhesive scrapbook borders.
Easter Cards (3)
Each card is finished off with a light tan paper flower and glittered brad from the Recollections collection at Michaels


Kaiser Flower Closeup
Linking Up At: 


Sunday, April 17, 2011

English Moss and Cappuccino Card

How’s that for a combination? I fell in love with Colorbok’s “English Moss” collection when I was in JoAnn’s one day ( fortunately with a 25% entire purchase coupon since I might have bought several things from that collection). Then, when The Twinery was donating proceeds from their orders to Japan Relief, I ordered an assortment of twine (LOVE LOVE LOVE). One of the colors included is called “Cappuccino” and when I needed to make a birthday card for a friend recently, the two just clicked!
Colorbok English Moss
The 12x12 paper pack contains reversible paper so it’s like getting twice as much. OK in my head it is!  I chose this green floral that has a shabby brown on the other side.
Twinery Cappuccino
The cappuccino twine from my sampler pack. The English Moss collection also had these great wordy glitter stickers:
Colorbok Glitter Stickers
The great thing about this card is you don’t have to be a stamper to make a beautiful card. A package of paper, die cuts, stickers, and embellishments and you’re off!
Colorbok Twinery Card
I layered a couple of die cuts from the English Moss pack onto papers from the collection and mounted in the center of the card using foam dots. I wrapped the biggest die with the twine and then added a couple smaller dies as accent pieces and finished with the word “enjoy” in the center. Closeup:
Colorbok EM Closeup
IMG_5345And that was only one piece of my paper pack! Squee! ( OK I make up words) Lots more to play with.
Linking Up @


Paper Issues Blog Design

Friday, April 15, 2011

BFF#16: Charm Bracelet Diva

This week’s BFF is Kathleen from the blog Charm Bracelet Diva.


Despite her blog name, she’s not a diva at all at least not in the celebutante / rockstar kind of way! No, she’s  a diva in the sense that she rocks her charm bracelet designs, finding and incorporating vintage pieces with new materials making each one unique and beautiful. Every single one is a work of art.

I have to include this bracelet called “Divatude” not only because I love the name and  it’s stunning, but it has a chocolate feel to it !
Or this gorgeous piece in which she included a vintage brooch:
Or her entire collection of Irish Dance Charm Bracelets :
But while her jewelry creations are brilliant, so are her non-jewelry creations. Check out this elegant  monogram pillow:
Humble materials, transformed into an elegant accent piece that goes so well with this upcycled chalkboard tray:
You have to see what this started out as! And of course, with my affinity for altering pillared prayer candles, I can’t help but love these:
Not only is Kathleen’s place a visual treat due to her talented creations, but her blog space is calming and inviting and she’s a wonderfully supportive blogger! Do go visit!

Thursday, April 14, 2011

Beth’s Homemade Peanut Butter Cups

I was clicking through my reader one night and what to my wandering eyes did appear but the words : “How To Make An Emergency Reeses Cup”. I was a Girl Scout and believe in always being prepared, and one should always be prepared in the event of a chocolate peanut butter emergency!

Beth. from Home Stories A2Z had a tutorial on how to make these and not only did they look delish, they looked fast and easy and really fit the description of something you could make when that craving hits you.
You know it does. You know sometimes you sit there and think “I need a peanut butter cup”. I made them that very night! Now here’s the problem. Mr. Chocolate liked them. A LOT. And the “in case of emergency, make one” thing wasn’t going to work. So her tute is for making these one at a time but in the  casa de Chocolate  aka my house, mass production was in order! The ingredients remain the same and they are SIMPLE. Peanut butter, choc chips, cupcake liners.
Chocolate Chips Peanut Butter
While she melted her chocolate chips right in the cupcake liner, since I was making multiples, I melted mine in a bigger bowl. Zapped for 30 second intervals for a total of about a minute and a half. For scientific reasons I don’t understand and past experience, don’t just set for 1:30 because it mucks up your chocolate. Stir into creamy melted goodness:
Melted Chocolate
Spoon your chocolate into cupcake liners. I used a teaspoon and plopped a good dollop…enough to coat the bottom. Follow this with about the same size dollop of peanut butter.
Chocolate in Cupcake LinersPeanut Butter Layer
Cover the  peanut butter with another spoonful of chocolate and use the back of the spoon to smooth over. You can either refrigerate for about 20 min or freeze for 5 or ten. It all depends on the state of emergency!
Peanut Butter Cup
Peanut Butter Cup Side
Most importantly, DO NOT advertise how easy these are to make or husbands and children will throw those words back at you! Make husband and son write thank you note to Beth!

Tuesday, April 12, 2011

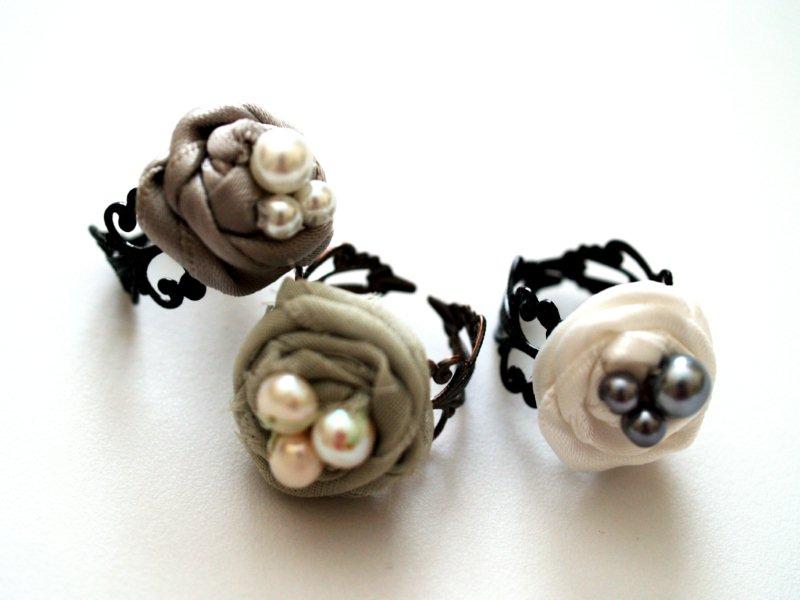
Bias Tape Rosette Ring

I’ve seen a couple of simply gorgeous fabric rosette rings recently. One style from the Queen of The Anthro knock-offs, Bev, over at Flamingo Toes:

Arent’t these gorgeous?! And I also love this one from Vanessa at V and Co :
These were on my mind when I was at JoAnn’s and found myself in the rick rack/ bias tape aisle. Light bulb! Bias tape is already in strip form and wouldn’t that work? Let’s see:
Bias Tape Rosette Ring
Started with dark khaki Wrights Bias Tape ( 1/2”):
Wright's Bias Tape
And a ring blank :
IMG_5393
I didn’t cut a specific length of bias tape but worked right from the card planning to cut whenever my rosette was the size I wanted. Started with a knot at one end:
Rosette Knot
Put some hot glue in the middle and then start twisting gluing, twisting gluing:
Bias Tape Rolled Rosette
When I liked the size I trimmed it. I thought about leaving it plain which would work but I can’t leave well enough alone! So I got a bead cap and pearl out of my stash:
Rosette, Finding, Pearl
Hot glued the bead cap to the rosette, and then the pear inside the bead cap and glued the whole thing to the ring blank:
Bias Tape Rosette Ring (2)
And definitely go check out the tutorials that Bev and Vanessa have here and here!

Linking Up At :
Anything Related
Photobucket