Monday, January 9, 2017

2017 New (and Old) Favorite Places for Fonts and Graphics (Update II))


Shortly before Christmas, I ended up having to replace my hard drive. Grrr. "Oh but you had backed everything up right?"  No comment. Lesson learned. Better yet, learn from my mistake! Back up back up back up!

On the upside, it gave me a good reason to discover some new resources for graphics and fonts (as well as discover some new images at familiar places). On the whole , the experience was more good than bad.  I thought I'd share some of my new finds as well as some of my go to regulars. 


Creative Market: This is definitely one of my new finds and fast favorites. It's free but you do need to sign up in order to use. Photos, graphics, themes, fonts etc. most of which are fee based, but the awesome part is that each week they release 6 freebies for you to download. The fonts are fresh and clean and the free graphics packs I've downloaded come with multiple elements. The magnolia wreath at the top of this post is from Creative Market!


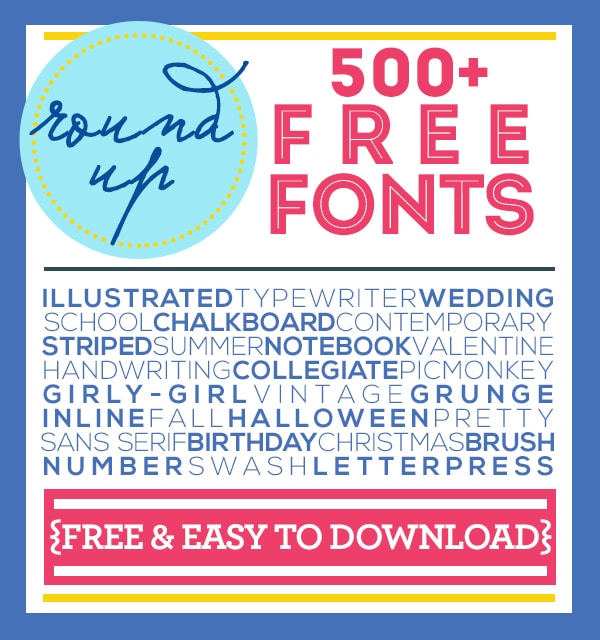
Moritz Fine Designs: "Free Printables for Your Home and Workspace" and where I found 500, yes 500 free fonts! No I haven't downloaded them all...yet. What I love is that they're grouped and organized so if you're looking for Typewriter Fonts for example, they're grouped together. If you're a font addict, you want to pin / bookmark this site.


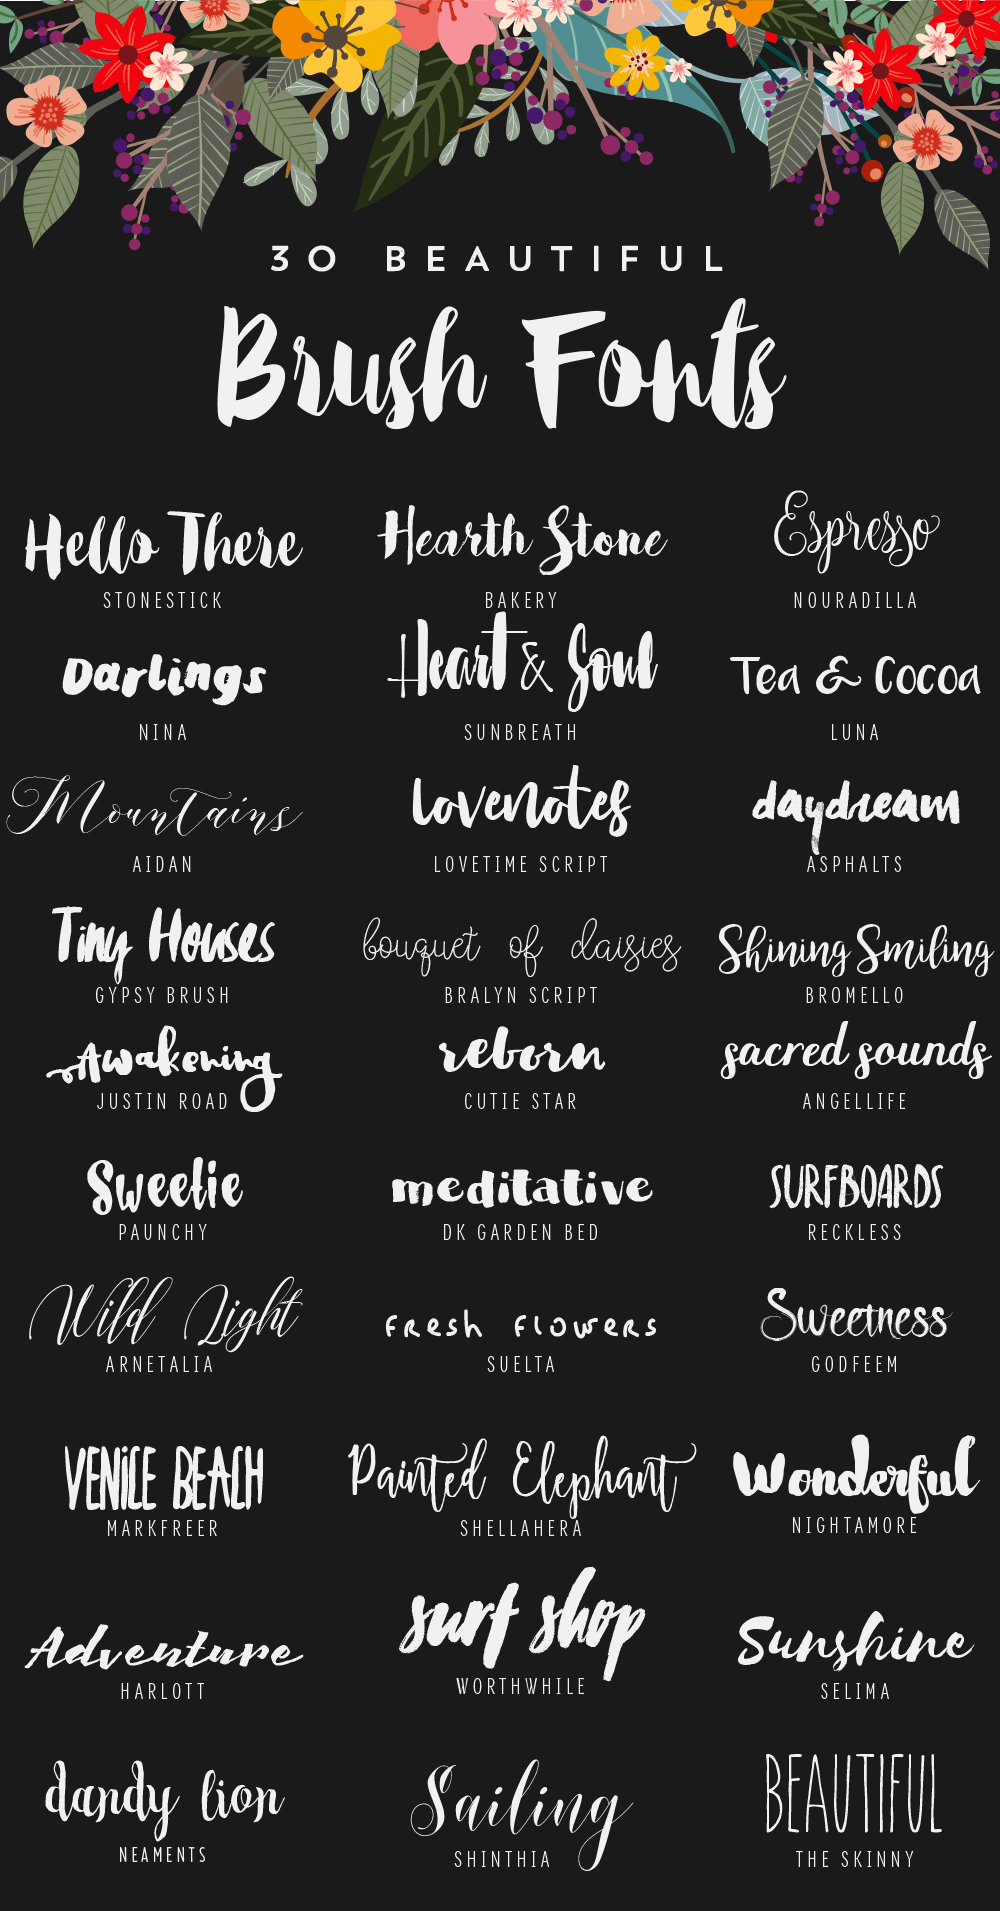
Star Sunflower Studio: In my search for fonts, I found this lovely grouping of brush fonts here but they have tons more! Again a site that's a combo of free and fee. 


Expressions Vinyl: In addition to being a resource for your vinyl needs, there's a fab collection of fonts at the Expressions Vinyl Blog! 


Fontbundles.net: Combination of fee and free and requires free account sign up. Fonts do expire so check periodically. 


Other great font resources:
DaFont (mostly free)
1001 Fonts ("Free fonts baby")
Fontspace (free)

You can also follow my Pinterest board on Fonts Typography and Hand Lettering

I also love these places I visited regularly before my hard drive bit it and am having fun re-building my library:

The Graphics Fairy OK who doesn't already know about The Graphics Fairy?!
Free Pretty Things For You
Free Vintage Digital Stamps
The Old Design Shop
New York Public Library Public Domains Collection
Just Something I Made


Sunday, January 8, 2017

My Twist on New Year's Resolutions...The Stop Doing List


I know most people make lists of things they're going to start doing and I've done that too, but this year I'm taking a different approach in making a list of things I want to stop doing. Many of these are blog specific but they're applicable in my life too. So in 2017, here are some things that I have promised myself I will stop doing. 

  • Stop seeking perfection. Whether it's because it's just my nature, or I am a quintessential Virgo personality, I have a tendency to not do / try something because I know it won't be perfect. True confession time: whether it's a recipe or a craft or whatever, if I don't think I can do it "right" I often won't do it at all. That has to stop.  Which leads to the next one which is the other side of the same coin...

  • Stop being afraid to fail. A lot of things have come naturally to me. In life, in crafting / making etc. I don't mean that to sound arrogant because the truth is that I gravitate towards the things that come easily to me and avoid the things that don't because I'm afraid to fail. Really and truly afraid to fail. I need to let this go because in failures there are opportunities. Many of us makers refer to them as "happy accidents" and true, I've had a few of them but I need to have some more. I also need to post the things that don't go quite as planned. Heck Heather Mann wrote a whole book on Craft Fails. I want to stop being afraid to fail enough to make Heather's next book ! 

  • Stop comparing myself to others. Especially when it comes to my blog and its "success". I started my blog around the same time as some others that have taken off and grown wildly. I am thrilled for those bloggers so this isn't about jealousy of them, but about me feeling like I failed because I didn't grow as big or as fast. Now, what I will forget to tell myself is that I started this whole thing at a time when I thought my day job was busy but stable,  then about a year or two into blogging that started to change radically and hasn't calmed down since. I also forget to tell myself that for many of those other bloggers, this was their day job. So I need to stop thinking I'm superwoman and remember that I work 65+ hours a week at a crazy job and I can't do that and grow my blog at the same pace as someone who has more time to devote to making things and cultivating their site.

  • Stop playing it safe. Again, a lot of these blend into each other but what I mean by this finding a balance between things I'm comfortable with and things I wouldn't normally do. I gravitate to black and white and neutrals and don't use a lot of colors. That will probably always be a large part of my work but I need to stop avoiding using some colors that don't come naturally to me and push some boundaries. 

  • Stop not using "special" materials. Anyone else buy really cool stuff that you never use because it's so special you want the perfect project to come to you and/or you're afraid you'll mess it up so you hang on to it and don't use it because all of the bullets that precede this one apply? Anyone? Just me? The end result is you have things that are special that never see the light of day. Stop that!  

There may be other things I need to stop doing but these are the main ones for now. How about you? Are there things you want to stop doing in 2017? If so would love if you shared in the comments! 

Thursday, January 5, 2017

BFF Open House Link Party Happy New Year!


Happy New Year! Hope everyone had a safe and happy start to 2017. My new favorite New Year's Quote is: 

"May the best of last year be the worst of this year"
 Like everyone else, I'm in the process of evaluating things I want to keep, lose, or change in the New Year. I want to revitalize my blog which has been a little stale so look for some changes. If you have any suggestions please feel free to leave them in the comments!


I want to keep my little party but would definitely like it to grow so if you have friends you want to bring, please do!

Let's see some highlights from last year's last party!


I did one of those "what are the first three words you see" word puzzles and the first word I saw was "peace" so this card from Paper Seedlings definitely caught my eye! Not just because of the word but I love the white on white layering and the detail. Beautiful!


Something I'd like to do more of in 2017 is Thrifting. I love found objects and My Thrift Store Addiction has some wonderful projects and ideas to get you started or re-started! 


If like me, you're still getting organized for the New Year, the gals at Lolly Jane have got you covered with 50 FREE printable 2017 calendars. 

This week's chocolate feature isn't actually chocolate but it's about chocolate! Love this vintage chocolate ad shared by Vintage TLC . Great as a printable or to use in image transfer project etc. 

Now onto this week's party! 


Tuesday, January 3, 2017

Angel Wing Necklace : Handmade Holidays


Like all of us makers, I made a lot of holiday gifts so I'll be sharing some that I wasn't able to share at the time. 

This one was for our favorite server at our regular Friday night go to restaurant. From the first time she came to our table we had an instant bond.  We are creatures of habit and the second time she came to our table she already knew our order! She's so good  to us, often treating us to dessert and just always such a sweet person. So I wanted to make her a little something and this Angel Wing charm seemed perfect. 


With the holidays being so busy I didn't take the time to take pictures of the step-by-step. One of my blogging resolutions for 2017! But the process and materials are simple: 

Supplies: 
  • Black chain ( Blue Moon Beads)
  • Silver Bead Caps ( Bead Landing)
  • Opaque White Crystal Beads ( Stash)
  • Black Crystal Spacer (Stash) 
  • Head Pins ( Stash)
  • Angel Wing Charm ( Shipwreck Beads)
  • Jump Rings (Stash)
  • Silver and Black Large Rings ( Bead Landing)
  • Toggle Clasp ( Stash) 
Measure lengths of black chain. I did 4 sections, 6 inches long, two strands each. Wrap white beads and bead caps on head pins and attach to each end of the double strands of chain.

Attach Angel Wing charm , spacer beads, and wrapped white bead to large jump ring as shown to make the pendant part. Attach chain and pendant to black and silver rings as shown. 

Of course what's a gift without a card so I made this one to go with it since her disposition is always Merry and Bright...not just at holiday time. 


Oops. I see my Merry & Bright was a little crooked. The card was super easy. Combination of papers from Recollections Black and Gold Christmas paper pack I fell in love with and a coordinating scrap from my stash!

Happy New Year all. Happy Making! 

Sharing At: 


Thursday, December 29, 2016

BFF Open House Link Party Goodbye 2016!!!


As much as I cannot believe we are at the end of another year, I won't lie and say that I will be unhappy to say goodbye to 2016! Don't let the door hit you on the way out.

However, what better way to say goodbye to the year  than with a party? 


What says party more than New Year's Eve and the gals at Lolly Jane have some wonderful ideas like this party hat tutorial which comes with a free clock printable! 


These festive Times Square Ball drink stirrers from Crafty Lumberjacks pair perfectly with the party hats don't they? 


What better time for a makeover than a New Year ? Grandma's House DIY has a gorgeous one. 


Finally, what's a New Year's celebration without a festive and of course chocolate dessert? 

These Peppermint Patty Brownie Cupcakes from Sugar Spice and Family Life are perfect! 

Now on to this week's party. Happy Happy New Year all!!


Monday, December 26, 2016

Adventures in Beginner Bead Embroidery : Handmade Gifts


I hope everyone had a wonderful Christmas. Can't believe another one has come and gone already. But now that gifts have been given and opened, I can share a couple of gifts I made. 

One of my BFFs and I went to an Art Fair earlier this year and there was a fantastic booth with the most incredible bead embroidery. I immediately became fascinated with a new medium and wanted to try my hand at bead embroidery. It was instantly addicting. 

Bear in mind that these are beginner projects without any training beyond a few You Tube videos! But the recipients seem to like their gifts. I made a couple of beaded cuffs ( and since I wasn't sure how this was going to go , I didn't take pics along the way) using felt scraps as my base and random patterns that just kind of unfolded as I went along. I also incorporated some coordinating ribbon scraps from my stash. 


This was the first one I made using my Mom's favorite colors. I did actually draw somewhat of a pattern on the felt. Once the top of the cuff was done, I stitched  heavy jewelry wire to the back then finished the back with a piece of ultra suede.  You can find lots of tutorials on You Tube and Pinterest to get you started. 


For the Blue Cuff  the process was the same only I added even smaller seed beads which now I'm even more addicted to. I like the combination of different sizes and types of beads. 

I quickly discovered ( especially for the smallest beads) that this is my favorite bead needle. They look delicate but they are very strong and when working with curves etc. so much easier to use than a traditional straight needle. You can get these at bead stores or craft stores. I got mine at Michaels. 

I couldn't stop once I got started so I also made this pendant which I used as the focal for a necklace: 


Before I added the backing, I glued a bail to the heart and then used a combination of bright and antique gold chains ot make the necklace. 

And while not bead embroidered,  I made these earrings to go along with the Blue Cuff: 


Thursday, December 22, 2016

BFF Open House Christmas Party !


Apologies for being MIA last week. My computer crashed and I was not able to get a party up . 
Back up and running now so this will be a party only ; no features. Hopefully I didn't lose too many of you!

Wishing you all a Very Merry Christmas and a Happy Hanukkah which also starts this weekend!! 


Tuesday, December 20, 2016

Hanukkah Card and Tags


Ack. I've been without a computer for almost a week which is a lifetime in blogging years. Backup your stuff people because we always think it can't happen to us and then boom, new hard drive. 

In the meantime, made Hanukkah cards and tags for a couple of friends. I'm tickled that the tags I started making a few years ago for one friend get asked about by her relatives "Is she making any this year". 


I've always loved shiny and glittery things so I had a lot of fun working with gold foiled and glitter papers found at Michaels. The foiled papers are a combination of Recollections, Craft Smith, and DCWV stacks. Add to that my weakness when Michaels has their specialty papers 10 for $10 and I'm in paper hoarder heaven. 

For the card, I cut a menorah on my Cameo ( image found in the Silhouette Online Store) and then just hand cut the candles and flames freehand. I double cut the menorah and gave it depth using foam dots by layering one piece atop another. Blue and gold glitter papers were layered on top of a foiled piece. Simple but I am really happy with the outcome. 

For the tags, I just like to play around with bits and pieces with no particular plan. I just want the colors to work with each other so when I package them, they look like a set. 

My signature paper style is tearing things. I just can't not have some ragged edges! 

With freaking out over my computer crash, would  you believe I forgot to take pics of this year's Christmas cards? I did manage to take pics of a set of Christmas tags I made as a gift! Whew. 


Papers used here are from the Traditional Christmas paper pack from Oriental Trading Company along with some of my glitter and foil stash. 

Tuesday, December 13, 2016

Rustic and Glam: Layered and Gold Leaf Christmas Slat Sign


This is  a sponsored post. Materials were provided to me. Project idea and comments are mine. 

The team at Oriental Trading Company provided me an opportunity to play with some of their great products to come up with a Christmas project and needless to say I had too much fun. 

I created this layered piece using a plain slat board , a wood tree shape , a plain frame and Christmas themed scrapbook paper but the most fun part of this piece was the gold leafing! Foil and shiny is so popular right now ( wouldn't matter if it wasn't, I love shiny things). I also love marrying the most basic and  rustic supplies and the glam (for example, my Christmas tree includes Swarovski crystal ornaments and a tree topper made using a toilet paper roll). 

Here's what I started with: 

Plain Slat Sign
Unfinished Christmas Tree
Traditional Christmas Scrapbook Paper Pack
Gold Foil Leaf
Acrylic Craft Paints
Gold Leaf Sizing ( I used Mona Lisa brand I had on hand)

The unfinished tree is actually meant to stand up but since I never use things as intended, I glued the stand to the back of the tree to give it some dimension. 

I painted the sign using black craft paint and then dry brushed it with cream paint. I did the same for the unfinished frame. 

I traced the tree onto a piece of the scrapbook paper , cut out, and used Mod Podge to apply it to the tree. Once dry, I lightly sanded the edges.  

I cut the "Love Peace Joy" sentiment with my Silhouette from gold glitter vinyl  and applied it to a slat board piece I had in my stash ( also painted black and dry brushed cream. 


Now for the fun part! If you've never worked with gold leaf before don't be intimidated. Do be prepared that it's messy. It's like glitter and once you start to brush it off it gets everywhere so plan accordingly or plan to walk around picking tiny flakes of leafing off of yourself. But, there's nothing like it so it's worth it. 

You need a good glue and I've had success using Mod Podge or PVA glue but really you should use a glue made for gold leaf which is what I used.  I didn't want complete coverage so I just randomly dabbed my glue here and there. It sets up in about 30 min. 


You can see here the random way I did the gold leafing. When your glue is set you lay a sheet of the leafing on top and then use a stiff brush ( stencil brushes work well) to pounce it onto the glue. It will adhere to wherever the glue was and then pieces of it will break away. I save my excess to use for other projects. 


I did the same to the frameand then used more of the scrapbook paper under the glass as shown and cut a gold glitter vinyl reindeer to go on top of the glass. Once all my pieces were ready I glued them to the sign and done. 


Stay tuned! I will have a couple more projects using the supplies I received!


Thursday, December 8, 2016

BFF Open House Link Party


Happy Friday Eve all. Hunkering down here in the PNW on snow watch like so many parts of the country. I'm a busy elf working on handmade presents and finishing up decorating.  And then I see more awesome ideas linked up at my party and my head spins even faster! Here are some ideas that may or may not make it yet this year but definitely pinned for next! 


Let's start with these printable but originally hand lettered gift bags by My 3 Monsters courtesy of Lolly Jane. LOVE and who can't use extra bags this time of year? Post includes a tutorial on how to easily print on paper bags. 


Speaking of getting your jingle on, leave it to Mich in LA to see this brilliant idea in a jingle bell! I want to spend the night in her brain sometime. And they're not just for earrings. You have to see what else she did with them. 


These sparkly polymer clay Snowflake Ornaments from My Busy Beehives would be a great addition to your tree or to make and give as gifts. Beautiful! 


I'm on the hunt for a new dessert for Christmas. I make one of two of the same cakes each year and want to try something new.  This Chocolate Raspberry Forrest Cake  from Chocolate and Carrots looks wonderful and the chocolate trees don't look too hard. What do you think? 


Now, on to this week's party! Stay warm. 


Thursday, December 1, 2016

BFF Open House Link Party


OK let the countdown officially begin. Twenty-four days until Christmas and twenty-three days until the first day of Hanukkah! Rev your engines. It's crunch time people! 


Let's start with a tour shall we? Now we know why Heather from Woods of Bell Trees always impresses with elegant projects. Look at her creative space all decorated for Christmas! Gorgeous! My office decorations consist of leftover supplies on the floor lol. 


Love this decorating idea from My Busy Beehives. A Jingle Bell Monogram! 


Also loved these "Ho Ho Ho" Vinyl Lettered Pots from White House Crafts. Simple, clean, fresh! 

I've always wanted to make a Yule Log and every year I say I'm going to try and every year.... Well this may finally be that year with this idea from 3Winks Design! How about a platter of these? Genius idea. 


Now, on to this week's party:


Monday, November 28, 2016

Dollar Tree Tree Topper


I decided I wanted a new Christmas Tree Topper this year for no reason other than I did, and makers make right? 

I was originally looking for the kind that have the coil thingy and went to Dollar Tree looking for one to use as a base but they didn't have any. But, makers make right? We also have to adapt and improvise so that's what I did. 

Supplies: 
  • 2 Gold Glittered Dollar Tree Star Ornaments (Large)
  • Toilet Paper roll...yep...toilet paper roll
  • Gold duct tape 
  • Gold and Black glitter vinyl (scraps in stash)
  • Large bottle cap ( I had in my stash )
  • Gold wire
  • Hot glue and glue gun

Cost: $2 since I had everything on hand except the Star Ornaments


I covered the  toilet paper roll with duct tape. Using my Silhouette I cut the gold glitter vinyl to fit inside bottlecap and cut the number "25" from black glitter vinyl.  The number works especially well this year since we celebrated our 25th Anniversary earlier in the year but obviously also works for the date of Christmas! 

Now in the spirit of radical honesty, this part didn't go totally as planned. If you look really closely at the bottlecap, you can see the grid lines from the transfer tape because I layered the numbers after I put the circle of vinyl inside the bottlecap. I should have done this before I put the circle in the bottlecap which would have made it easier to get the transfer tape off. At least that's what I'm telling myself. So since I couldn't get the transfer tape off without screwing up my numbers and a lot of swearing, I left the transfer tape on and it looks like ledger paper or something. At least that's what I'm telling myself! 


I marked the toilet paper roll where I was going to glue the stars ( front and back) but to make this contraption sturdier, I used some jewelry wire to secure the two stars together at the top and right and left sides. Then I glued my oopsy bottlecap to the front and done. 

Since I'm just taking down Thanksgiving and we won't get our tree until Friday, I can't show it to you atop a tree but here it is atop the mantle. 


This was my Thanksgiving mantle which I never posted so "Happy After Thanksgiving"!  I update my chalkboard for each holiday but I'm kinda thinking I'll leave this sentiment through Christmas since PhD boy ( man...he's a man...but that doesn't sound the same) comes home on Friday for a month!!! Not that I'm excited or anything. 


I've been practicing my lettering too!