Showing posts with label Handmade Gifts. Show all posts

Monday, April 4, 2022

Handmade Gift: Layered Rose Monogram and Onesie Card


I've been in a bit of a slump lately, but I snapped out of it when I learned that one of my favorite baby cousins is having a baby! She lives in another state and I was so excited to see pictures from her baby shower which inspired this gift idea to go along with the really cute outfits I bought! 

Supplies: 
  • 8x8 Box Frame (Michaels)
  • Coordinating Scrapbook Papers (Recollections, Michaels)
  • Digital Monogram Cut File (Creative Fabrica and Cricut)
  • Foam Tape (Dollar Tree)
  • Digital Cutting Machine (Cricut)

I had all of the colors I needed in my paper stash...the one that Mr. Chocolate thinks cannot be added to...HA! I pulled out the colors that coordinated with her shower and then downloaded a Rose Monogram from Creative Fabrica where I'm a subscriber. 


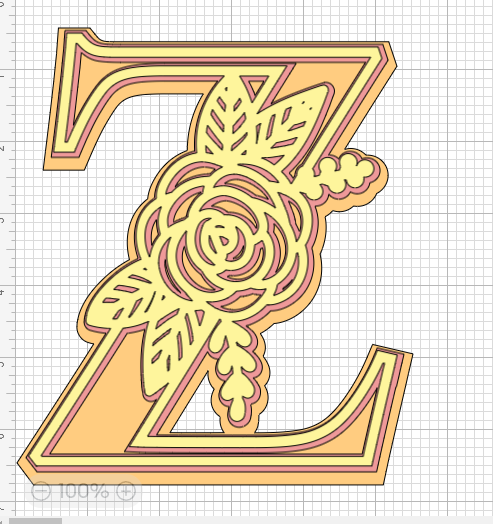
Initially (ha ha monogram nerd joke) I was going to go with these as shown but I switched out the pink for a pale orange so no, your eyes aren't deceiving you. I used the watercolor paper for the background and then orange, light turquoise and cream for the layers of the Z. 

After downloading the SVG file from Creative Fabrica, I uploaded into Cricut Design Space and sized to fit the 8x8 frame making the letters about 5.5x5.5. 


I cut each layer and then assembled by using foam tape to apply the middle layer to the bottom, then used spray adhesive to apply the top layer. 


I measured the watercolor background paper to fit the frame and then attached the monogram using more foam tape. If you're not using a shadow box type of frame, you can use spray adhesive to keep the layers flat for a regular frame. 


But a gift isn't complete without a card right? Used some of the leftover paper from the monogram and another piece of the watercolor paper to make the card.


I used a Onesie design from my library in Cricut Design Space and replicated the layering from the monogram. The card measures 5x7 with the panels 4.75x5.75 and 3.75x4.75 and 3.25x4.25.


Very happy with how these turned out!  And dang! There are some cute baby clothes out there! 


Monday, August 17, 2020

Quillermania Continues: Monogrammed Letters


I recently made three different gifts for three different friends. As my quilling mania continues, this time I made coordinating gifts and cards. 


Left to right: A monogram for a friend's daughter who recently moved into her first post-college home. Her initial done in colors to match her bedroom.  Middle: A gift for a friend in her furbaby's colors. Right: A monogram for one of my BFFs daughter in her brand new son's initial. 


For this one I used this fun bow themed background paper, cut the letter using my Cricut, and then quilled in colors to match her bedroom.  For the card I made to go with, I stuck w/ the same color theme but did a dog paw for her furbaby. 


I used the same background paper for the paw card and then coordinating quilling strips for the paw. 


For the paw hoop, I used a bone print background paper and then used different shades of brown to make the paw. Did the reverse as the hoop above and did the paw print here and the monogram of the furbaby's initial on the card. 


For the last one, I used the nursery colors and made the monogram, again cutting the letter using my Cricut Explore Air 2 and then made quilled "baby feet" and a rattle for the card. using a chipboard letter sticker to finish. 


For this one I used a navy paper layered with a vellum paper with silver dots. 

My husband is almost ready to stage a "quillervention" because I keep popping out of my craft room with new projects. Almost. Because he keeps claiming a few of them! 

Vintage Charm weekly party button
2

Wednesday, December 6, 2017

Handmade Gifts: Stenciled and Gold Leafed Hanukkah Treat Plate


Hanukkah begins next week and each year I try to make a gift for a special friend to celebrate. This year I went with what I'm calling a Hanukkah Treat Plate that can be used each night to share the goodies of the season. 

Supplies: 
  • Clear Dinner Plate ( I got mine at Cost Plus)
  • Mod Podge Super Gloss Formula
  • Acrylic Paint
  • Gold Leaf
  • Gold Leafing Glue
  • Clear Contact Paper
  • Stencil ( I made my own using my Cameo 3 but you could use a ready made stencil)
  • Paint brushes and foam applicators
The plate is food safe since everything is done from the underside. You can bake it to "cure" it so the paint won't come off or if you think ahead like I did for once in my crafting life, you can make 21 or so days ahead and it will cure.

Let's get started! 


Clean the underside of your plate with alcohol to make sure you get all the oils store dust etc off and you get good adhesion of your materials. I cut my own menorah stencil using my Silhouette Cameo and contact paper from the dollar tree. This is my favorite stencil material. It cuts great on a digital cutter and you can't beat the price for a roll ( $1).  I also covered the areas I didn't want to paint w/ contact paper. 


Using foam applicators, paint your stencil. I used metallic silver for the menorah and gold for the flames and did 3 coats. 


For this kind of project, you have to reverse your brain because you're building the layers in reverse. So start with the focal image and then do the background. Once I was satisfied w/ the menorah, I added the gold leafing.  Apply the glue per directions ( you'll find this in the fine art section of the craft store) and then apply the leafing. I remind people every time I do a leafing project IT'S MESSY. The gold leaf will fly everywhere as you apply it so be prepared. 


Yes this looks like a hot mess but keep going. Once you're done w/ your leafing ( and clearly I didn't want a perfectly covered plate...I wanted a streaky look) then mix your acrylic paint ( I used Deco Art Navy) with the Mod Podge ( I did 1/2 and 1/2 because I didn't want this part to be opaque) and apply with a flat brush. 


I did this for the whole plate then filled in the center with just plain paint. Sealed the whole thing with a coat of just the Mod Podge. 

NOTE: Mod Podge formula matters! Use the Super Gloss for projects like this. 


Once your plate is dry, flip it over and imagine it filled with chocolate rugelach

A few years ago I included some gift tags with my friend's gift and the following year her relatives were asking if she was getting more so I've done them ever since. 


The black and gold foiled paper is my current addiction. Better yet, I got a stack of it ( ok I bought 2 stacks) when Michaels had one of their $5 Hot Buy stack sales. And of course, I made a coordinating card: 


Monday, December 4, 2017

Handmade Gifts: Brushed Gold Geometric Tile Coasters


Like all makers, I'm sure you're in full fledged Handmade Gift mode. This is actually one that wasn't  on my list but which I was thrilled to make. Here's why.  

When my son came home for Thanksgiving, he was telling us about a party he and his roommate had thrown just before. Last year, I'd made and given him a set of coasters and he'd used them for the party but nicest of all, one of his guests wanted to know where he'd gotten them. "Um , my mom made them". Awww! She really liked them and I was so honored that of course I had to make a set for her! 

Supplies: 
  • Ceramic Tiles . I got mine at Lowes for $.16 ea ( and a weird look from the Lowes guy when he asked if I was replacing tiles and I told him I was making coasters)
  • Vinyl / Foil. I used Cricut Brushed Gold Adhesive Foil
  • Die Cutter or Digital Cutter. I used my CAMEO 3 ( yep I use Cricut stuff on my Silhouette Cameo. I'm a riddle wrapped in an enigma). 
  • Images to cut. Mine came from Silhouette Online Store
  • Aluminum Tape
  • Vinyl Bumpers ( Clear self adhesive dots to put on the bottom of the coasters)


Clean your tiles with rubbing alcohol to make sure you remove all the warehouse dust and fingerprint oils etc. 

Choose, cut and weed the images you want to apply. I wanted to do a coordinated set so I went with varying geometric images. I used a couple of the same ones I'd used for my son's, but I added the heart for the ones I made for his friend. 


I went with three images and made two of each.  Using transfer tape, apply the images to your tiles. 


To finish, I wrapped adhesive aluminum tape ( I bought a huge roll of this at a stamp show years ago but I believe it's from the electrical aisle of the HW store so your Lowes guy can look at you funny too!)


Finally, I put clear vinyl bumpers ( the kind you use to prevent cabinet doors from slamming) on the bottoms since I wasn't finishing the bottoms with cork or felt which are a couple of ways I've seen people complete these. 

Easy peasy and inexpensive gift that's pretty and functional. Can'tbeat that.


Tuesday, May 16, 2017

Ermagerd! Special Gift for a Special Friend


A few years ago, fate introduced me to someone who has become a great friend. A change in work assignments brought us together though in our company, "together" is virtual since she is on one side of the country and I'm on the other.  

Our paths had never crossed before and we quickly discovered we had many things in common. Our passionate love of our kids, our "wicked smaht" sense of humor, our shared love of the same TV series and movies and more. I don't remember exactly how the expression "ERMAGERD" (for OMG) became part of our daily discussions but it was probably from something that had happened on "Game of Thrones" or "Bates Motel". 

We'd always have the same take on something and that morphed into us saying we were like Forrest and Jenny from "Forrest Gump" ...."peas and carrots" which became "peas in a pod". She became Erma and I became Gerd and that's been our thing!  I wanted to commemorate our relationship which is what this gift represents. Still with me? 


I knew I wanted to letter something, and I knew I wanted to frame it so I started with these supplies: 
  • Unpainted Frame
  • Acrylic Paints 
  • Lettering Pens
  • Embellishments for frame
  • Heavy Paper ( I used watercolor paper)
  • Lightbox
  • Fun Font


I painted the frame black , then crackled it using my tried and true white glue crackle technique with metallic gold as the top coat.  Once dry I added the rolled paper flowers I picked up on one of my Michaels trips. 


For the lettering and pea pods, I chose a fun font, found a piece of clipart I liked, created the sentiment on my computer, printed off and then using my lightbox, layered watercolor paper on top. Traced with a pencil, then outlined with a high quality non-bleed pen ( I bought a pack of pens by Recollections @ Michaels, comparable to Micron Pens). 

Some might ask why I didn't just use the computer generated print but I wanted this to have a hand lettered feel (and the watercolor paper wouldn't fit my printer anyway). Since I wanted it to coordinate w/ the frame, I used a metallic gold gel pen to accent the peas in the pod. 


We also share a love of black and white clothing. Since I love making jewelry and had recently picked up some new supplies to play with, I made her a pair of earrings, and made a complementary pair for me! I wear big earrings, so I made hers a little less bold but using the same beads. 


I  can't have pierced ears so mine are clips and hers are pierced. I'd picked up a package of  connector links ( the silver ovals) and layered different sizes together for each pair, and then strung the beads on headpins as shown, connecting them to the links with jump rings. 

I've waited to post this until I knew she received ( and liked!) her gift which she did and does. As I told her, the BEST feeling in the world for us makers is the excitement we feel when someone loves something we made for them. My gift in return ( not that one was expected) was her excitement over receiving this. Best feeling in the world! 


Love ya Erma!