Thursday, October 2, 2025

BFF Open House


Happy October and peak crafty, creative, and cooking season! And just like that, our weather's a bit cooler, the humidity that comes with monsoon season seems gone, and I find myself saying "I'm cold" which is a joke to the rest of the country because I say that when it's below 90. I used to tease my mom and friends mercilessly when they'd say they were cold, and then we moved here and I had to eat those words. Bodies do adjust and change! 

Still having fun with Halloween projects (although I'm feeling that Christmas itch). This week I shared: 


Some fun ideas shared at last week's party! 


Two Chicks and a Mom shared this fabulous Hanging Halloween Bat, perfect for a porch, door, or inside! 


Whether for Halloween or Harvest, this time of year is pumpkins time to shine! Master Pieces of My Life has some stunning and creative ways to display them! Check out 10 Unique Ways to DIY Pumpkins.


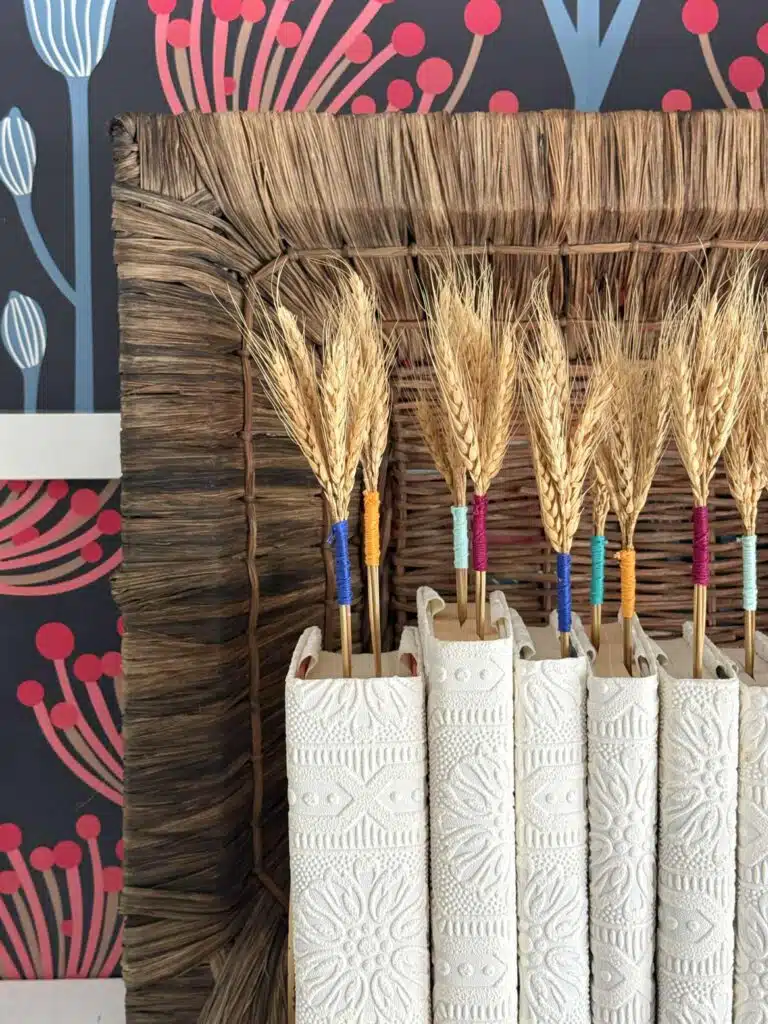
Transform a simple brown bag into an elegant way to display Fall flowers! My French Twist shows you how to make these beautiful Paper Bag Vases


Finally, how perfect for the season are these Chocolate Chip Autumn Leaf Rake Cookies from Cindy's Online Recipe Box?!


A huge thank you to all who shared, and I hope everyone's taking a moment to visit other posts! The world needs our creativity, especially now. We, the Makers, are sometimes the ones who bring a bright spot to someone's day with a handmade gift or shared enthusiasm when we find another Creative. Let's use our superpowers for good! 


You are invited to the Inlinkz link party!

Click here to enter

Tuesday, September 30, 2025

Halloween: Repurpose Old Decor...Jack Skellington Glass Block


Every time I put out decorations Mr. Chocolate unnecessarily tells me, "Feel free to get rid of stuff!"

Not that I need the reminder, and he also knows I've been making new stuff, but since he's the keeper of the bins...

I had a Halloween-themed glass block made years ago that I've debated about making over, but the lights kept working until now, which gave me a reason to make it over. 

Supplies: 
  • Glass Block (the kind with an opening / seal unless you want to drill!)
  • Black Vinyl and Transfer Tape
  • LED Battery Operated Lights (Dollar Tree)
  • SVG image of choice
  • Digital Cutting Machine (Cricut Maker)

This was my original with some spider webs in each corner and decorative rhinestones. I was initially going to remove them and then looked at the block and the other side was blank so I used it and left this as is. 

Removed the broken lights, cleaned up the block, and then looked for a "Jack Skellington" face to use. I found this one here.


I missed that one of his nose holes got stuck to the vinyl as I was weeding, but didn't feel like cutting again. 


Positioned my image on the glass, and then used my scraping tool to apply the vinyl. I thought I'd just use an acrylic paint pen to draw his missing nose hole in, then remembered I had some rhinestones that would work!


I removed the other nose thingy and used two of the teardrops. 


I had some of these LED lights from Dollar Tree in my stash and thought they'd be perfect for this, so threaded those into the block, and...


It's actually a bit brighter than the pic shows. I love it when I can reuse and repurpose things, and it got the Mr. Chocolate seal of approval! 


Monday, September 29, 2025

Halloween: Glam Sugared Skulls


Happy New Week! Sharing a play on words inspired project with these Glam Sugared Skulls. Living in the Southwest, Sugar Skulls, Catrinas, and Dia de los Muertos iconography and creations are EVERYWHERE and I love them. So, my brain doing what it does, came up with this idea. 

Supplies:
  • Plastic Skulls (Dollar Tree)
  • White Multi Surface Acrylic Paint (Waverly)
  • Mod Podge
  • Glitter
  • Gemstones (Dollar Tree)
  • Silk Roses (Michaels)


I used these plastic skulls from Dollar Tree and my favorite multi-surface Waverly paint. 


Cover the skulls thoroughly with paint. Those sponge spouncers work better to me than brushes. 


I wanted these to look like the skulls were cast from sugar so I grabbed some white glitter from my stash and mixed a bunch into some Mod Podge. Then, using the spouncer thingy (very technical term!), applied to the painted skulls. 


I craft like I cook. "Some"..."a bit"...so I don't have exact proportions but just mix until you're happy!


You can see the glitter effect here. I grabbed some of these irregularly shaped gemstones (Dollar Tree) and decided to use them for the eyes. I just started gluing them randomly and filling in. Yes, they're self-adhesive, but for better adhesion, I reinforced them with some dimensional glue. 


Mr. Chocolate had thoughts on the rhinestones I put in the noses. Pffft. 


I unintentionally made these to match us! Me, with black curly hair represented by black roses, and him, "clean shaven". I used a black rose spray from Michaels, cut it apart, and then glued leaves and flowers as shown.


Mr. Chocolate!


Me!


Us!

I'm planning a future decor tour post when I'm all done using all these projects I've made so you'll see how I used them (if I can stop making more stuff!). 

Sharing At:
Creatively Crafty Linky Party #270


Thursday, September 25, 2025

BFF Open House


Happy Friday Eve, Fall,  and last weekend of September! You know what that means, right? The PRESSURE is on! From here on out, it's a full-court press with holiday crafting, baking, cooking, EVERYTHING.

This week I shared a couple more fun and easy Halloween projects and I still have a few more I'm working on. But, I stopped in World Market the other day and instantly wanted to immerse myself in Christmas! I haven't seen Christmas stuff in Michaels yet but Dollar Tree is gearing up and saw a couple of things in Walmart. My goal is to finish Halloween decorating by next week.


Now let's take a look at some of the fun ideas shared at last week's party! 


Step Creates shared this beautiful Fall Fox Garland that is so perfect for the change of the seasons.


Sonata Home Design shared a two-in-one way to unify decor with these Matching DIY Book Covers, enhanced for the season with Wrapped Wheat. 


Crazy Little Lovebirds shared a festive and Easy Dollar Tree Floral Arrangement


Finally, what a fun addition to Halloween desserts are these Chocolate Covered Strawberry Witch Brooms from Hunny I'm Home DIY!

Thanks to all who shared and can't wait to see what you've got in store this week! 


You are invited to the Inlinkz link party!

Click here to enter

Tuesday, September 23, 2025

Halloween: Glammed Up "Starry Night" Ghost Scrape Painting


I didn't set out to make everything "Glammed Up",  but that's how it's worked out this Halloween crafting season. Natch, I wanted to try my hand at the popular ghost scrap paintings we're seeing everywhere, but also "natch", I had to put my own signature on it! 


Supplies:
  • Canvas, size of your choice 
  • Acrylic Paints, monochromatic or multicolor
  • Cardboard
  • Gemstones


I had a black canvas in my stash which was perfect. I decided my twist on this would be to do multicolor ghosts, so these are the colors I used. 

NOTE: I'm going to show you what not to do so yours can be better!!


I made the mistake of thinking pouring my paint straight from the bottle was a good idea. Lazy! It's worth the time I didn't take to put your paints in their own bottles with sharper tips. But, I didn't, so lesson learned. 


I followed the basic steps shown in all the tutorials you can find on Pinterest or You Tube...I cut cardboard in different widths and then used them to scrape my paints. I really loved how overlapping them created different looks as the colors blended. To make the eyes, I used a black acrylic pen. A small paintbrush and acrylic paint would work, as would a black Sharpie. 

You can see here I had an oops with some residual gold paint left on my cardboard scraper. No worries. Once everything was dry, I went back over any oopsies with black paint and then did some random strokes all over the canvas. 


Humans aren't perfect. Why should ghosts be? Even my VIRGO OCD let imperfections go!


Now for the glam! I used these irregular shaped rhinestones (Dollar Tree) in clear and gray, along with golds, and started adding them randomly above the ghosts. They're self-adhesive but I reinforced them with some clear tacky glue. 


I also had some gemstones in the shapes of moons and stars that I added. 


My "Starry Night" Ghost Scrape painting! 

Let me know in the comments if you've done a variation of this popular craft and drop a link!