Showing posts with label St. Patrick's Day. Show all posts

Tuesday, March 8, 2022

Seasonal Decor: St. Patrick's Day Easy Vignette


Our big furbaby girl is on the mend from her surgery last week so I grabbed a few minutes, which is literally all this takes, to add a little St. Patrick's decor. This was so easy I'm embarrassed to even make a post about it but...
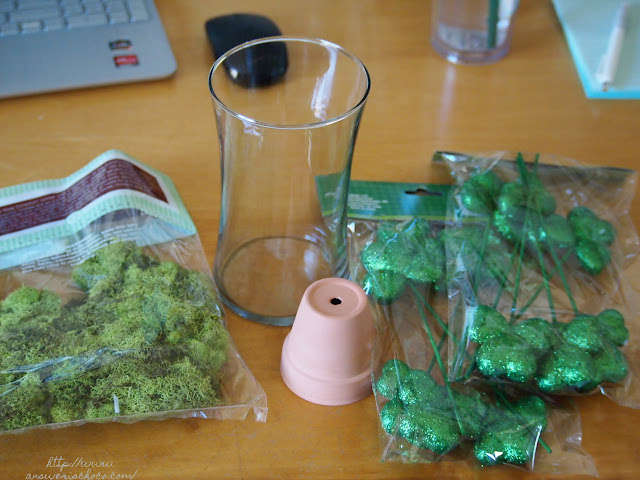
Supplies: 
  • Felt Gnomes, Target 
  • Glass Vase (On Hand)
  • Mini Clay Pot 
  • Shamrock Picks (Dollar Tree)
  • Moss (On Hand)
  • Ribbon (On Hand)
I found the gnomes at Target in their "used to be a dollar" section and couldn't resist. They were 3 for $3! How could I not? Mr. Chocolate has named them "Ginger Gnomes" because of their beards. The Shamrock picks I found at Dollar Tree and the rest of the supplies I had on hand. 


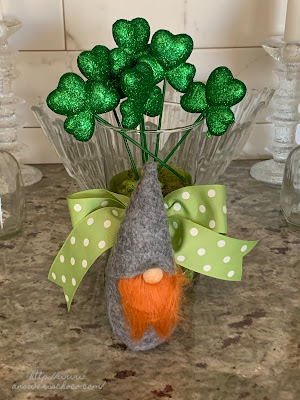
I placed some of the moss on the bottom of the vase, then placed the  mini clay pot upside down in the center. The hole in the pot made the perfect holder for the Shamrock picks so I fit as many as I could, built up the moss around the pot, pushing it down using the handle of a paintbrush, and then used the remaining picks from one pkg. I have a second package leftover!


I had the polka dot ribbon in my stash and it was just the right amount to use to tie a bow around the vase. I used the two empty tequila bottles from a Valentine's project last month to stand up two of the gnomes with the third as shown. I told you this was too easy! 


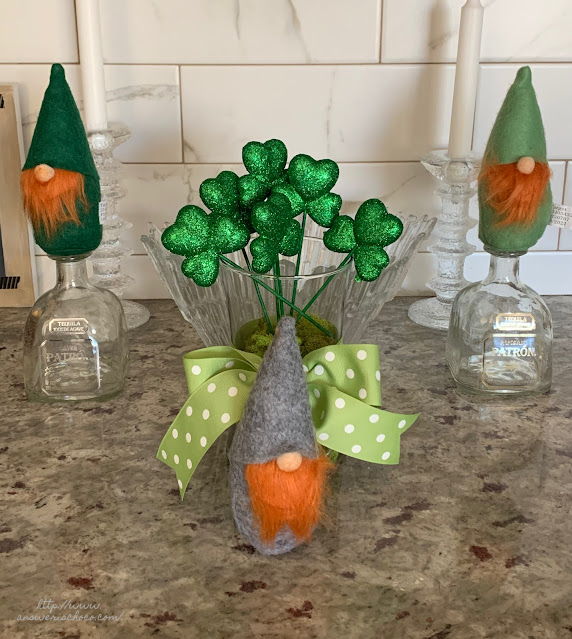
Never hurts to add a little luck right? 


Saturday, March 6, 2021

St. Patrick's Day: Acrylic Paint Poured Shamrock Sign


This week's BFF Open House Link Party continues here

I've been having fun with some St. Patrick's Day decor. In addition to my Layered Shamrock I had fun with this $1 wood sign from Dollar Tree. 

Supplies:

  • Wood Shamrock Sign ( Dollar Tree)
  • Acrylic Paints 
  • Zinsser Paint Booster ( Lowes)
  • Silicone ( Hardware Store )


Ignore the red hearts. I thought I was going to layer them onto the sign and changed my mind. I found this line of Top Notch paints at JoAnn. I'm not sure if it's an in house brand or not but they are another line of reasonably priced acrylic paints. They make a whole host of other products as well. The Zinsser paint booster is an alternative to Floetrol which is used in a lot of paint pour projects. The silicone you can get at any hardware store. 


I chose to go with a more muted green palette along with some white and a couple drops of gold. So first step was to mix the paints. My formula for small projects is about a capful of the paint booster to 1/3 cup of paint. It's not scientific, I just found it gives the right flow. If you're starting out with paint pouring play around to find the consistency YOU like for your projects. There's no absolute. I squeezed 2-3 drops of the Silicone in and mix well until your paint just looks like paint again. 


Re-using cups is great in practice but I didn't think about pictures. Note to self. Use new cups. But I didn't, so don't be confused by the other colors you see. 


For this project I did what's called a "dirty pour". What this means is layering  the paints in one cup vs pouring each color individually. You can see them start to interact in the cup which they'll do more as they flow once they're on the surface you're painting. 


For a "clean pour" you pour your paints from their respective containers onto the surface one by one. For a "dirty pour" there's the flip step. Place your surface atop your cup, then holding the cup, flip until your surface is on the bottom and the cup with your paints sits atop it. Some paint may leak out but that's OK! 


When you lift your cup you'll see your paints begin to spread and how they've blended and their magic is revealed. I love this part the most! From here, just tilt your surface to spread your paint until your surface is covered. I ended up having to add a little more paint to my pour cup which was fine. I was trying not to have too much and ended up with too little. It's a Goldilocks process!


I love paint pouring so much because no two pieces are alike and each takes on its own personality. If you want exact replication, this art is not for you! 

Once dry, I finished with some black and white check ribbon and kept it simple, just hanging it on a mirror in our entryway. 


I'm happy with it and it was $1! 


Tuesday, March 2, 2021

St. Patrick's Day: Layered Shamrock from Maggie Rose Designs


Last December I attended a  workshop where I discovered someone who has become one of my favorite designers, Maggie, from Maggie Rose Design Co. She does a lot of amazing things including creating beautiful layered cut files that she generously shares with her readers. I made another of her designs last month using her Layered Floral Heart

Maggie's recently shared some changes in her life where she's paused her making, if not her designing time, and issued a call for anyone using her latest design to use their Cricut to cut it out and I happily answered that call! I really connect with her style. 

I haven't done a lot of St. Patrick's Day decorating in the past but this year since creating is my full time job, I've been having fun with it and have a couple more projects I'll be sharing. 

Supplies: 
  • Layered Shamrock Cut File ( You'll need to sign up at Maggie's site to get the password to download for FREE!) Trust me, you want to do this as she has some gorgeous files in addition to this one. 
  • Cutting Machine ( Her files work for Cricut or Silhouette) I used my Cricut Explore Air 2
  • Four Sheets Contrasting Scrapbook Paper 
  • Foam tape / Dots
  • Shadowbox Frame
  • Background Paper


I alternated my papers based on how I wanted  the layers to appear, using white glitter, black, gold glitter, and green. All of my papers are Recollections from Michaels. 

Once you've downloaded the design and imported into your design software, re-size as desired and then cut each layer. 


You can see the beauty of each layer as a standalone. I assembled the Shamrock using foam squares.

HINT: I start with the top layer and work backwards because the top layer is usually the most intricate and you want to ensure you don't place your foam squares or dots where they'll show. 


I love how all of the layers work together! 

I knew I was going to frame this like I'd done with the Layered Floral Heart. I used a 12x12 Shadowbox Frame from Michaels. But first, I needed to decide what I wanted for the background! 


Michaels got me again with their "Buy One Get Two Free" Hot Buy Paper Stacks. I have zero willpower when it comes to these. I loved this one called "Let's Wander" (in my house...it's COVID!) which I love with its watercolor and foiled papers. I chose this one. 


I thought the greens and golds went perfectly with the papers I used for the Shamrock. 


Taped it down to the background paper and then assembled it together in the frame. 


I'm so SO happy with how it turned out and it's all because it started with a FABULOUS design from a talented designer! Thank you Maggie! 


Tuesday, February 25, 2014

Celtic Inspired Multi-Strand Necklace

Celtic Multi Strand Necklace 1

With St. Patrick’s Day coming up , I thought make something I could wear to celebrate but that would also fit in my wardrobe overall. I’ve always love Celtic jewelry  so the combination of a filigree multi-strand clasp, antique gold and silver chains and moss and cream flat backed beads is my attempt at capturing the feel. All supplies in this project are from Blue Moon Beads. You will need:
  • Multi strand clasps
  • Gold and Silver chain
  • Flat back pearlescent acrylic beads
  • Jump rings
Blue Moon Flat Back Pearl

I joined the flat backed beads back to back with jump rings. I wanted a bolder bead and this way if they flip around there’s no bad side. I added short lengths of chain in between alternating cream and green beads with jump rings. Cut lengths of chain equal to the beaded pieces . Join all to two of the clasps.
Celtic Chain Necklace

I added a couple more of my back to back bead sets to the ends of the clasps and then equal lengths of chain to complete the necklace.

Celtic Multi Strand Necklace

Celtic Inspired Necklace


Sharing At:


Sunday, March 17, 2013

Double Layer Chocolate St. Patrick's Day Bark

Double Layer St. Patrick's Day Bark

Top o the mornin’ to you. Happy St. Patrick’s Day! We’re just celebrating quietly at home. Since College Boy’s home for Spring Break, I’m making a big dinner including “drunken” pot roast, slow cooked all day in Guinness.

For dessert, I decided to make some “Leprechaun Bark”. I loved the one that Leigh Anne from Your Home Based Mom shared at a previous link party and have seen variations around the web. Here’s my version. For this you will need:
  • White chocolate candy melts and/or white chocolate chips
  • Dark chocolate candy melts and/or white chocolate chips
  • Almonds ( I roughly chopped whole unsalted almonds)
  • Green M&Ms
  • Wilton Edible Gold Stars ( cake decorating section of craft store)
  • Wilton Color Mist, gold ( cake decorating section of craft store)
  • Green Gel / paste food coloring. I used Wilton

St Patricks Bark Ingredients

Melt your white chocolate. You can do this using a double boiler method or in the microwave. You’ll notice I didn’t include amounts…I just kind of eyeballed my measurements.

Tinted White Chocolate

Once your white chocolate is melted, tint with food coloring. You could also add some mint flavoring here if you want. Spread on parchment lined cookie sheet; sprinkle with some of the chopped almonds. Stick sheet in freezer. Press almonds down with the back of a spoon.

While this is setting up, melt your dark chocolate, add in remaining almonds, remove sheet from freezer, spread dark chocolate layer.

Dark Chocolate Layer

Just try to get it to cover your green layer. Then sprinkle with green M&Ms ( I bought mine at The Sweet Factory store at the mall so I would get only the amount I’d need).  Sprinkle on gold stars, put back in freezer for about 30 min until set.

St Patrick's Bark Gold Stars

Lightly spray the color mist…just enough to get a light coat and shimmer. Let dry then cut or break to size.

Gold Star St Patricks Day Bark

Thursday, March 17, 2011

Buckets O Luck

I didn’t post these earlier because I didn’t want Mr. You Know Who to see them ( and I never know when he reads my blog but I think I’m pretty safe now). I found these plain buckets in Target’s $1 Section and thought they’d be fun for St. Patrick’s Day. I cut the letters on my Cricut using white vinyl, and since waste not want not…punched the shamrocks from the scraps.
IMG_5133
I lined the buckets with white polka dot cellophane I had leftover, and filled with Mr. Chocolate and Chocolate Chip’s favorite candies…at least those that were wrapped in gold foil!  Wrapped one big treat in coordinating green wrapping paper:
IMG_5136
Then topped the bigger candy with one of my printables, scaled down, trimmed with decorative edge scissors and mounted to black card stock.
IMG_5145

Linking Up At:

Photobucket

Monday, March 14, 2011

St. Patrick’s Desserts…Chocolate of Course!

Trying to decide what to have for dessert for St. Patrick’s Day. The fam doesn’t love corned beef and cabbage so it’s usually a long simmering pot roast cooked with some Guinness . My non-red-meat eating son has been eating some again lately, so that may be back on the menu this year. Or, I’ll roast a chicken basted in Guinness.  Thankfully he has no problem with chocolate and dessert's the most important part of the meal right? 

Hershey’s has this mint chocolate dessert:
Chocolate Mint Dessert
I could see some Thin Mints added to this or maybe one on top of each piece? 

Epicurious.com has this Guinness infused pudding made to look like its special ingredient:
Chocolate Guinness Goodness
Family Fun has this yummy looking toffee shortbread recipe:
Toffee Shortbread
As much as I love chocolate, there's something about shortbread so with chocolate? Mmmmmmm.

bhg.com has this amazing looking Irish cream chocolate cheesecake:
Chocolate-Irish Cream Cheesecake
Or, you can’t go wrong with a cupcake!
St. Patrick's Day Cupcakes!
These are from cakecentral.com. Guinness chocolate cupcakes with buttercream icing and chocolate coins.
So, what are you making? I need to go for a walk after writing this!