Showing posts with label Paper Mache. Show all posts

Tuesday, November 7, 2023

Fall Decor: Paint Poured Paper Mache Pumpkins


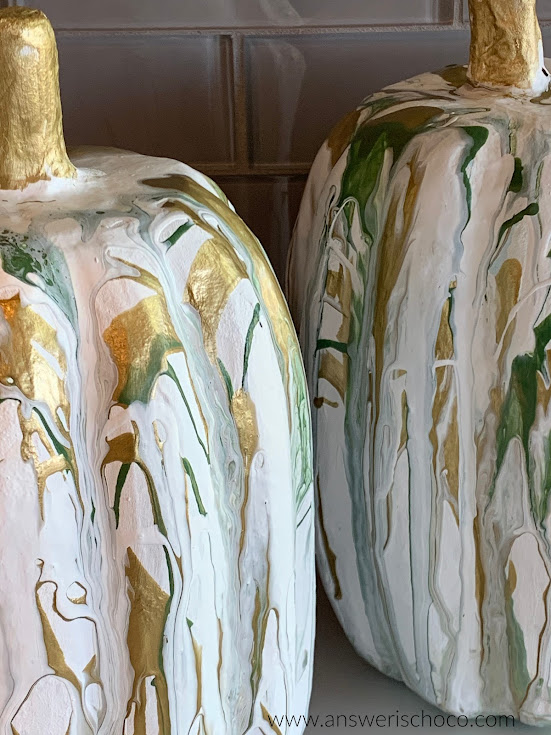
In addition to the Tissue Paper Pumpkins I shared yesterday, I had fun this weekend paint pouring some paper mache pumpkins. I'm thrilled with how they turned out! 


Supplies:

  • Paper Mache Pumpkins (70% off at JoAnn)
  • Liquitex Acrylic Paint Pouring Medium (Michaels)
  • Acrylic Craft Paints

I found these tall skinnier pumpkins for 70% off at JoAnn. Who could pass those up? Not me! You could do the paint pour on these as is but I knew I was using white in this project and really wanted it to pop so I coated with white acrylic paint. 


I was sure I took pics of my paints before I poured them but apparently not. So, I mixed white, green, and gold paints in their own cups along with Liquitex Pouring Medium. It's available wherever fine art supplies are sold. I got mine at Michaels. 


I am not an exact person. I guestimate how much I'll need for a project then do about 1/3 medium to 2/3 paint. Different paints have different viscosity. Metallic paints are sometimes thicker so I use a little more medium with them. I go for a consistency that's about the same as white school glue. And since pouring and taking pictures require more hands than I have, I didn't take pictures of the actual pouring. 

Some prefer layering the paints into one separate cup but I worked with the three colors/cups individually. Kind of like I cook. Some of this, some of that, more of this until the colors were dripping down the pumpkins to my liking. 


 This is the paint still wet and doing its thing of swirling, streaking, blending. I just let gravity do the work. 


Once dry, they almost look like they were carved from wood. SO happy with them! They were around $4 each and I already had everything else on hand.


Wednesday, December 4, 2013

Ghosts of Christmas Ornaments Past: Paper Mache Ornaments

You could say I love ornaments. Did you say it? I have all kinds but some of the ones I love the most were the simplest to make.

 One of the easiest types of ornaments to decorate are the plain paper mache ones that every craft store carries. They come in all kinds of shapes...the basic ones like circles, squares, etc can usually be found year round, and during the holidays there are lots of choices.

I thought I'd share some past projects using them . The original posts / tutorials are all linked. They are an easy and inexpensive way to add to your decor or to make as package toppers, gifts etc.


For these, I stamped directly onto the ornament and embellished with rhinestones and glitter. 


These were done the same way as the first but I added some beads to the end of the ornament. 


These use a combination of vintage sheet music, graphics from The Graphics Fairy, and Mod Podge. The only limit is your imagination!


These are a combination of the two. Mod Podged with sheet music and edged in glitter. The focals are metallic snowflake stickers. Again, you could use any combination of papers / stickers, buttons, jewels. 


These I actually used in a banner for Valentine's Day but the idea could easily be adapted for Christmas. PEACE, JOY, NOEL are all words that could be used. 


Each year when we get out the Christmas stuff I get to re-live memories of the years I made these. I hope you find some inspiration !


Sharing At:


Tuesday, May 14, 2013

Mod Podged Mini Dress Form Photo Prop

Mini Dress Form Photo Prop

Being a jewelry maker, I’m always looking for different ways to photograph my creations. I got this idea when I stumbled upon mini paper mache dress forms in the 2 for $3 section at Michaels.

For this project you will need:
  • Mini Paper Mache Dress Form
  • Mod Podge ( I used matte)
  • Wood Spool
  • Printed Tissue ( I used a damask print, 5 12x12 sheets to a pack by Recollections also at Michaels)
  • Coordinating Trim and Paper Flowers
Mod Podge Mini Dress Form

Cover your spool and dress form with Mod Podge; apply paper. When I’m working with tissue paper I like to “pre-scrunch” it since it’s likely to get wrinkly anyway. I find this keeps the wrinkles uniform. You can be exact and line up the patterns, or you can be me.

Damask Tissue Mini Dress Form

I trimmed the top of my spool with some leftover pom pom trim, hot glued two coordinating paper flowers to the top of the spool, glued the dress form on and DONE!

Mod Podge Dress Form Jewelry Holder

Now I have another little photo prop to use in my posts.

Dress Form Photo Prop

Sharing At:

Monday, December 3, 2012

DIY Vintage(d) Tree Topper: Scrapbook Paper, Glitter, and Paint

Vintage(d) Tree Topper

I decided when I took down last year’s tree that I wanted a new tree topper. I’d been using big ribbon bows but they were looking a little tired. We get a real tree, and nature does not always provide that perfect branch at the top for most of the vintage or vintage inspired glass  toppers I like. So natch, I made my own !

For this project you will need:
  • Paper mache cone
  • Craft paints ( I used a Sterling Silver and Sterling Silver Glitter)
  • One 12x12 sheet of scrapbook paper
  • Oversized bottle cap ( you could also use a jar lid)
  • Paper cut to fit inside your cap
  • Focal point ( I used a vintage looking brass sticker)
  • Glue Gun
  • Glitter
I painted my paper mache with a couple coats of silver metallic, then went over that with a couple of coats of the silver glitter paint.

Before and After Metallic Cone

In between coats of paint, make the medallion that is the centerpiece of this tree topper. Cut one 12x12 page of scrapbook paper into 4 6x6 sections. I used a sheet music page from Recollections and made one inch score marks using my Martha Stewart scoring board.

Martha Stewart Scoring Board

Once you’ve scored and folded each of your sections, hot glue them together. Since the paper I used was pretty heavy I used hot glue vs tape.

Paper Medallion

Then I took a small paintbrush , thick glue, and silver glitter and made my way around my medallion until it was edged.

Glitter Edged Medallion

I had some giant bottle caps in my stash but a small jar lid would work for this too. Cut a circle of silver glitter paper to fit inside, Mod Podged it in there, and then added an embossed brass colored sticker to the middle. The one I used is by K&Co.

Giant Bottle Cap

I hot glued a silver tinsel pipe cleaner around the inside edge. I had some silver glittered snowflake pics from my after Christmas deal scrounging last year so pulled on out, stuck it through the top of my cone and added a dab of hot glue to keep it in place. Glued  my completed medallion on to my cone and done.


Vintage(d) Tree Topper

Vintage(d) Tree Topper

Sharing At: