Showing posts with label vintage. Show all posts

Thursday, July 21, 2016

BFF Open House Link Party

The Answer Is Chocolate

Hi all and happy Friday Eve. Hope those of you in the hotter than hot parts of the country are managing to stay cool. I'm very thankful that our PNW weather has returned to some sanity after a few years of very un-PNW heat waves! 

Here are some features from last week's party I hope will inspire you! 


Doreen from Altered Artworks finds the BEST things to re-purpose. This kitchen rack is no exception.


And Raven Would shared this gorgeous DIY wood batik wall decor piece. LOVE!


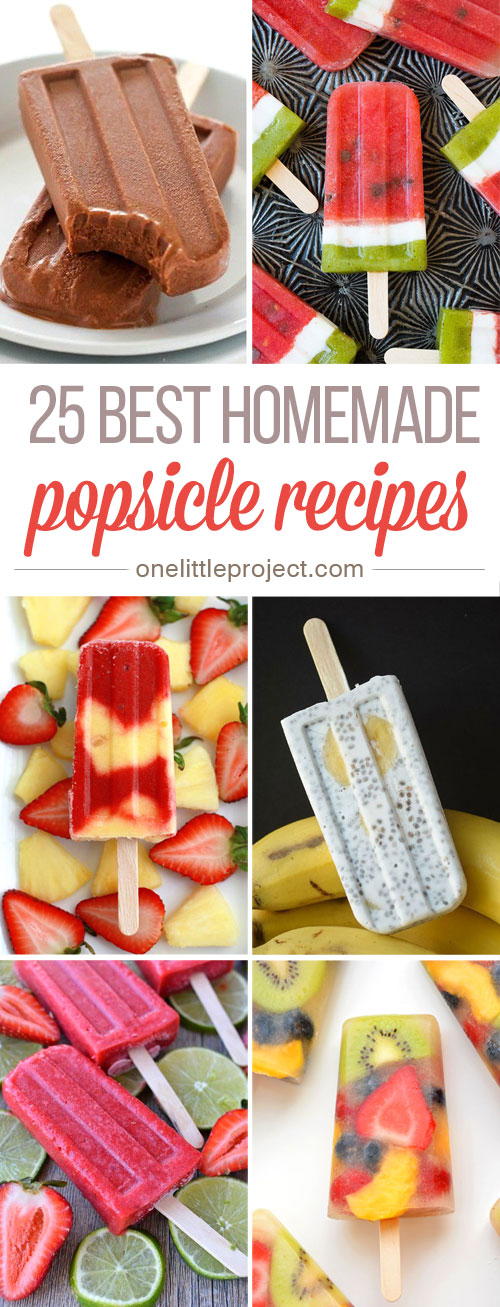
If you're looking to stay cool, you can't go wrong with these DIY popsicle recipes from One Little Project . YUM

And what's Summer without ice cream? And what's ice cream without hot fudge? I mean it's like Ethel without Lucy! I may or may not have even eaten hot fudge with NO ice cream.  Pat and Candy have you covered! 


Now on to this week's party! 


Monday, December 8, 2014

Altered Vintage Grater Christmas Decor

Altered Grater

While walking through an antique store looking for a pair of ice skates ( no joy) I stumbled upon this old grater. Along with the ice skates I was actually looking for a box grater ( also no joy).  I had no idea what I was going to do with it (it’s not like I knew what I was going to do with the box grater either) but I knew I’d regret not getting it.

Dimensional Mod Podge Charms

The focal for this is actually the “25” charm which is what I’ll show you how to make.

For this you will need:
  • Dimensional Mod Podge ( I used silver glitter)
  • Mod Podge Matte
  • Jewelry bezels (Michaels)
  • Scap of scrapbook paper
  • Punch (my 1” punch fit the bezels perfectly)
This is one of those easiest projects ever that people will think is a lot harder than it is. Let them. Also, you can use one of the pendants for actual jewelry!

Mod Podge Charms 1

Here’s how difficult this is:
  • Punch circles from paper
  • Adhere circle to bezel w/ Mod Podge Matte
  • Flood bezel with Dimensional Mod Podge, let dry
25 Charm

For the grater itself? Easy peasy. Wrap the grater with a scrap of dropcloth or fabric scrap. Make a pinwheel from more paper scraps. Add a star and the “25” charm. I added another charm I made from microscope slides. Finish with a strip of washi tape and a button.  Mine sits in my kitchen because it’s a grater and even though I alter them with all kinds of non-kitchen stuff….duh!

Altered Grater 1

Sharing At:


Tuesday, September 2, 2014

Halloween Archive : Vintage Witch Hats and Spooktacular Giveaway

Vintagey Witch Hats

This is a re-post of a popular project I shared last year, inspired by the  Three Witches from Macbeth. Supplies I used last year were from Oriental Trading Company.Project idea 100% mine.


One reason I thought to re-post this is because to get ready for Halloween this year, they're having a spooktacular giveaway that you definitely want to enter: 


The Grand Prize is $500 worth of stuff ( $500!!) but they're also giving away a $25 gift card to their site EVERY DAY until 10/18! Who wouldn't want to enter to win?

Oriental Trading Company

If you're not familiar with Oriental Trading Company or haven't been there in a while, in addition to a great selection of party supplies and project kids that are great for kids, they have really really expanded their crafting supply section. I was able to go through the ordering process which was straightforward and easy, and my shipment arrived quickly.

The hats themselves are not actually hats. They started out as these:

Paper Mache Cones

Plain paper mache cones. I covered them using torn and twisted kraft colored butcher paper and Mod Podge  and glued them to a cardboard circle base.

PA010958

Since I knew I wanted them to be old looking, I wasn’t precise and just kind of went over the form until it looked like a witch’s hat. When dry, painted with black paint. Now for the fun stuff!

Oriental Trading Co Papers

I chose some of the Halloween papers from Oriental Trading Company along with epoxy poison labels. I used the papers to make layered flowers that I scrunched and crumbled. After all, the witches from Macbeth would not be seen in pristine new hats.

Halloween Paper Flower

Using some of the die cuts and stickers I also received, I made accessories for my hats, keeping with a poison potion theme.

Witch's Brew Hat

Arsenic and Venom Hats

Waste not want not, so I used from of the scraps of paper to embellish the hats going around one of the cones, and one of the brims.

PA010962


Bewitching Hats

Sunday, December 1, 2013

Vintagey Merry Christmas Printable


After a couple of years of a bright mantle, I'm feeling neutrals and silver this year.  Sharing this printable I made using PicMonkey which I could sit and play with all day but I have decorating to finish! 

It's sized to 8x10 but you can resize smaller if you like. Click on the image to bring to full size, then right click to Save As. 

Sharing At: 


Tuesday, November 26, 2013

Bleached Bottlebrush Trees

Botttlebrush Trees

I love the look of vintage holiday decorations and have long wanted some vintage bottlebrush trees. I’m automatically drawn to displays of them in stores. I am not always drawn to their price so once again, I decided I could make my own.  SO easy. Another why didn’t I do this before project.

You will need:
  • Bottlebrush trees. Can be found at hobby and craft stores or where Christmas villages etc are sold. I bought a big bag at JoAnn’s last year for 75% off after Christmas knowing that I wanted to make some this season.
  • Household bleach.
  • Water
  • Container
  • Time
  • Spray adhesive
  • Glitter
I googled around for some hints on how to bleach the trees. All of the instructions were similar: mix equal parts bleach and water in a container; submerge trees, wait. Time is the tricky part and my conclusion is you just have to keep an eye on your trees vs an absolute amount of time. One tree took 15 min. Another the same size took 30. Just bleach until they’re the color you want. I wanted natural but may do some more and stop at pale green. I've seen tutorials where people have dyed them all kinds of colors or used spray inks etc.

Bleached Bottlebrush Trees
Mr. Chocolate only looked at a little oddly when I told him I was bleaching trees. He just doesn’t ask anymore. What’s weird is the color bleaches out but the flocking stays on the trees.
Glittered Bleached Bottlebrush Tree

While the trees were drying from their bleach bath ( rinse with plain water once you get the color you want), I made their bases by wrapping some wood spools with washi tape.

Washi Spools

When the trees were dry, I used a spray adhesive (Elmers) and silver and iridescent glitter. Spray, sprinkle, turn, repeat.  Then hot glued them to my spools.

Natural Bottlebrush Trees


Bleached Bottlebrush Tree Closeup

They’ll likely end up on my mantle but since I’m a diehard about not decorating for Christmas before Thanksgiving , I haven’t totally decided yet.

Sharing At: 


Sunday, February 24, 2013

Mr. Chocolate's Birthday: Altered Cigar Box

Altered Cigar Box

Mr. Chocolate recently had a birthday and I made him an altered cigar box as part of his gift. He actually contributed to his own present because one day he came back from Total Wine with a bunch of cigar boxes he’d found there for $1.50 ea. I was thrilled since when I’ve tried to buy these at different places they’ve been anywhere from $5-$10 ea. Ridic.


Cigar Box

Here’s my “before” cigar box. Can’t stand the smell of cigars, but love the boxes. Luckily the empty boxes don’t smell.  I panted the edges of my box in black and then Mod Podged coordinating papers onto the box.

Mod Podged Cigar Box

I used a different paper for the inside of the lid.

Cigar Box Lid

And went around the edges with coordinating washi tape. I wanted a vintage 1920’s feel and was thrilled when I found this Susan Lenart Kazmer antique license plate pendant on sale for $2.99 at Michaels.

Susan Lenart Kazmer Pendant

I loved it as it was but wanted it to coordinate better with my color scheme so painted it with black acrylic paint and then went over it with silver Rub n Buff .

Altered Cigar Box Top

I stamped an antique car and sentiment (Tim Holtz) onto a torn dictionary page and distressed it with Ranger Distress inks. Mod Podged that onto the lid and added some coordinating chipboard stickers I’d found at Michaels (Recollections). Added a watch charm I’d also found at Michaels.

Altered Cigar Box Top

Altered Cigar Box Corner

I’ll share the other parts of his present in an upcoming post.


Monday, December 3, 2012

DIY Vintage(d) Tree Topper: Scrapbook Paper, Glitter, and Paint

Vintage(d) Tree Topper

I decided when I took down last year’s tree that I wanted a new tree topper. I’d been using big ribbon bows but they were looking a little tired. We get a real tree, and nature does not always provide that perfect branch at the top for most of the vintage or vintage inspired glass  toppers I like. So natch, I made my own !

For this project you will need:
  • Paper mache cone
  • Craft paints ( I used a Sterling Silver and Sterling Silver Glitter)
  • One 12x12 sheet of scrapbook paper
  • Oversized bottle cap ( you could also use a jar lid)
  • Paper cut to fit inside your cap
  • Focal point ( I used a vintage looking brass sticker)
  • Glue Gun
  • Glitter
I painted my paper mache with a couple coats of silver metallic, then went over that with a couple of coats of the silver glitter paint.

Before and After Metallic Cone

In between coats of paint, make the medallion that is the centerpiece of this tree topper. Cut one 12x12 page of scrapbook paper into 4 6x6 sections. I used a sheet music page from Recollections and made one inch score marks using my Martha Stewart scoring board.

Martha Stewart Scoring Board

Once you’ve scored and folded each of your sections, hot glue them together. Since the paper I used was pretty heavy I used hot glue vs tape.

Paper Medallion

Then I took a small paintbrush , thick glue, and silver glitter and made my way around my medallion until it was edged.

Glitter Edged Medallion

I had some giant bottle caps in my stash but a small jar lid would work for this too. Cut a circle of silver glitter paper to fit inside, Mod Podged it in there, and then added an embossed brass colored sticker to the middle. The one I used is by K&Co.

Giant Bottle Cap

I hot glued a silver tinsel pipe cleaner around the inside edge. I had some silver glittered snowflake pics from my after Christmas deal scrounging last year so pulled on out, stuck it through the top of my cone and added a dab of hot glue to keep it in place. Glued  my completed medallion on to my cone and done.


Vintage(d) Tree Topper

Vintage(d) Tree Topper

Sharing At: