Wednesday, September 12, 2012

Planning a Party? Great Giveaway from Etsy Shop pick.print.party!

Hi everyone. I'm very excited to introduce you to a fun new Etsy shop called pick.print.party


It’s run by a super sweet couple named Lee and Rebecca and they have an awesome assortment of party related goodies which as their shop name suggests is as easy as picking, printing, and partying.  Here’s how it works:

1. Pick and purchase your preferred design
2. When ordering, include the details to be customized (you'll see the details on the details in their shop)
3. When ordering, choose your format:
PDF (two invites to a page) – suggested for home printing
JPEG – suggested for professional printing (Target, Costco, etc…)
That’s it!

With Halloween upon us. the have some perfect invites for your ghoulish gatherings like:

Halloween Bash Invitation - DIY - Printable

and they have  many other cool items to choose from. If you’ve got a birthday party coming up, they’ve got you covered. I love this black and white polka dot background birthday invite which would be great for a teen or adult party,
Birthday Party Invitation Butterfly - Polka Dot - DIY - Printable

but if you’re looking for fun for the little ones, they’ve got those too:

Little Monster Birthday Invitation - DIY - Printable

or how about this one for a little girl that makes me want to ride the teacups at Disneyland!

Alice in Wonderland Very Merry Un-Birthday Theme Party Invitation - DIY - Printable

So much more, and as still newlyweds themselves , they’ve got wedding planning couples covered too. Many of their designs also come in coordinated sets, and they are adding new designs all the time.

Now for the best part. pick.print.party is offering one of my readers the chance to win a $25 gift certificate to their shop!

Here's how to enter
a Rafflecopter giveaway


You have five chances to win. The giveaway will remain open through Sept. 19 with the winner announced on Sept. 20.

Good luck!


Monday, September 10, 2012

Fashion Trend: DIY Shamballa Bracelets

DIY Shamballa

I’ve been on a jewelry making bender lately. Don’t worry paper, I still love you so much, and Fall and Winter is when I tend to get my glitter on, but right now it’s a bead thing.

Have you Shamballa’d? 
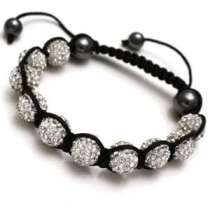
Shamballa bracelets have their origin in Tibetan Buddhism but they have become a very popular fashion accessory. Here's what one looks like:

shamballa bracelet
Like every other fashion trend, they range from the high end in the thousands of dollars, to where people like you and I come in…knocking them off at a fraction of the price.

The core of the Shamballa bracelet is a macrame square knot. I just love the look of them. And so did Mr. Chocolate who had the nerve to tell me he thought it looked too hard for me to make.

Of course that meant it was ON. I was planning to try to make one already,  but there’s nothing like a little competitive incentive am I right?

Shamballa Bracelets

The one on the left I used moonstone and a charcoal crystal bead in the middle and waxed cotton cord by Bead Landing from Michaels; the one on the right I used these kind of foiled / dusted silver beads and a thicker twisted Bead Landing cord.

The square knots you see in the middle are actually a type of sliding clasp and the ends with beads slide within the knots to tighten / loosen the bracelet so you can get it on and off.

There are tons of videos out there so I will not try to teach the knotting technique. I used a three part series from Beadaholique. You can find them all on You Tube and the first one is here: Shamballa Bracelet Pt 1. There are several other videos on You Tube so you can easily find one that works with your learning style.

The most important thing is to make sure the beads you choose have holes big enough for the cording you choose.  You can use hemp, leather, waxed cotton cord, whatever you want.

The other tip I’ll share is to glue your knots before you cut the ends of your cord. For this I like the original drippy kind of super glue. For other projects I prefer the gel kind for more control ( and less likelihood of gluing my fingers together) but you want this to seep into the knots. 

The supplies you’ll need are:
  • Beads of choice
  • Cord of choice
  • Super glue
  • A little patience to get the knot technique
So here is the inspiration for what Mr. Chocolate wanted:


$550 David Yurman . Uh No. He also didn’t want the double strand.

Here’s what he got:

Shamballa Knock Off

He even went with me to Michaels and picked out the beads ( that’s a whole nother blog post!). Lava rock and silver.
Shamballa Lava Rock

He also didn’t want the long dangly ends ( picky customer!). It might not be David Yurman but it also wasn’t $550! The most expensive item was the 250 feet of cording for which of course I used a 40% off coupon. Total cost was less than $20 with cord and beads left over for other projects.

Sharing At: 


BFF Open House Link Party #69 Wrap Up and Features

Fall is definitely in the air both in real life and blog life. In just a week, I’ve noticed our leaves starting to turn into those vibrant golds and oranges that only come with fall. I hope you all enjoyed meeting Marcie from I Gotta Try That. Her Halloween series continues.

This week’s party had so many great Fall and Halloween ideas. Here are just a few!


Check out this mirrored pumpkin from Closet Crafter Ohio. What an elegant way to update your Fall Décor from now all the way through Thanksgiving.

I adore this necklace from Rena at Jewelry making Journal. She calls it “A Love Letter From Autumn” which is so perfect since it involves a Fall themed postage stamp:

postage stamp jewelry tutorial by Rena Klingenberg

I love how Sarah at Alderberry Hill went glam on this addition to her Halloween décor: 


Mich in LA has a gorgeous nature inspired bracelet that she came up with as a perfect addition for a Halloween costume appropriate for any elf, fairy, or mother nature themed idea. I think smaller versions of these would make wonderful napkin rings.


I just got a huge catalog in the mail from Restoration Hardware and before I even had a chance to peek at it, Rachel at Holy Craft shared this awesome knock off that she did for $5 vs the $550 RHW wants for it! I like Rachel’s price and hers looks every bit as incredible as the inspiration piece!


And finally, I think I am going to have to try a batch of these to send to College Boy. Check out these Monster Cookie Dough Truffles from Mommy’s Sweet Confessions:


This is definitely one kind of Monster that wouldn’t scare me! Thanks to everyone who linked up as always. Make it a creative week!

Thursday, September 6, 2012

BFF Open House Link Party #69 and BFF "I Gotta Try That"

Welcome to the first link party of September! Time is just going to speed up (even faster) from here on out. Now that Summer’s done, I’m going to bring back the blog feature part of the BFF Open House, so let’s get right to it. This week’s BFF is Marcie from I Gotta Try That.  Marcie is a mom of five and a grandmother of six soon to be seven and believe me, you would NEVER guess that from her profile pic. She loves to create and when she see's something, well you get where the name of her blog comes from:

I Gotta Try That

I’m totally getting in the mood for Halloween and Marcie has got a fantastic series going right now so if you’re looking for some inspiration, she’s got you covered. Let’s start with this easy and inexpensive Swamp Slime Martini.


Non-alcoholic and totally fun.

Or how about this “Wicked” glow in the dark tutu Trick or Treat bag! Complete with legs!


And this super easy but perfectly spooky Skeleton Frame. Love!


I hope you’ll go share some bloggy love with Marcie.

Now, let’s get to this week’s party!

link party rules-001

Tuesday, September 4, 2012

Easiest Jewelry Project Ever: Industrial Chic Watch Gear Ring

Watch Part Ring

OK this was one of those projects that was so easy to make I’m embarrassed. On the other hand, it wasn’t something I thought of until I saw similar pieces in a museum gift shop. So total knock off, but easy knock off and at a fraction of the price!

I have this bag o watch parts in my stash . I picked up the parts and an equal amount of watch part containers at a street fair and have used pieces in several projects.

Watch Parts

For this project you need the “guts” or gear of a watch, a ring form, and glue.

Liquid Fusion

I like this Liquid Fusion clear urethane glue because it has no odor and is very strong. The ring form by Plaid, I picked up at Jo Ann’s on sale.

Here are the really complicated instructions. Glue watch part to ring form. OK I left out one step. Pull off the winder thingy first.

Watch Part Ring

I’m sure you can find spare watch parts on Etsy or flea markets.

Sharing At: 


Monday, September 3, 2012

BFF Open House Link Party #68 Wrap Up and Features

Thanks everyone for a great party last week. Creativity is boundless in the blogosphere. Here are just a few ideas that caught my eye.


Marty, from Marty’s Musings shared a lovely way to collect and display cards for her daughter’s wedding. This could adapted for birthdays, anniversaries, graduations etc.


Janet, from Janet of All Trades, shared this fun bracelet idea.


Danni, from Silo Hill Farm, showed how to make a cute Fall Subway Art sign using scrapbooking stickers.


There were also several chocolate confections. Like these amazing looking cupcakes from Mommy’s Sweet Confessions

Or this incredible cake from Back for Seconds:

How adorable is this?!

Thanks everyone who linked up and for choosing to share your creativity here at The Answer Is Chocolate. Make it a creative week!

Saturday, September 1, 2012

Decor Craft: Numbers, Time Pieces, and Mod Podge

Numbers , Time, Mod Podge

You can still link up to this week’s BFF Open House here.

I thought I’d share a little something I made to commemorate our Anniversary. We both love clocks, time pieces, etc. For Mother’s Day this year we went to a local flea market where I found an antique pocket watch casing but hadn’t decided what I wanted to do with it. Then this idea came to me when I picked up some of this numbers paper by Recollections at Michaels recently.

Recollections Number Paper

I had some  Tim Holtz time piece and gear pieces in my stash, and Mr. C gave me a couple of wood discs ( I have no idea what they are) he found in his den. Add to that an MDF plaque from stash and another piece of scrap paper.

Mod Podge Recollections Numbers Paper

I traced the plaque and disc on the papers and cut out. Then applied with Mod Podge and sanded the edges when dry.
Cricut Damask Decor

I liked the design I used from the Damask Décor Cricut Cartridge on my upcycled cheese box so I cut another one out of chocolate brown vinyl.  I antiqued both the paper covered disc and the plaque with Ranger Distress  Inks:

Ranger Distress Inks

and edged the wooden disc with some aluminum tape. Once the paper pieces were done, I glued all my watch pieces together with E-6000.

Tim Holtz Time Pieces

I’d debated whether to use the inside or back of the pocket watch casing and decided to go with the back. So glued the time pieces together then glued to the casing , then glued to the disc.

Repurposed Pocket Watch

Me, being me, I had to add a rhinestone in the middle as the final touch! Gotta have bling!

Numbers, Vinyl, Pocket Watch

The most expensive piece of this was the pocket watch casing…$10 which I still don’t know if that was a good deal or not, but it’s silver and it spoke to me, and so there.

The Tim Holtz sets are around $5 or $6 each ( of course I buy these w/ 40% coupons!) and you get several projects out of them. The MDF frame I got at Ben Franklin for $1.99 and the rest of the stuff I had. Oh the Recollections paper was 4 for $1 on sale at Michaels.

The 21 years of memories that this project represents? Priceless.

Sharing At: