Showing posts with label Recollections Paper. Show all posts

Sunday, December 12, 2021

Christmas 2021 Cards


This week's party continues here.

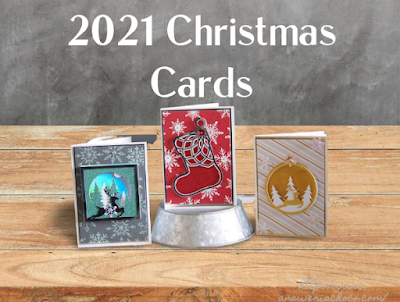
I had maybe the most fun I've ever had with making Christmas cards this year. I've really focused on learning how to work with layered cut files and while I am still a novice at making my own, I almost don't need to ( except for my innate stubborn nature and wanting to do "all the things" ) with all of the amazing files that are out there. For these, I used files from Creative Fabrica and Sweet Red Poppy 

Disclosure: I am a Creative Fabrica affiliate so I do get a small benefit if you order through my link

Supplies:

  • Christmas Scrapbook Papers (I used various packages from Michaels)
  • Foiled Cardstock (Recollections, Michaels)
  • White 110lb Cardstock (Recollections, Michaels)
  • Foam Squares / Tape (Dollar Tree)
  • Coordinating Sequins, Glue, Tape Runner
I used a combination of papers I already had and ones I got new this year because I'm a paper addict and Michaels keeps coming out with gorgeous papers and when they have their buy one get 2 free Hot Buys can you blame me?! 

This year I added White Christmas
and this week (12/12-12/18) they're on sale for $4.99 each!!! Hmmm...

I can never decide on just one style both because the papers are too inspiring and the cutting files too plentiful. So I did some with silver as the primary, some with gold, and some red. 


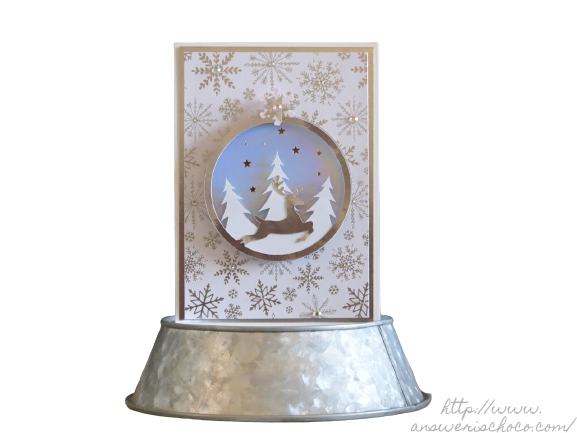
I'm also having fun playing with a great site called Designify I learned about from Abbi Kirsten, one of my favorite designers, who taught a workshop I attended called The Magic of SVGs and showed how to easily remove backgrounds from photos. Basic use of the site is free ( you can pay to upgrade ) and includes some backgrounds like the one I used in the focal image. 2021 was supposed to be the year I really focused on skills but it had other plans and distractions and I'm glad to be able to get back to it. 2022...don't get any ideas! 


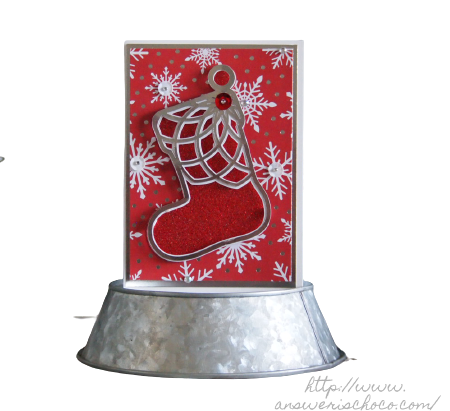
For the red cards, I used papers from last year's Hot Buys: Christmas Red and White.


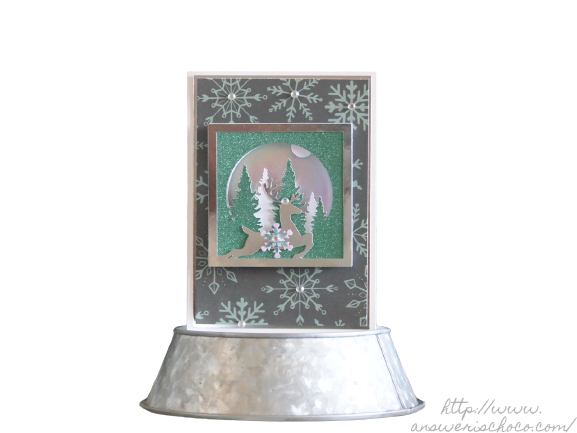
I imported, sized, and cut my images using Cricut Design Space and my Cricut Explore 2, and then layered them using foam squares and foam tape then finished them by adding adhesive rhinestones and coordinating sequins. 


Cardmaking remains my first crafting love! 


Monday, August 2, 2021

Papercrafting: More Cards For Box Of Balloons !


I wrote in May about an organization called Box Of Balloons that works to ensure that children get to be celebrated on their birthdays. They were then partnering with several of my local Starbucks locations to collect cards, wrapping, decorations etc. and as a Cardmaker and a Mom, it was right up my alley. I did it for the sheer joy of combining those two loves and because I want every child to know the feeling of being special on their birthday. 

I was honored and humbled to receive the following email from the local chapter President, Amy:

"I'm so impressed with your handmade cards and gift tags and wanted to say THANK YOU so much for your wonderful donation.

I've been putting a card and gift tag in each birthday box I've been creating and it adds such a personal touch to each box. Thank you so much for donating these as I'm sure they took a lot of time and energy to create. They're so beautiful and made so well and I'm just blown away and grateful :) "


I was thrilled they were happy and would be put to use and immediately planned on making more! As I've written about (probably ad nauseum!) June was a bust for creating between prepping for a planned move and spending an unplanned week in the hospital. So once things had settled ( somewhat...life is life!) in July, I wanted to get back to it and on Saturday dropped another three dozen cards in the mail! 

Supplies:

  • Birthday Themed Papers (American Crafts, The Color of Memories Collection from JoAnn and Happy Cake Day stack by Recollections from Michaels)
  • Cardstock
  • Birthday Themed Washi Tape ( Park Lane, JoAnn) 
  • Glitter Papers ( Recollections, Michaels) 


 This time around I used some American Crafts birthday themed papers I found at JoAnn along with some Park Lane birthday themed washi tape I scooped up on sale there. 


Like some of the sheets from the Recollections "Cake Day" stack, this sheet had panels I cut up to use as the focal for the cards, matting each with coordinating glitter papers. The washi tape coordinated perfectly with the colors (and it didn't hurt that it was an additional 50% off clearance). 


The Balloon background paper is from the same American Crafts collection. I kept things simple, matting the image on glitter paper, then another coordinating paper ( great way to use scraps) and attaching to the card with foam squares. 


Since I still had plenty of papers from the "Happy Cake Day" stack I previously used (and may or may not have bought another stack when Michaels had another buy one get two free Hot Buy sale which is my kryptonite) I made some more using those. 


Unintentionally, I usually make my cards in a portrait vs landscape orientation...no reason...just do...but since these panels didn't lend themselves to that, made some that way too. 


It's very fulfilling to feel like doing something you absolutely love can make a difference. Especially now. Especially in a child's life! 


Monday, January 28, 2019

Baby Boy Cards


I made a couple of cards this weekend to congratulate new parents and grandparents on the arrival of a new bundle of joy. I decided to keep things fairly monochromatic in hues of blue . 

Supplies Used: 
  • White Cardstock (Recollections, Michaels 110 lb)
  • Pale Blue 12x12 Glitter Paper ( Recollections, Michaels,  Holiday Glitz and Glitter Stack)
  • Light and Medium Blue 12x12 Cardstock (Craft Smith, Michaels Blues Stack) 
  • Baby Boy cut file (Silhouette Online Store Design ID #17765)
  • Onesie cut file (Silhouette Online Store Design ID # 59708


Misc: 
  • Gold paper scrap
  • Heart punch
  • Washi Tape
  • Adhesive ( I live for my tape gun)
  • Paper Cutter
  • Silhouette Cameo 3
  • Foam tape
Instructions: 
  • Using paper cutter, cut and score white cardstock to 5x7  card
  • Cut blue glitter paper panel to 4.75 x 6.75
  • Cut pale blue cardstock to 4.25 x 6.25
  • Layer glitter and pale blue panels as shown. 
  • Add washi tape to opposite corners as shown
  • Download, size, cut "Baby Boy" and "Onesie" images. 
  • I cut sets of images from the glitter paper and from the medium blue paper. I like giving images a little bit of a shadow by layering them. I find this gives them some depth. 
  • Mount cut  images to card panels using foam tape
  • Punch heart from gold scrap and mount to center of onesie


I made matching panels for the inside of the card but forgot to take a pic when they were blank. You can see a little peeking out from the card that's laying down. 


Saturday, October 28, 2017

Anatomy of a Halloween Card


This week's party continues here.

For my Halloween cards this year, I went with a color palette of black, purple, silver and gold and for my focal, used an image from The Hungry JPEG. 


I printed the image on photo paper and then trimmed to the size I wanted. I used a stamping technique called masking, where you closely trim a copy of your image, lay it over top of an image you want to color, and then apply ink so you color everything but your focal image. 


The image on the left is the one I want to color ; the one on the right is my trimmed mask. 


I used a purple ink and then randomly applied a black ink to my image. Once I was happy with my inking, I randomly sprinkled some gold embossing powder and used my heat gun to set the embossing powder. 


Once I had all my focal images done, I mounted them to purple glitter paper and then silver glitter paper. 


To make the cards, I used black metallic card stock cut to 5x7, and papers from a Recollections paper stack I'd picked up a couple of years ago at Michaels. Ironically, I didn't use it at the time but knew I would sometime!


I accented with a Halloween washi tape and a spider punched from scraps of the silver glitter paper. 

For the interior of the card, I digitally colored one of my hand drawn doodles to match my color palette,, bordered and layered the image onto a black and white background paper in PicMonkey and then added some text: 


As always, I have scraps of paper I can't bear to part with so I used those to make some tags I sent to friends to use for their treats etc. 


Saturday, September 29, 2012

Altered Skeleton Bottle

Altered Skeleton Bottle

I’m always excited when Mr. Chocolate decides to try a new adult beverage because he always chooses stuff that comes in the coolest bottles and eventually they’ll be mine all mine mwaaaaaaaaahhhhhh.

I had fun last year making “Pick Your Poison” altered bottles, that I wanted to make another one.
I started with this empty bottle:

Altered Bottle Blank

appropriately called Mischief.

I was going to use the paper you see underneath it then I decided to use this paper instead:

P9266492

Fishnet! Yes, fishnet paper. I thought it screamed Halloween. Measured around my bottle, cut the paper and applied to the bottle with Matte finish Mod Podge, then tore some strips of black and white damask paper and slapped that on with the MP.

Fishnet and Damask Bottle

Once that was dry, I cut out a circle from the All Hallow’s Eve scrapbook paper shown here, applied it to the bottle with Antique Matte Mod Podge, then applied a rhinestone circle sticker.

Blingy Halloween Bottle

I had a skeleton head left over from my coffin boxes and decided it would make a great bottle topper. First I wrapped the bottle neck with black and white baker’s twine, then kind of zig zag wraped black ribbon on top of that:
Skully Head Bottle

I also had some spider web paper left over from my coffin boxes so I made a pleated pinwheel to make a collar for Mr. Skully Head.

Skully Head Bottle

Carrying on my propensity to pun, I added a key from a package of Tim Holtz keys…a Skeleton Key .I crack me up.
Skully Bottle

Sharing At:


Saturday, September 1, 2012

Decor Craft: Numbers, Time Pieces, and Mod Podge

Numbers , Time, Mod Podge

You can still link up to this week’s BFF Open House here.

I thought I’d share a little something I made to commemorate our Anniversary. We both love clocks, time pieces, etc. For Mother’s Day this year we went to a local flea market where I found an antique pocket watch casing but hadn’t decided what I wanted to do with it. Then this idea came to me when I picked up some of this numbers paper by Recollections at Michaels recently.

Recollections Number Paper

I had some  Tim Holtz time piece and gear pieces in my stash, and Mr. C gave me a couple of wood discs ( I have no idea what they are) he found in his den. Add to that an MDF plaque from stash and another piece of scrap paper.

Mod Podge Recollections Numbers Paper

I traced the plaque and disc on the papers and cut out. Then applied with Mod Podge and sanded the edges when dry.
Cricut Damask Decor

I liked the design I used from the Damask Décor Cricut Cartridge on my upcycled cheese box so I cut another one out of chocolate brown vinyl.  I antiqued both the paper covered disc and the plaque with Ranger Distress  Inks:

Ranger Distress Inks

and edged the wooden disc with some aluminum tape. Once the paper pieces were done, I glued all my watch pieces together with E-6000.

Tim Holtz Time Pieces

I’d debated whether to use the inside or back of the pocket watch casing and decided to go with the back. So glued the time pieces together then glued to the casing , then glued to the disc.

Repurposed Pocket Watch

Me, being me, I had to add a rhinestone in the middle as the final touch! Gotta have bling!

Numbers, Vinyl, Pocket Watch

The most expensive piece of this was the pocket watch casing…$10 which I still don’t know if that was a good deal or not, but it’s silver and it spoke to me, and so there.

The Tim Holtz sets are around $5 or $6 each ( of course I buy these w/ 40% coupons!) and you get several projects out of them. The MDF frame I got at Ben Franklin for $1.99 and the rest of the stuff I had. Oh the Recollections paper was 4 for $1 on sale at Michaels.

The 21 years of memories that this project represents? Priceless.

Sharing At: