Showing posts with label Plaid. Show all posts

Wednesday, February 4, 2015

Valentine's Day Easy Heart Canvas


Valentine Canvas Bling Arrow

I had some of the jeweled adhesive left over from my Valentine letters and even a little goes a long way. I had a canvas in my stash and made this piece to add to my mantel.
For this project you will need:
  • Framed canvas
  • Craft Paints (  I used Folk Art Acrylics Spring White, Hologram, Sequin Silver)
  • Washi or other low tack tape
  • Clear Contact paper
  • Glitter glue
  • Craft foil
  • DCWV Self Adhesive Jewels

Valentine Canvas

To start, paint canvas white (Folk Art Spring White). When dry, tape off and then paint with white glitter paint ( Folk Art Hologram).  When dry remove tape.

Folk Art Glitter Paints

Using clear contact paper ( thank you Dollar Tree!) cut a heart stencil, apply, and paint heart with a couple layers of Sequin Silver.

Valentine Canvas Contact Paper Stencil

Once the heart was dry I “distressed” the canvas using craft foil. The paint was still tacky enough to pick up the foil so I just laid it down and scribbled randomly. Where it took it took since I wasn’t going for complete coverage.

Valentine Canvas Foil

To finish, I cut an arrow from leftover pieces of Jeweled Adhesive. I just did this freehand using the grid lines on the adhesive as a guide. Embellish with dots of glitter glue and done!

Valentine Canvas Foil


Valentine Canvas Bling Arrow

Hugs and Kisses Sig

Monday, July 7, 2014

Mod Podge Collage Clay : Embellish EVERYTHING But I Did A Vase

Collage Clay Black and White Vase

If you are a reader of my blog, you know how much I love Mod Podge. Well the folks at Plaid just keep adding to the line of already fabulous Mod Podge products and I was so excited to have the opportunity to play with some of the newest. You may have seen these already at Michaels. Mod Podge Collage Clay, Mod Molds and Mod Melts.

Disclaimer: Plaid provided the products for this post at no cost to me. Project idea and opinions are my own.

Here are the goodies I got to play with:

Mod Podge Decoden Supplies

The Collage Clay comes in a tube that looks like frosting, including the tips you use to pipe on the clay so  Collage Clay is not recommended for children ages 12 and under, and the product is not edible. Small parts are a choking hazard for children.” If you choose to show children involved in using the product, please make sure they are over 12 years old since the product is not recommended for children younger than this.
The clay can be painted after it's dry .

Collage Clay Decorating Tip

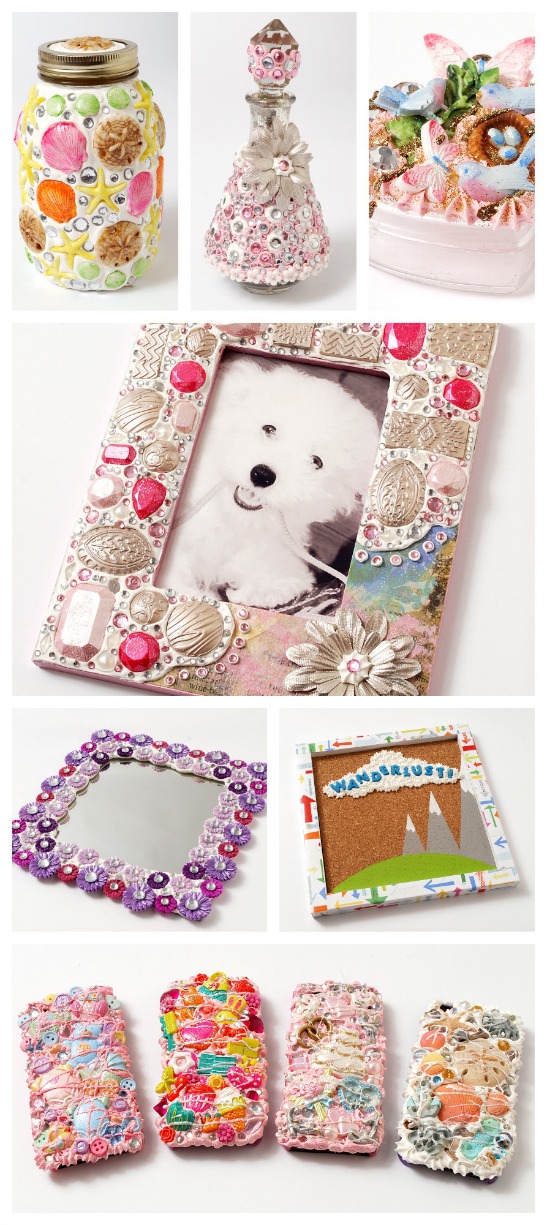
All of these products are great for a current trend called “Decoden” which is the art of decorating anything with trinkets, and "the more the merrier" is the name of the game in designing an over the top look in this 3D collage technique. Use Collage Clay with Mod Melts, trinkets, buttons, rhinestones, and anything else you can think of!

I decided to try my hand a decorating a vase. For this project you will need:
  • Plain glass vase
  • Vanilla Mod Podge Collage Clay
  • Mod Podge Melts Texture Mold
  • Mod Podge Melts ( gold)
  • Washi Tape
  • Rhinestones
  • Ribbon
I marked off a border using washi tape so I’d have a guide to apply my Collage Clay:

Collage Clay Vase

Using the tip shown above, I went around the vase making “dots” . It’s so much like cake decorating I’m sure you cake masters would love this!

Collage Clay Application


The iinstructions say you should let the clay dry anywhere from 1-5 days. I let mine dry for about 24 hours because I didn’t want it to be fully set when I applied some rhinestones . I also applied the Collage Clay to the bottom of the vase. Once dry, I removed the tape.

Mod Melt Mold Button

While my clay was drying I made the “buttons” using a gold Mod Melt stick ( you can run them through a high temp mini glue gun and filled the mold with the melted well, melt. It takes about 10 min to set and then pops right out of the silicone mold. Any little oops drips come right off of the silicone.

I dry brushed my buttons with white acrylic paint so the detail of the mold would really stand out.
Using some leftover ribbon I wrapped the vase and tied off as shown, then glued my “buttons” on.  The Collage Clay was set but not hardened so I was able to lightly press black rhinestones around the top.

Mod Podge Collage Clay Vase Top

You could make sets of these for centerpieces or just one standalone for fun. I had a lot of fun playing with the Collage Clay and the melts and can’t wait to do some more!

Mod Podge Clay Vase

Now who doesn’t love a chance to win something?


The folks at Plaid are giving you a chance to win your own set of these fun crafting goodies. Details are at their site here. You can also learn more about these and other fun Plaid  products here:

  • Check out The Plaid Palette blog: http://www.plaidonline.com/blog
  • Sign up for Plaid's newsletter: https://www.plaidonline.com/craft-newsletter-signup.aspx


  • Follow Plaid on Pinterest: http://www.pinterest.com/plaidcrafts
  • Like Plaid on Facebook: https://www.facebook.com/InspiredByPlaid
  • Follow Plaid on Instagram: http://instagram.com/plaidcrafts

  • Follow Plaid on Twitter: http://www.twitter.com/plaidcrafts
  • Watch Plaid on YouTube: http://www.youtube.com/plaidcrafts
  • Follow Plaid on Google+: http://plus.google.com/+PlaidOnline


Sharing At:


Here are what some other creative bloggers are doing:


Tuesday, September 4, 2012

Easiest Jewelry Project Ever: Industrial Chic Watch Gear Ring

Watch Part Ring

OK this was one of those projects that was so easy to make I’m embarrassed. On the other hand, it wasn’t something I thought of until I saw similar pieces in a museum gift shop. So total knock off, but easy knock off and at a fraction of the price!

I have this bag o watch parts in my stash . I picked up the parts and an equal amount of watch part containers at a street fair and have used pieces in several projects.

Watch Parts

For this project you need the “guts” or gear of a watch, a ring form, and glue.

Liquid Fusion

I like this Liquid Fusion clear urethane glue because it has no odor and is very strong. The ring form by Plaid, I picked up at Jo Ann’s on sale.

Here are the really complicated instructions. Glue watch part to ring form. OK I left out one step. Pull off the winder thingy first.

Watch Part Ring

I’m sure you can find spare watch parts on Etsy or flea markets.

Sharing At: 


Tuesday, June 26, 2012

Mod Podgeables Mixed Metal Necklace

Mod Podgeables Necklace

It is no secret that I’m a bit of a Mod Podge maniac. You might recall I recently shared the amazingly generous shipment of Mod Podge products from Plaid featuring some of the newest additions to the Mod Podge product line. In case you don’t here’s a refresher:

Mod Podge Haul 

I love making jewelry and I love bold, chunky jewelry but sometimes it can turn out heavier than I planned. 

Problem solved with  the new acrylic podgeable shapes,  podgeable papers and tracing templates that coordinate with the shapes of the podgeables. 

The hardest part was choosing which papers to use!

Podgeables Collage 3

I went with an “industrial chic” design, using papers from the Classic and Romance stacks. The papers are wonderful because they’re double sided so it’s like having two papers in one!

Necklace Mod Podgeables

I used my new favorite Mod Podge formula, Antique Matte, to adhere the papers to the podgeables. The tracing templates make it easy to cut your shapes exactly to match, and depending on your selection of punches, you may have some that are the perfect shape and size.

Place Trace Cut

Apply your MP to your paper, adhere to your podgeable and let dry.

While these pieces were drying, I had fun with the new metallic Dimensional Magic. If you’re afraid of trying resins, try Dimensional Magic. The metallic DM has little flecks of glitter that float in it.

I  had some charms in my stash that I filled with silver DM and self adhesive rhinestones. The DM comes out opaque and dries clear so the glitter shows through.

P6185326

Here are my charms as they were drying. 

Podgeables Collage

I had so much fun with this. With all of the formulas, there’s something for just about any kind of project you can think of.

I want to thank the folks at Plaid and The Blueprint Social for the opportunity to have so much fun doing what I enjoy with products I absolutely love. Sponsored post? Yes. Opinions? All mine!

Mixed Metal Podgeables Necklace

Plaid is celebrating the 45 anniversary of Mod Podge, and Michaels is carrying the new additions to the MP family. You can visit also Plaid on Facebook here and Twitter here.

And you can see more wonderful projects here

Sharing At: 


Tuesday, November 22, 2011

Plain Frame to Snowflake Tray Transformation with Martha Stewart and Plaid !

I recently had the opportunity to play with some of the Martha Stewart Craft paints and stencils from Plaid. I’m still swooning over the amazing selection of goodies Plaid sent me to work with. Work? No. PLAY!!!
Frame Tray
I have a surplus of frames and love using them for things other than well, framing things! I decided I needed a holiday tray.
PB163498
I started off with a plain frame:
Frame to Tray Transformation
Took out the glass and set it aside and then painted the inner portion of the frame with Sterling Glitter from Martha’s paint line. These paints are great because they are multi-surface and they go on everything. I love the glitter paints and you can get different effects depending on how you use them.
PB103469
For the inner portion of the frame  I used the Sterling on its own. For the red around the edges, I used a coat of the Satin finish (Habanero) and went over that with Garnet Glitter. This makes for a great opaque but sparkly combo!
Martha Stewart Pearl Paint
I cleaned the glass  frame and got out a snowflake stencil and used the Pearl finish for this. Right on the glass. No primer or additive. And I love the end result because it looks like etching. I covered the whole surface with snowflakes.
Stenciled Snowflake Tray (2)
After checking to make sure I was liking my progress by laying the glass on the frame, I forgot to take pictures as I finished up the red edging but you get the idea!
Snowflake Tray Corner
I think the silver glitter looks like frost which goes perfect with the snowflakes! For the legs of my tray, I used old thread spools painted with the Habanero / Garnet Glitter paints.

I  had so much fun with this that I had to do some other things . So I made a snowflake plate to go with my snowflake tray. Just a plain glass plate from Dollar Tree. I painted on the underside of the plate, again using the snowflake stencils.
Snowflake Plate Closeup
I used  the Pearl again, and a Satin paint called Wedding Cake for the snowflakes. The Wedding Cake shows up better in the pics but the Pearl has that etched look and we know no two snowflakes are alike right?

Stenciled these on the underside of the plate then when dry, went over them with the Sterling Glitter and around the rim of the plate with a couple coats of the Sterling Metallic. Went over the Sterling Glitter with Metallic Yellow Gold.
Snowflake Tray and Martha Paints
And I still couldn’t stop so I had to play with a mug I picked up at Dollar Tree because now I have a treat  plate on a tray and of course I’m going to need something to drink!
PB163495PB163497
The “25” is for December 25 ( hubs didn’t get it so just in case) . I made my own stencil from contact paper because I wanted it big and then used the Habanero Satin and Garnet Glitter paints for the numbers and on the handle.

I kinda boo boo’d so I outlined the numbers with gold paint pen and then freehand added some dots. And did I mention that you can bake these in your oven if you don’t want to wait 21 days for the paint to cure and then the paint is dishwasher safe?

While the wonderful folks at Plaid provided the amazing Martha Stewart supplies used, the opinions are 100% my own and these are products  I will definitely be buying more of!
Martha Stewart Paints

PB163513

Sharing At:
Photobucket
homework
A Crafty Soiree