Showing posts sorted by relevance for query cabinet. Sort by date Show all posts

Monday, August 14, 2017

Another Altered Cabinet Door: NEST Sign


I mentioned in an earlier post how I love using cabinet doors for projects. I usually find mine at a local architectural salvage place and got this one along with a previous one for a donation of $5 ( for both) to Habitat for Humanity. 

We have a lot of blank wall space which I don't actually mind, but it's also great for when an idea does hit because  I haven't had to take something else down. This will hang in our TV watching area where we end up spending a fair amount of our time .  This is where I find out all of the latest intrigue on "Game of Thrones", say goodbye to my Sestras on "Orphan Black", see who's up to what on "Scandal" and "How to Get Away With Murder" and Netflix and chill.

We also read here when the TV's not on. We're homebodies so the them of "Nest" seemed appropriate.

Supplies: 
  • Salvaged Cabinet Door
  • Acrylic Paints
  • White School Glue
  • Printed Tissue Paper (Recollections)
  • Mod Podge
  • Adhesive Foil (I used Cricut Gold Metallic)
  • Scrabbook Paper (C'oredinations Cream and Black) 
  • Misc Embellishments
  • Die Cut and/or Electronic Cutting Machine (Silhouette and Cuttlebug)


The wooden wings will be part of another post but I took a pic of the unfinished cabinet door with them so more on that later in the week. 


I painted the "frame" of the door with black acrylic paint (I used Craftsmart). Taped off the edges and then painted the interior with cream acrylic paint. 


I didn't worry about complete coverage of the interior because I knew I'd be putting the tissue paper here.  Cut the tissue paper to size and then apply using Mod Podge. 

Measured out my tissue paper before I painted
Using my favorite white glue technique, I crackled the frame of the door. Basically paint a layer of glue ; let dry until tacky but not completely dry ; paint over w/ contrasting color. 

Tip: You want to use long even strokes and go in one direction, not up and down. Back to School is the perfect time to stock up on cheap, white, glue! 


While that was drying, I laid out my design on my Silhouette Cameo, then cut the images and lettering using Cricut Gold Foil. 

Enter frustration. When I applied the foil pieces, the transfer tape pulled up the Mod Podged tissue paper in some spots. The nice thing about working w/ the tissue paper was that it was easy to tear some "matching" pieces and just repair those spots with a little more Mod Podge. 


I don't think you can really tell where I had to patch. I used my Cuttlebug to cut the flowers ( Tim Holtz Tattered Florals) rolled the edges and added rolled roses in the center. I rummaged around in my mismatched embellishment stash and found some swirly things ( technical term) that I painted to match and put on the nest image and the corners of the door. 


Friday, September 3, 2010

Stashbusting September Project #1

It's three days in and I haven't set foot in a craft store! Yeah me! That may also be because I haven't left the house but.....pesky details. I went to the closet of magical mystery and pulled out some stuff that I picked up to be used "someday".
ONLY THE TIP OF THE ICEBERG
I decided on a project using a cabinet door I picked up at a salvage place. Everyone keeps cabinet doors on hand for no reason right?
I had some vinyl left over from my "Wish Upon A Tray" project and the lightbulb went on. So I painted it black. The cabinet door. Not the lightbulb.
FIRST COAT
added a second coat and then tried the white glue crackle technique. "Make The Best of Things"  has a great tutorial on this. I will NEVER buy crackle medium again! Love this. Best part was that during school supply shopping, I bought a half dozen or so bottles of white glue at Staples for maybe $2 total. Less than the cost of a small thing of crackle medium.
SMEARED IT ON W/FINGERS
After it gets tacky but not dry, add another color of acrylic paint and wait for it to dry. Or not...I was not patient so used my craft dryer ( aka an old blow dryer) to speed things up and I can't be sure, but I think the heat made it crackle more:
I just did the edges so it would look like a frame if that makes sense. I added a couple of strips of scrapbook paper on the raised panel in the middle; used my "dream" vinyl leftover from my earlier project; added an embossed metal strip from the magical mystery closet (which means it was something I picked up on sale somewhere that I knew I'd use someday) along with some dimensional flowers (Jolee's Boutique I think) from another project which I dry brused w/ gold paint and silver Rub n Buff; and a butterfly from a bag of ephemera I'd bought at a stamp show. And: 
STASH BUSTED! OK, TINY DENT MADE!

You can check out the other projects in the T Shirt Diaries "Stashbusting September" challenge here

Linking Up At:
UndertheTableandDreaming All Thingz Related  

Sunday, June 20, 2010

Father's Day: Wall Art

I didn't put this up earlier because I didn't want you know who to see it before he got it. But now that he's got it ( and likes it) here's what I made Mr. C. for Father's Day:
I'd been wanting to try out Sabby in Suburbia's photo transfer tutorial, and when my husband found a photo of a favorite childhood memory, his favorite bike, I thought it would make the perfect subject to use.  I've had this cabinet door I found on an excursion to a magical place called  Earthwise Architectural Salvage in Seattle, which I knew I wanted to use for a piece of wall art. Originally I thought I was going to do something w/ chalkboard paint on it but I decided the wood was too pretty as is. 

I converted the photo to black and white in my photo editing program and printed on regular printer paper. Then using Sabby's tutorial, I covered a plain canvas board with Mod Podge ( I didn't even paint it...it was already primed and gesso'd) , stuck the photo to it printed side down ( remember to print any text mirror image!) and let it dry for 24 hours. Then wet the back of the paper and rubbed it off. I then added a scrap of scrapooking paper:


I then spelled out his name and the word bike with some pewter letters I had on hand and superglued them to the canvas. I really like how aged this looks. 

I didn't leave the cabinet door completely alone...that's not what we do is it?!  I cut a piece of scrapbook paper to fit the center panel and Mod Podge'd it on:


The sun  decided to make a rare appearance and mess up my picture, but you get the idea. And yay...another use for my still ginormous roll of carpet tape, which I used to adhere the canvas to the cabinet door.
Linking Up At:


All Thingz Related

Visit thecsiproject.com
UndertheTableandDreaming


Here's his card, using images from The Graphics Fairy along with a transparent frame from Colorbok's Nocturne collection.
Linking Up at:

Tuesday, July 12, 2022

Home Decor: Blending Traditional and Modern


 As I've mentioned, our new home is very modern. And while it would be fun to buy all new things, I live on a planet called Reality. Plus DIYing and making things over is what we do. Our prior homes have been more traditional and I wanted a way to make some pieces I still love fit in with this more modern aesthetic. Plus, it's better for the environment as well as the wallet to re-purpose right? These pieces were already thrifted finds I'd painted once so painting them again was no big deal. 


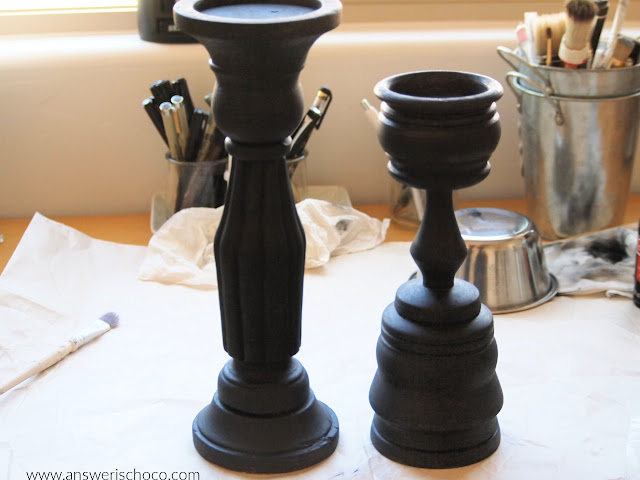
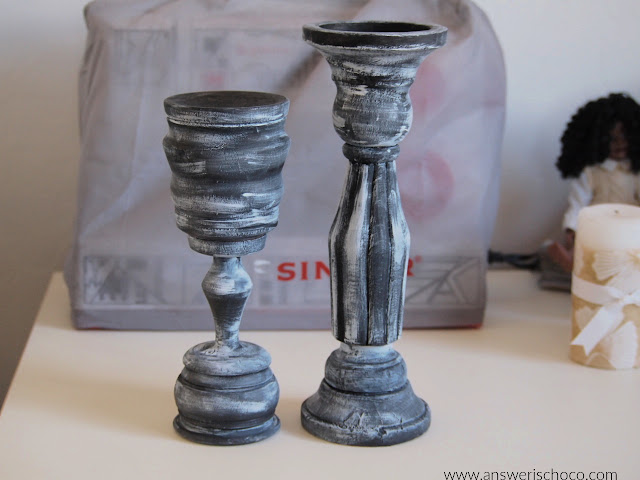
These were some candleholders I found several years ago at Goodwill. They didn't match so I painted them to match and painted them again! 


We have a lot of black accents in this house so I started by painting them with a couple of coats of black acrylic paint. I still love a vintage look so I didn't leave them solid, and dry brushed them with a little bit of white. 


To finish, I used Silver Leaf Rub N Buff to accent some of the raised areas to make them pop. Originally, I thought I'd re-do the candles too. They're decoupaged onto the candles but the powder room also has a wood cabinet and I decided I really liked how they went with it. 


I also knew I wanted to place a small table I'd also previously thrifted and painted. Again, I wanted to emphasize the black but again, I still like my vintage / distressed look. 


I originally painted it a light tan with white drybrush. I painted the legs solid black and  for the bottom did a crackle effect with white using my tried and true white glue crackle technique. 


I applied the same Rub N Buff around the edges of the top and shelf of the table. We had a Longaberger basket we bought years ago that matched the cabinet as well as a beautiful wood bowl from my husband's family that I thought would be perfectly displayed on this table, and the black captures the essence of the sink. 


I feel like the silver accents on the candleholders and table work well with our floors, the black and white with the sink, and the browns with the cabinet! We added a couple of black storage baskets from Target to hold extra supplies like toilet paper. I'm really happy with how it all came together mixing traditional and modern. 


Sharing At:


Sunday, February 19, 2017

For the Cost of a Donation: Upcycled Cabinet Door Tray


I dragged Mr. Chocolate to a flea market last month. It was held at an architectural salvage place in Seattle called Second Use. While the flea market didn't yield any treasures, a stroll through the Second Use Warehouse did. 

Of course Mr. Chocolate looked at the two cabinet doors and me like we were nuts. I'm used to it. He now loves the tray I made from one of the doors. All for the cost of a $5 donation to Habitat for Humanity. Two good things in one! 


This is what I started out with. I liked the panels and the way this door was framed. I mean I immediately saw a tray!  So I painted it with a white bisque acrylic paint. I didn't care about full coverage because I knew the look I was going for and it wouldn't matter. 

Back Side of Door

After my first coat was dry, I went over it with a coat of Espresso acrylic paint. Again, I didn't care that it was all streaky. In fact that was better. 


Then, using my tried and true glue crackle technique, I slathered on a thick coat of cheap white glue, let it dry until tacky, then went back over top with another coat of the Bisque White and watched the magic crackle process happen. 

Crackle Step 1 : Cover With Glue


One of my New Year's resolutions was to use things in my stash that I hadn't because I was hanging on to them for some irrational reason. So I pulled out a stencil that I'd never used and added some leaves using  Martha Stewart acrylic paint: Grey Wolf: 


To finish, I added a pair of door handles I picked up at Target ( the screws weren't long enough for the thickness of the door so I just glued on using extra strong glue) . 


The cup is one I painted at a paint your own pottery place. 

Not so crazy now am I Mr. Chocolate?