Monday, December 6, 2021

Christmas: DIY Acrylic Ornaments


I had so much fun with these easy to make ornaments! I found these plain acrylic disc ornaments at Michaels and they were a must get! They can be painted, papered, or as shown here, are the perfect surface for vinyl. 

Supplies:
  • Acrylic Disc Ornaments (Michaels)
  • Assorted Vinyl and Transfer Tape
  • Assorted Beads
  • Snowflake Ornament Hooks (Walmart)
  • Misc Jewelry Supplies (Jump Rings, Head Pins, Pliers)
  • Design
  • Digital Cutter (Cricut, Silhouette, etc. )


NOTE: This project assumes a digital cutting machine and familiarity with applying vinyl but you could use a die cutter to cut the images or cut images using an X-Acto knife. 


The ornaments come 18 pieces to a package. Regular price is $9.99 w/out sale or coupon. I used Cricut Glitter Vinyl and a metallic turquoise vinyl I had in my stash. The images I used were various ones I had in my collection. 

First step is to size your images to fit the ornaments. These are 3 inches in diameter so you want to size your image slightly smaller. Then cut and weed your vinyl. Set aside and prepare your surface. 


I used glass cleaner and paper towels but you could also use alcohol to clean them. You want to make sure you remove any residue plus you want a clean surface! Then apply the transfer tape and apply your image to the ornament. 


Once you've positioned your vinyl then use your scraping tool to apply. Remove transfer tape. Now it's time to embellish! 


I added some iridescent rhinestones to the trees on these, and some black ones on the gnome. 


I picked up these cute snowmen beads at JoAnn's when they were having a great sale. They were perfect for the turquoise. I also found these snowflake ornament hangers at Walmart. I wish I'd bought more! I strung the bead onto a head pin, closed, then  used a large jump ring to attach the ornament hanger to the ornament and a smaller jump ring to attach the bead. Same process for the others shown using coordinating beads. 


And there you are! 


One of my friends did a Krampus tree this year so I had to make her an ornament for it! 


Sharing At: 


Thursday, December 2, 2021

BFF Open House


Happy December everyone! The time crunch is ON! I hope everyone had a nice Thanksgiving and for those who began celebrating Hanukkah, hope it's been fun. It was just the two of us but I cooked like it was 20 of us only without the stress of what mood(s) guests would be in and not having to time cooking to drive, pick up relatives, cook, drive relatives home etc. It was freaking glorious. The halls are now all decked and full speed ahead until Christmas which will be wonderful this year because thanks to the pandemic last year, it was the first one we didn't spend with our son and he'll be here this year! Thank you 🎅🏾.

I don't know about you but the hardest part of this time of year for me is being busy making things that you can't post because they're gifts for people you don't want to see them! However, you can share them here so let's take a look at some ideas from last week's party ok?


If you're still looking for some fun decor projects, these Yarn Loop Trees from The Apple Street Cottage are easy and festive! And there are so many fun yarns to play with.


I love a good Dollar Store project and this Ornament Wreath from Life as a LEO Wife is pretty and easy on the budget. 


My blog is really about this next blog's perfect name: Makeable Crafts. Festive accent pillows can change the whole feel of a room. These are no exception! 


Finally, it's the time of year when dinner needs to be easily doable with everything else going on right? These French Dips from Homemade On A Weeknight are PERFECT for that! 

Alright all you Santa's Elves, let's see what you've been up to this week. 


You are invited to the Inlinkz link party!

Click here to enter

Thursday, November 25, 2021

BFF Open House Happy Thanksgiving


Happy Thanksgiving  all! By the time you see this you will have probably gobbled til you wobbled. Hope you all had a wonderful holiday. It's full speed ahead from here on out and keeping it simple this week with just the link-up and no features. Wishing everyone who will be celebrating Hanukkah starting this weekend much love, light, and latkes! I'm grateful for fellow creatives who choose to share your work and talents here each week! 


You are invited to the Inlinkz link party!

Click here to enter

Sunday, November 21, 2021

Christmas Decor: Layered Christmas Stocking


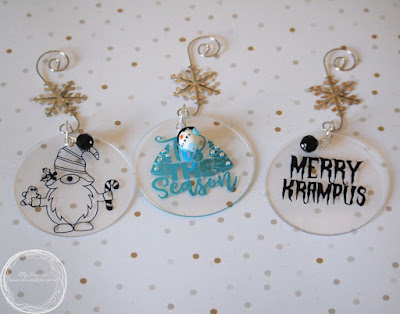
"It's the most wonderful of the year" also the busiest but definitely fun! As a Maker, it's definitely my favorite. And another favorite this making season continues to be layered cut files that so many Makers keep coming up with and sharing, I can hardly keep up! For this project I used one from a collection of Layered Ornaments from one of my favorite creators, Kimberly from Sweet Red Poppy. Whether you sew, do papercrafts or just love pretty things, you really need to check out her blog! 

NOTE: This project assumes familiarity with how to use your machine's software. 

Supplies: 
  • Layered SVG Files (I used the stocking from this collection by Sweet Red Poppy)
  • Cutting Machine (I used my Cricut Explore 2. These also work for Silhouette)
  • Gold Foil, Cream, Silver Glitter cardstock (All, Recollections from Michaels)
  • Background Paper ( I used sheets from the White Christmas stack, Michaels)
  • Display Case Frames (Michaels)
  • Foam Dots
  • Embellishments (I used Wood Stars from Dollar Tree)


For the smaller stocking, I used a silver display case frame from my stash. I pick these up whenever they're a buy one get one at Michaels. The 8x8 frames come 3 to a package and the 12x12 come two to a package so when they're a BOGO it's a great deal! For the 12x12, I thought I had silver but alas, no so to the craft paints! Here's where what some might call a craft fail, I prefer to call a happy accident! I took the frame apart since I was going to paint it. Set the glass and insert aside. 


You might think I used a crackle medium. Nope! I took out some silver chalk paint and apparently it's a wee bit old and had separated. Oops. I stirred and shook it but when I applied it it crackled itself! While I thought I was going to go with a solid silver finish, as I watched this happen I was actually quite happy. Ergo, happy accident! 


The next step was to prepare my layers. The stocking comes in five layers but I wanted it simpler so I hid two of the layers and used the ones shown sized to 6 inches tall for the smaller stocking and 10 inches for the larger. 


Once you've sized your layers, cut them on your machine. Here are my completed and cut layers. 


Once you have all of your layers assemble using foam dots/squares/tape. For the top layer I cut the squares in half to fit the more narrow border. 


Working from the back of your layers, place the foam squares around the cutout, then flip and attach to your base layer. Repeat with the top layer. 


The reason I only did three of the layers is because I'd chosen a star background paper and was excited to use these wood stars I found at the Dollar Tree ( once again..."why didn't I buy more of these?!") because I went back and gone, baby, gone. I put small drops of glue (Ranger, Glossy Accents) on the back and applied to the stockings as shown. 


Squeal! I instantly fell in love with this White Christmas Hot Buy stack at Michaels. This week (11/21-11/27) they're my favorite...buy one get two free so get thee to a Michaels if you are looking for some pretty holiday scrapbook paper. I chose the paper I wanted for my background and cut one sheet to fit the 8x8 and trimmed the other to fit the 12x12 and then adhered to the inside of the frame back using double sided tape. Then I adhered the stocking using more double sided tape and assembled the frames. 


I am so happy with how they turned out! The color combinations are endless. I am so addicted to these beautiful and intricate layered files. 


Sharing At 


Thursday, November 18, 2021

BFF Open House


Happy Friday Eve all! By this time next week we'll be stuffed like the turkeys many of us will have just consumed and busy in our workshops or online shopping because the final countdown to Christmas will have begun! Hanukkah starts the Sunday night of Thanksgiving weekend and comes early this year. Everybody panic and freak out! OK, no. Because WE'VE GOT THIS right? We're Creatives, Bakers, Holiday Gift Makers! We are Crafters and Cooks and our work will get looks! Are you fired up and ready to go? GOOD! Let's take a look at some ideas from last week's party! 


If you need one more EASY PEASY piece of decor for your Thanksgiving gathering, printables are the way to go and this one from Building Our Hive is perfect! You could do smaller sizes for each place setting even. And it's available in multiple colors! 


Another quick and easy idea for your Thanksgiving table are these Silverware Wraps from Satsuma Designs. These were designed with kids in mind but no reason they can't be for adults too right? 


I love Gnomes and they're everywhere, especially at Christmas. What's better than a No Sew Gnome?! Check out this one from Condo Blues


Finally, if you already have a chalkboard laying around or you're lucky enough like Lisa to find one at a thrift store, then this idea is for you. Fresh Vintage by Lisa S will show you how to stencil with more than one color to achieve this look! 

OK Chocoholics! We were made for this. Let's get to making!!


You are invited to the Inlinkz link party!

Click here to enter

Tuesday, November 16, 2021

Thanksgiving Decor: Gather Dollar Tree Sign


I know lots of people went straight from Halloween to Christmas decorating but I'm contrary and like having my Fall / Thanksgiving decor in between! No judgement...that's just me. I swear I'm going to end up owning every single one of these Dollar Tree signs but I can never pass them up! They're an easy way to decorate and easy to do whatever you want to them from paint to decoupage and many things in between. I decided to do this one in the palette I used for my Thanksgiving Cards

Supplies: 

  • Gather Sign (Dollar Tree)
  • Acrylic Paints in choice of colors. I used Delta Ceramcoat Mulberry and Craftsmart Bright Gold
  • Dimensional Glue. I used Ranger Glossy Accents
  • Craft Foil. I used Recollections from Michaels in Copper
  • Coordinating Sequins 


I always start these by painting the interior of the letters, then the edges, then the back and front. For me, it helps ensure I don't leave bare spots in the nooks and crannies!


These take paint really well so it only took one coat. Next I dry brushed with the gold. 


I really wanted just a hint of gold so I kept it very light. After that, I added some copper accents using the same foil I'd used for the interior sentiment of my cards. 


NOTE: I thought plain Elmers was going to be enough because I was going for a very light effect with the foil...kind of like a dry brush...it was not! So I brushed on some dimensional glue ( Ranger Glossy Accents ). You can put the foil down almost as soon as you brush it on and then I burnished with the handle of a pair of scissors. 


I grabbed some bright gold sequins along with the metallic brown ones I'd used for my cards and just randomly placed them using the same Glossy Accents. 


You can get a better feel for the copper in this pic. I layered the sequins, using the large gold ones and then smaller brown ones. 


Easy. Pretty, Inexpensive. Three of my Crafting food groups! 


Sharing At: