

Monday, April 4, 2011
Visiting At The Scrap Shoppe Today!
Congrats to my friend Michelle from The Scrap Shoppe who exactly one week ago today, added a new little boy to her family! She's a great planner aheader so while she's out on her "BML" (Bloggy Maternity Leave) she lined up several of us to guest post. Today's my turn so if you want to see "eggsactly" what I'm sharing, come on over to:
Saturday, April 2, 2011
Dollar Tree Washer Charm Bracelet Tutorial

I was honored when Bella invited me over to guest post! One of the things I love most about blogging is how supportive and helpful bloggers are to each other.


Washer Charm Bracelet
")
Like so many of us creative bloggers, I’d be lost without The Dollar Tree! I go there at least once a week just to walk the aisles and see what I might find. Last time I was there I found this pack of washers.

I had some chain on hand in my jewelry making stash:


I made sets of small, medium, and large based on the size of the washers, putting a jump ring on each:

Linking Up At:


I’ve Been Challenged to A Duel!

OK she didn’t actually, physically, smack my face…she’s way too cool for that. But she did challenge me! YIKES. Have you seen her creativity and her series on “Guess The Mystery Thing”? I hid under my bed.
When I emerged wearing my big girl pants, I agreed. I can take the public humiliation! That’s why there’s chocolate right?! This was actually the brainchild of another fun blogger, Michele from Michele Made Me ( there’s a theme!) . It’s called “Make It Good”

a two person, recycling craft challenge. The challenge rules can be found here but basically, you are issued a theme and a required element and the rest is up to you! Our theme was Industrial Architecture and the required element was…………bread tags! You know, those plastic square tags that keep your bread bags closed?
After almost giving in to chickening out, I started looking around at images of Industrial Architecture and kept coming back to old abandoned factories. So I found an image in my PrintShop Deluxe program that I thought I’d use. I also looked around my craft room and my eyes landed on an empty container in my stash along with some aluminum tape from the electrical aisle at the HW store.

I covered my bread tags in the aluminum tape because in my head they became “bricks” to go on my “building”.


For the box itself, I covered it first w/ white contact paper and I roughed it up a bit with an emery board to make it more Industrial. I went around the bottom half with some decorative tape I’ve used on other projects.
I applied some of the aluminum tape to a scrap piece of cardboard ( cereal box) and ran that through my Cuttlebug using Tim Holtz’ Texture Fades ( Dot Matrix and Gridlock) embossing folder. Tore pieces of that up and applied to the box.


I took the image from my PrintShop program and made it a negative and aged it. Printed it out, covered it with clear packing tape, added photo corners, and adhered to the container.
So there’s my Industrial Architecture Bread Tag Using challenge submission! And now for the scariest part.....I link here to Michelle's project and invite you to go visit. We’ll now await her, and your judgment!
Friday, April 1, 2011
BFF# 14: The Tattered Tag
Happy Friday and welcome to another :
 This week’s featured blogger is Christina from her blog The Tattered Tag:
 I love how she describes her blog so I’m going to let her do it:


this “making me hungry” cinnamon sugar bread. You will not guess what it’s baked in, so you’ll have to go visit Christina to find out!

The Tattered Tag is my reverie, allowing me to share my homespun charms (crafts) and reclaimed treasures (great junk) with the world because my husband will not allow me to keep it all to myself, stashed in our garage.
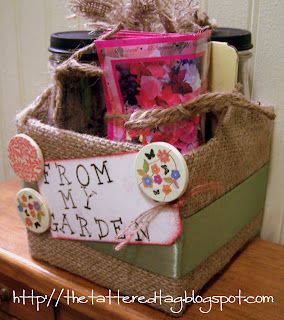
I can relate! She’s a busy lady, making and showing her own projects, running an Etsy shop, promoting other bloggers, hosting a weekly link partyShe’s so supportive and leaves the nicest comments for those who link up. But her own creations are also creative and equally thoughtful. Like this gift “basket” she put together from recycled coffee bottles and the container they came in:
Complete with seed packets and soil from her own garden. Oh yes, she gardens too!
Or this adorable upcycled cookie tin, transformed for Easter:
I share her love for taking simple found objects, transforming and incorporating them into her décor. Like this Autumn display she did:
for which I have to show two pictures. The daytime version which is lovely on its own and the nighttime version :
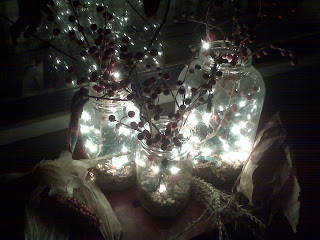
which is so quietly elegant. She’s also got a whole section of her blog devoted to baking and cooking where she blends her craftiness with delicious concoctions like: this “making me hungry” cinnamon sugar bread. You will not guess what it’s baked in, so you’ll have to go visit Christina to find out!
Thursday, March 31, 2011
Ultimate Blog Party! You're Invited.
The title speaks for itself. I learned about this just in time for the first day and this is no April Fool’s joke. It is a huge link party (actually multiple links with varying categories) that is hosted by a great blog I wasn’t familiar with until today called: 5MinutesForMom.

It started in 2007 as a way for bloggers ( mostly but not exclusively moms) to get to know each other and has grown from an impressive start of 1000 links to last year’s 2300 links! It kicks off tonight and the hosts will tweet about it when the links are up so the best way to know the minute the party starts is to follow them on Twitter: @5minutesformom and/or watch for hashtag: #UBP11
All of the party deets can be found here: http://www.5minutesformom.com/34651/ultimate-blog-party-2011/ and if you decide you want to join the fun you can add a button to your party post from those found here: http://www.5minutesformom.com/34650/ultimate-blog-party-2011-badges/

Grab your favorite beverage and a chocolate chip cookie. I am Carol, mom to a soon to be HS graduate, thick in the throes of college decisions and soon to be an empty nester. I started my blog almost a year ago to connect with other people who get waaaay more excited than my husband does about Mod Podge, papercrafts, scrapbooking supplies, jewelry making,thrifty vintage finds and transforming what some would call trash into treasures. I combined my love of handmade things (those I make and those I admire) and my passion for all things chocolate into this little corner of the internet where I’ve met some amazing and talented women. I’m really excited to be participating in The Ultimate Blog Party and look forward to meeting even more wonderfully creative people.
The best part is that it runs from April 1 through April 8 so you have several days to participate!
All of the party deets can be found here: http://www.5minutesformom.com/34651/ultimate-blog-party-2011/ and if you decide you want to join the fun you can add a button to your party post from those found here: http://www.5minutesformom.com/34650/ultimate-blog-party-2011-badges/
Oh and did I mention there are PRIZES? I’m participating because it sounds like a fun party but prizes are always nice too! The party starts at midnight Eastern time but I'm putting this post up early to share :)
To those who are visiting The Answer Is Chocolate from the party, WELCOME!
Guest Posting At" Bella Before And After "
Happy Thursday and I’d like to give a shout out to the newest followers of The Answer Is Chocolate. I’m so glad you found something interesting enough to keep you coming back!
The lovely Bella, from Bella Before And After, invited me over to her place to guest post so that's where I am today.
I'm sharing a project there that's something I haven’t shown here before…I’l give you a hint. It involves these:

The lovely Bella, from Bella Before And After, invited me over to her place to guest post so that's where I am today.

and the end result does not involve plumbing so if you're curious, come on over!
Tuesday, March 29, 2011
Tissue Paper and Twine Egg Tutorial
Thank You:

for featuring my egg!

Last year “BB” ( before blogging) I made some Easter eggs covered with scrapbook paper and Mod Podge. True to my deal hunting ways, I picked up several more of the eggs I used after Easter when they were on sale for $.49. Michaels has them again this year and even at regular price they’re $.99:for featuring my egg!


I had an idea in my head ( uh-oh) that I wasn’t sure would work but I figured the most I was out was $.49…not a big price to pay. I slapped some Mod Podge on the egg and then smooshed some torn tissue paper on. Continue the slap and smoosh. The tissue drinks up the Mod Podge and it’s really easy to blend the edges so you don’t have seams. Better if you tear your tissue. Just regular old tissue that some stores give you way too much of and you don’t throw it away tissue.


To finish, I tore a strip of muslin, wrapped around the middle and tied a dragonfly charm to the knot with more twine. I added Prima paper flowers, a button, and a self adhesive rhinestone.


Here are both of them in an alabaster footed bowl ( cobbled together from Salvation Army finds) :
")
Linking Up At:


Subscribe to:
Posts (Atom)