
Showing posts with label Guest Post. Show all posts
Showing posts with label Guest Post. Show all posts
Tuesday, December 6, 2011
Guest Posting At The Scrap Shoppe Today!
Happy Tuesday all. I'm over at The Scrap Shoppe today, sharing a super easy and inexpensive Christmas decor idea that would also make a great gift. Hope you'll drop by. Michele has a wonderful series going with tons of inspiring ideas !
Tuesday, November 8, 2011
Guest Posting At A Glimpse Inside

Greetings all! I'm guest posting over at Allison's blog A Glimpse Inside today. Sharing a festive fall project if you'd like to stop by for a visit!
Sunday, August 28, 2011
Today's Guest Chocoholic: Bev from Flamingo Toes!
I'm so excited to be here guest posting!
My name is Bev and I blog over at Flamingo Toes.

One of my favorite things to do is to make knockoffs - especially from Anthropologie.
So that is what I'm doing today!
I fell in love with the Shepherd Moon Necklace at Anthro a few months ago - and I really love
how it came out!
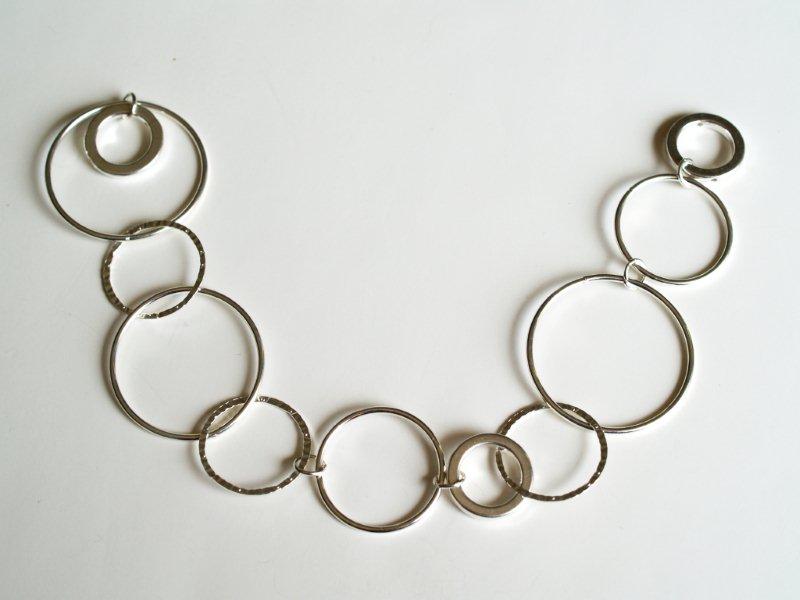
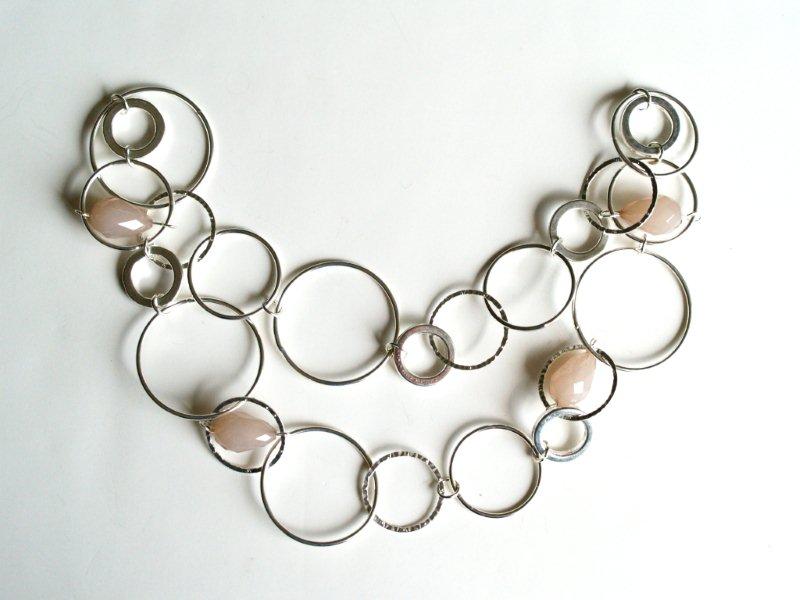
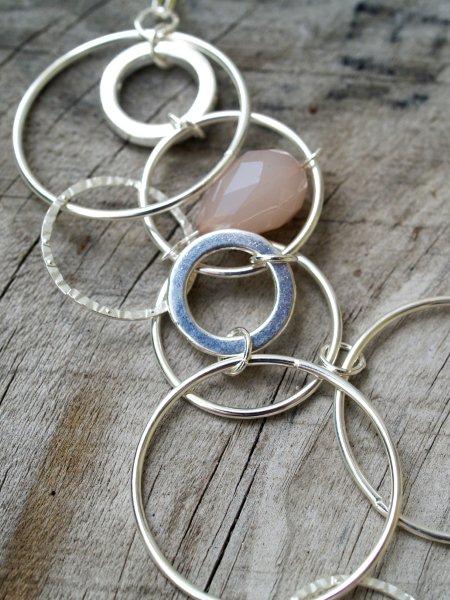
Here's my version:
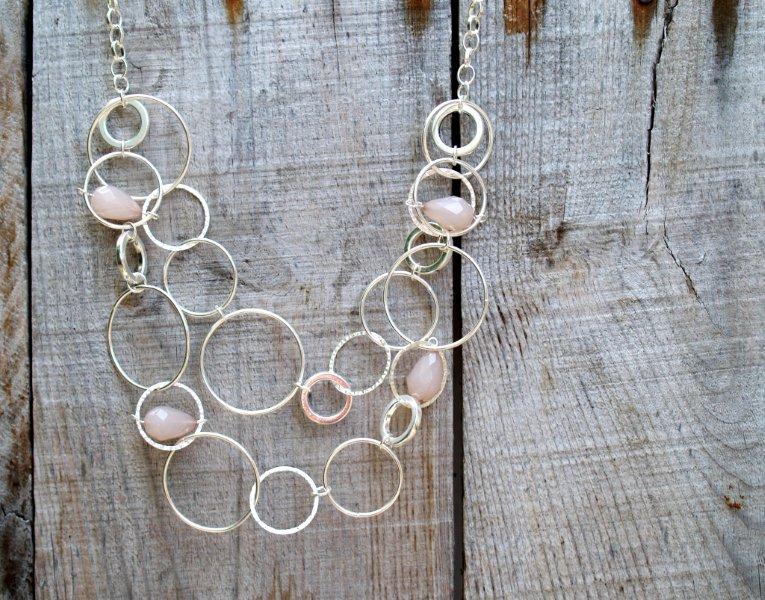
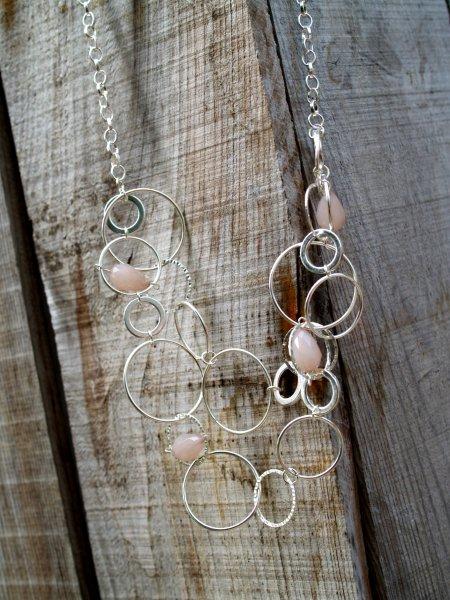
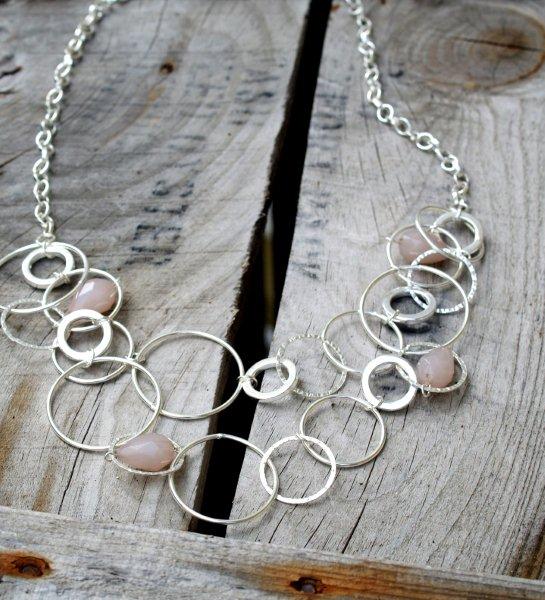
And here's Anthro's version:

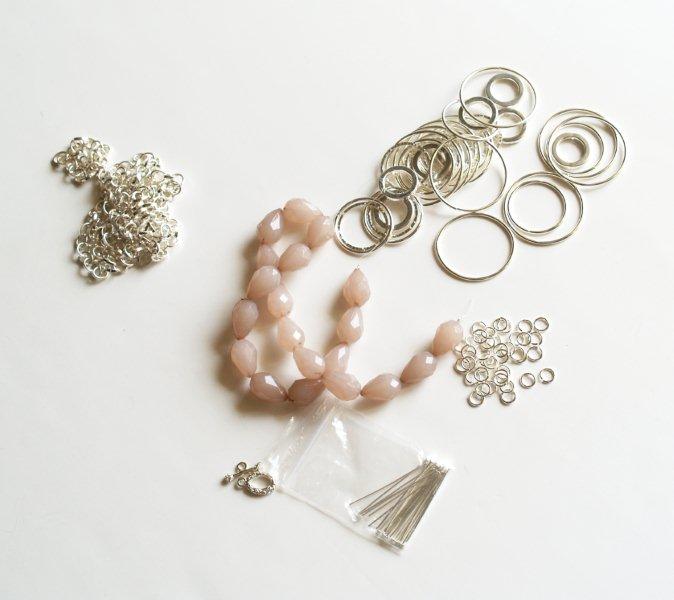
You'll need:
Length of chain - 16"
Assortment of silver rings (I bought an assorted package + a strand of smaller rings from Michaels)
Beads (just smaller than the medium ring size
Eye pins (same number as beads)
Jump rings
Necklace Closure
Jewelry pliers: wire cutters, round nosed pliers
Start by laying out the lower half of the necklace, just to get an idea of placement.
You should have two rows - one shorter than the other.
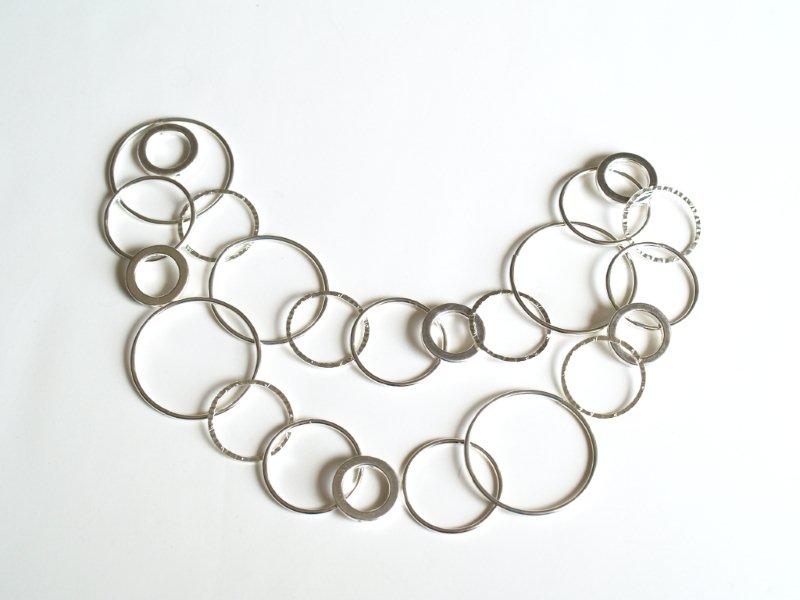
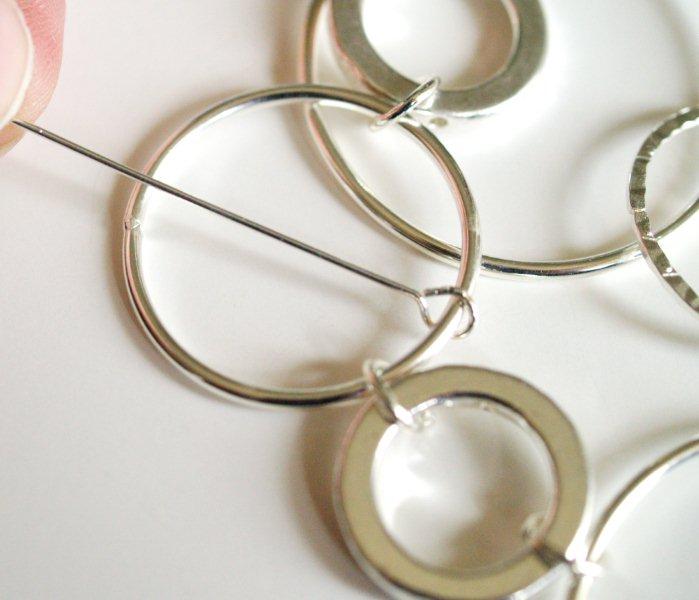
Start on one side and begin connecting your rings with jump rings.
Work your way across the top row of rings.
Some of the rings were like jump rings and had an opening. For those, I opened up the ring and connected them that way.
If your rings don't have openings - you could cut them with wire cutters.
The top row of rings should measure around 10" across when pulled straight.
Start adding in your longer row of rings the same way.

The longer row should measure about 13" long.

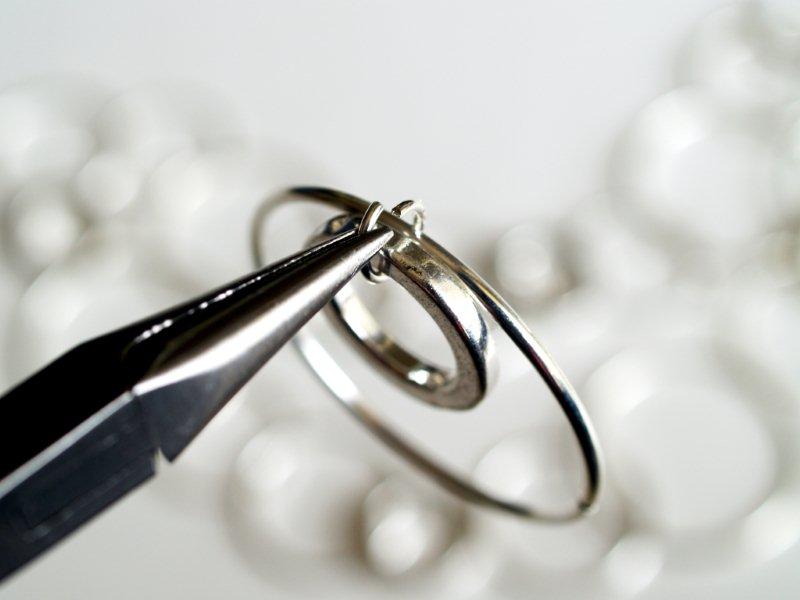
Now we're going to add in the beads. You can use eye pins for this (pins that have a loop on one end) or you can create your own from wire.
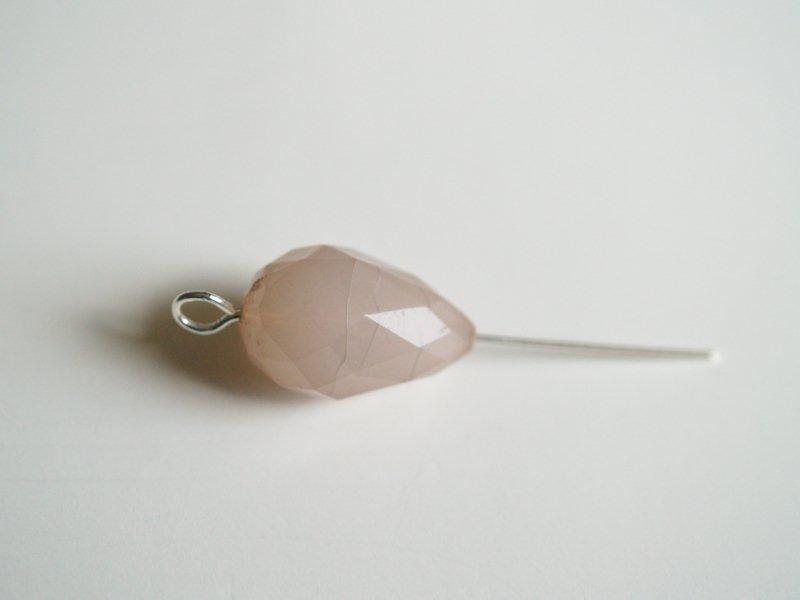
Decide which rings you'd like your beads on and measure how long the pin needs to be.
Add the bottom
loop to one side of the ring.
Add the bead to the wire and decide where the other loop needs to be.
Create the loop at the other side and attach it to the ring.
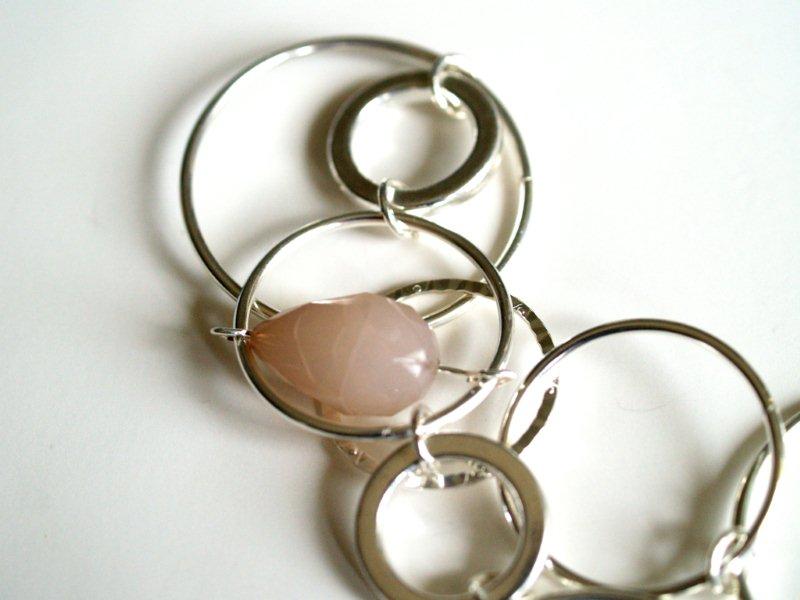
Continue adding beads to the necklace where you'd like them.
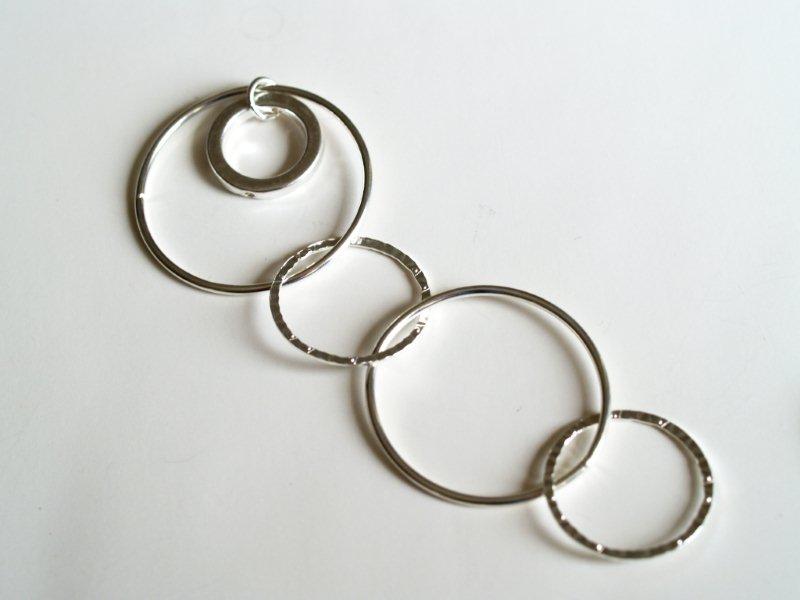
Add a jump ring to the top ring on each side. Cut the 16" chain in half. Add one 8" piece of chain to each side.
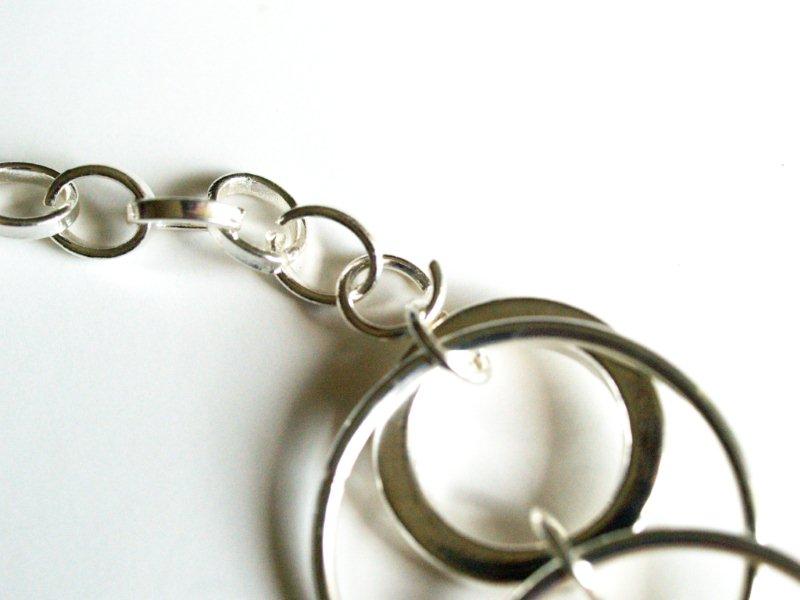
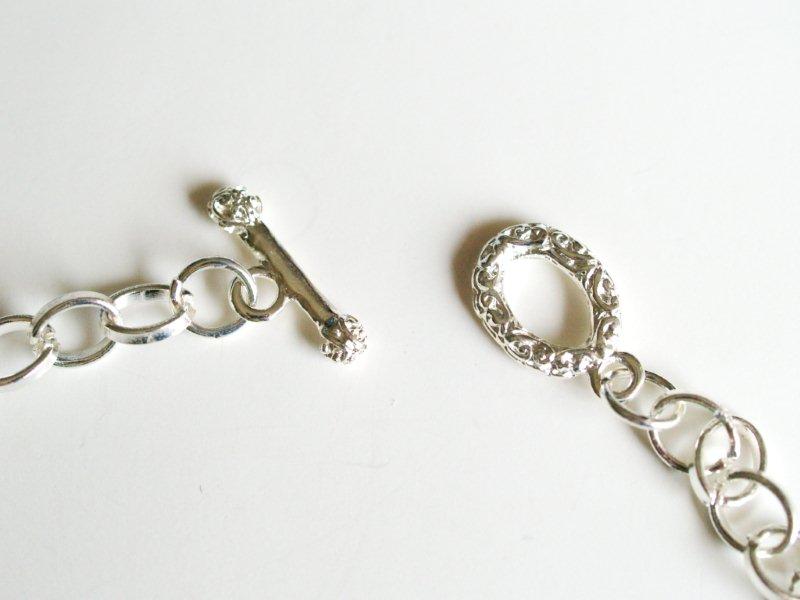
Add a necklace closure to the other end of the chains. I used a toggle clasp but you can use any tip of closure. Connect it to the two loose ends of chain with jump rings.
That finishes off your Shepherd Moon Necklace!!
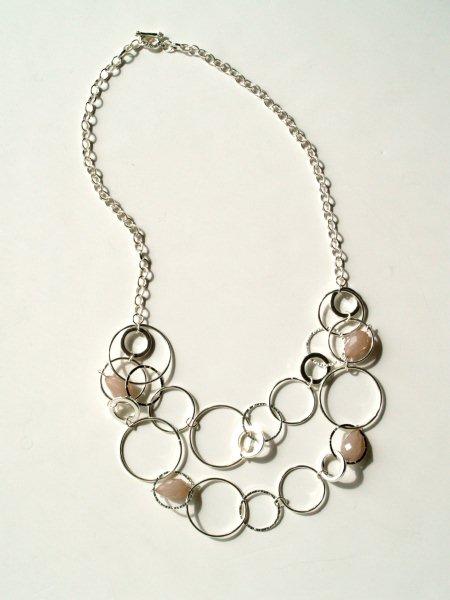
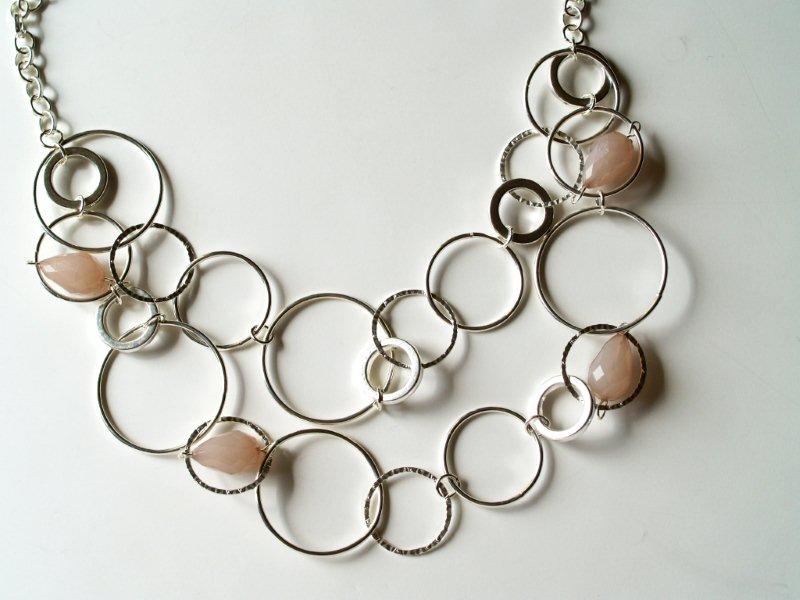
Isn't it fun?
I love all the different sizes of rings!
I hope you like it!
I'd love for you to stop by Flamingo Toes and check things out!
Here's a little sampling of projects - you can find these and more on my Tutorial pages!
Thanks so much Carol for letting me come over and hang out! :)
Saturday, August 27, 2011
Today's Guest Chocoholic: Michele from The Scrap Shoppe
Hello chocolatiers! My name is Michele, and I create over at The Scrap Shoppe.

I use my blog to share interesting craft techniques, craft projects that catch my eye, and give you some fun freebies that you can download and use in your own crafting. And I also share a creation of my own each week which often includes a full tutorial so you can try it yourself.
I'm excited to be guest posting for Carol today!
Something you all need to know about me up front is that I'm slightly obsessed with monograms.
![]()
 source
I present you with the DIY Letterpress Stamp!
source
I present you with the DIY Letterpress Stamp!
![]()
![]()
![]()
![]()
![]()
![]()
![]()
![]()
![]()
![]()
![]()
![]()
![]()

4. Yarn Wreath
And I'm always trying to think up new creative ways to make more to add to my decor!
This is my latest inspiration:
source
I present you with the DIY Letterpress Stamp!


The materials needed to make your own oversized letterpress stamp are pretty basic.
I used a large paper mache monogram letter and a couple of pieces of wood cut about a 1/4" larger than the letter.

Just stacking everything up you can see what I'm going for with these three pieces.
Now to start putting everything together!

The two pieces of wood were glued together then wood putty was used to seal the cracks between the two pieces. It was then sanded and primed. You can see that you can not even tell that this block is more than one piece of wood!

I mixed some brown, black, and dark green acrylic paint to make a grayish brown color and painted the wood block. With the primer, it only took 2 coats of paint for good coverage.

I painted the M the same color as the block. Then I mixed some brown, black, and gold acrylic paint and brushed it lightly over the top of the M, making sure not to give it good coverage. Then I quickly wiped much of the paint back off.

I think that extra lighter coat of paint on top gives the letter a "used" feel like it really was used as a stamp! And it helps add that metallic touch of an old letterpress stamp.

Once everything was painted and dry it was time to glue my monogram to my wood block.
I used my trusty Beacon's 3-in-1 adhesive.
This stuff is like a hot glue gun in a bottle.
All the adhesive power, none of the burns!

I made sure I had my 1/4" edge all the way around my new "stamp" as I glued the letter down.

Although the letter was made of paper mache, it still made the front of the stamp a little forward heavy when it was standing upright. And with that 1/4" gap on the bottom of the stamp, it had a tendency to tilt slightly forward. To remedy that I added a small bit of that material you put under your rugs so they don't move around. Then I painted it black so as not to be noticed.


Its amazing the transformation paint can have!

Another happy monogram project to check off the list!
Thanks so much for letting me share this project with your readers, Carol!
And I invite everyone over to my place to have a look around!
![]()

Thursday, August 25, 2011
Today’s Guest Chocoholic: Christine from Christine and Co!
Hello there, The Answer is Chocolate devotees! I am Christine, from Christine & Co. and I am delighted to be doing a guest post for my friend Carol.
Okay, so I have yet to meet the person who doesn't love Pinterest. One of my boards has "things I have to try out," so I thought I would bring you one of my experiences.
I came across this picture of a wood block that was wrapped with string, and then used as a stamp. After following the link to this picture, I found out it was a technique (one of many) in this book Print Workshop.
It was written by Christine Schmidt. I had to try it for myself.
 Oh you know I'm doing this again! There are so many applications for this.
Here's what I did...
 I took some twine and wrapped it around an old block of wood.
 Got some ink on it, and stamped...
 I added my own tag, and a strip of ribbon from my stash. Gift bag, anyone?
This was fun--I loved being here! Come by my place for a visit at Christine & Co. The more the merrier!

Okay, so I have yet to meet the person who doesn't love Pinterest. One of my boards has "things I have to try out," so I thought I would bring you one of my experiences.
I came across this picture of a wood block that was wrapped with string, and then used as a stamp. After following the link to this picture, I found out it was a technique (one of many) in this book Print Workshop.
It was written by Christine Schmidt. I had to try it for myself.

Here's what I did...


This was fun--I loved being here! Come by my place for a visit at Christine & Co. The more the merrier!
Wednesday, August 24, 2011
Today's Guest Chocoholic: Maggie from Midwestern Sewing Girl!
I'm so excited to be here guest-posting for Carol today! The Answer is Chocolate is one of my absolute favorite blogs...I NEVER miss a post...truly...
My name is Maggie & I write a little blog called Midwestern {Sewing} Girl where I detail my craft, diy & remodeling projects as I (attempt to) makeover my house...I would absolutely love it if you would stop by sometime!
Today I'm going to share one of my favorite projects with you...this was all I used...
 Here's how it went...
I downloaded these super-cool pdfs from The Graphics Fairy... they're from a 1915 Atlas...so awesome. I opened them up in PS Elements, removed the color and lightened them up and then printed them out on plain-old computer paper.
Here's how it went...
I downloaded these super-cool pdfs from The Graphics Fairy... they're from a 1915 Atlas...so awesome. I opened them up in PS Elements, removed the color and lightened them up and then printed them out on plain-old computer paper.

 Mod-Podge'd 'em up...waited for 'em to dry & hot-glued the grosgrain to the top and bottom edges...easy-peasy lemon-squeezy.
Now, I wouldn't try to circumnavigate the globe using my lampshade...I did have to make some cuts in some strange places in order to get the maps to fit...and there is a possibility that now North America and Asia are sharing the same continent on my lamp...but it works for me...
Mod-Podge'd 'em up...waited for 'em to dry & hot-glued the grosgrain to the top and bottom edges...easy-peasy lemon-squeezy.
Now, I wouldn't try to circumnavigate the globe using my lampshade...I did have to make some cuts in some strange places in order to get the maps to fit...and there is a possibility that now North America and Asia are sharing the same continent on my lamp...but it works for me...


 |
| link |


So, that's it! Super-easy...big impact...
Thank you so so much for having me today, Carol!!! You are the absolute best...
And don't forget, folks, to stop on over! I'd love to see you...
Subscribe to:
Posts (Atom)