Showing posts with label The Scrap Shoppe. Show all posts

Monday, June 11, 2012

BFF Open House Link Party #57: Wrap Up and Features Dads, Grads, Fourth and Fun

Thanks for another fun party. Summer is definitely here and we are in full Dad, Grad, and Fourth of July Season. Here are just a few ideas that caught my eye:

Malia, from Yesterday on Tuesday shared this great Father’s Day Tie Wreath. She has a wonderful tutorial

Father's Day Wreath

If you have a grad in your life, Linda from Our Mush Push has a great card layout ( and awwww thanks Linda, glad you found inspiration in my grad cards).


In our house, it would more likely be me eating this but I love this “Manly Munch Mix” from Shaken Together:


If you want to whip up a batch, Keri’s got the labels in addition to the recipe.

I love making and using printables to change up my seasonal décor. Michele at The Scrap Shoppe has a fantastic Fourth of July printable she’s sharing:


Sorry…you have to get your own frame lol.

Finally, Kristina from Remade Simple shared a super cute shirt she did with a bleach pen and stencils.


Thanks as always for choosing to share your creativity here at The Answer Is Chocolate. Make it a creative week!

Friday, December 16, 2011

Framed Glitter Ornament

This week's BFF Open House link party is still going on here and will be up through Sunday. 

I thought I'd post an idea I recently shared over at The Scrap Shoppe where Michele has had a wonderful Handmade Holiday series going. This week is recipes so you should definitely check it out! It wraps up tomorrow but there have been some wonderful ideas shared. 


I was excited  Michele decided to do another Homemade Christmas and thrilled to be invite  to share a  fun , easy, and inexpensive piece of Christmas décor : A Framed Glitter Ornament

Dollar Tree Ornament Frame

I really enjoy making things using inexpensive materials. Largely that’s because I can justify buying more supplies, but I’m also a firm believer that you don’t have to spend a lot to have pretty things around you. Like so many crafters, one of my go to places is The Dollar Tree.

On one of my trips I found a pack of glittered reindeer ornaments. Five for $1! Had to have.Right next to them was  a pack of red tissue paper “hot stamped” with silver. Also a must have!
Dollar Christmas Decor
One of my other stash staples are unfinished wood frames from Michaels. Yep you guessed it. They’re $1.

I took one sheet of the tissue paper and traced around the frame and cut out. Covered my frame with Ranger’s Glue N Seal and then put my tissue paper on. You could also use Mod Podge. I chose not to seal the top since I wasn’t sure if it would dull the shine of the silver foil.
Dollar Chrismas Decor
Don’t worry if you don’t get this exactly measured to your frame. Let your adhesive dry and then I file around the edges with a piece of fine sandpaper or a package of emery boards that you picked up at Dollar Tree!

Waste not want not, so I covered the cardboard that came with the frame with some scrapbook paper:
PB173554
I covered both sides because it just gives a nice finished look since there’s no back to the frame.

Took one reindeer from my package of ornaments, cut off the string used to hang and then hot glued it to my finished frame, offset so the feet and antlers are glued to the frame vs onto the paper. I liked the dimension this gave.
Dollar Tree Framed Ornament
I cut the letters JOY from black vinyl using my digital cutter but if you don’t have one of those, you could easily use alphabet scrapbook stickers or letter stamps.  Embellished those with red self adhesive rhinestones I had in my stash.
Dollar Tree Ornament Shadow
Another reason I like the effect of gluing the reindeer to the frame vs the paper is this shadow effect. The glittered snowflakes I also had on hand and came in a package of 12 for $1.99 at Michaels.

My total cost for the supplies for this project was about $3!
  • $1 frame
  • $1 Tissue Paper ( over 4 sheets left over  so lots more crafting!)
  • $1 Ornaments ( really $.20  for this project since I used one of five)
Let’s say you decided to spend $4 more on frames and make a total of five of these so you used up all your ornaments. Price per project would be around $1.40!! And I guarantee you’ll still have tissue paper left over.
Dollar Tree Ornament Frame

If you're looking for a last minute decor idea or gift, this is a fast an easy way to whip something up.

Sharing At: 


Tuesday, December 6, 2011

Guest Posting At The Scrap Shoppe Today!

Happy Tuesday all. I'm over at The Scrap Shoppe today, sharing a super easy and inexpensive Christmas decor idea that would also make a great gift. Hope you'll drop by. Michele has a wonderful series going with tons of inspiring ideas !

Saturday, August 27, 2011

Today's Guest Chocoholic: Michele from The Scrap Shoppe

Hello chocolatiers! My name is Michele, and I create over at The Scrap Shoppe.
I use my blog to share interesting craft techniques, craft projects that catch my eye, and give you some fun freebies that you can download and use in your own crafting. And I also share a creation of my own each week which often includes a full tutorial so you can try it yourself. I'm excited to be guest posting for Carol today!
Something you all need to know about me up front is that I'm slightly obsessed with monograms.
And I'm always trying to think up new creative ways to make more to add to my decor!
This is my latest inspiration:
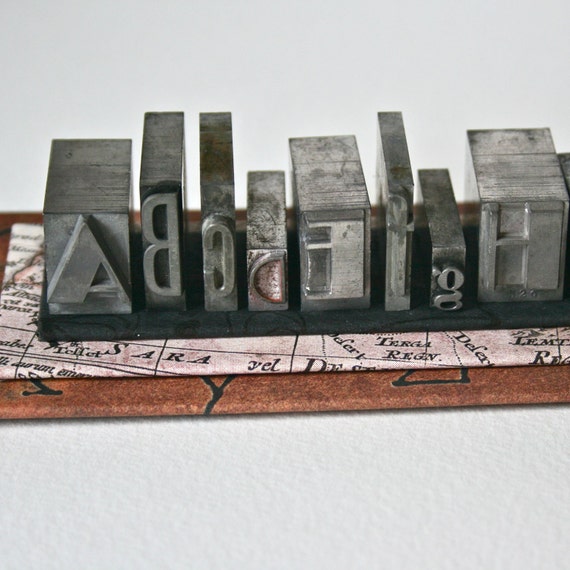
Metal Printer's Type - Alphabet 8 with Pedestal source I present you with the DIY Letterpress Stamp!
The materials needed to make your own oversized letterpress stamp are pretty basic.
I used a large paper mache monogram letter and a couple of pieces of wood cut about a 1/4" larger than the letter.
Just stacking everything up you can see what I'm going for with these three pieces.
Now to start putting everything together!
The two pieces of wood were glued together then wood putty was used to seal the cracks between the two pieces. It was then sanded and primed. You can see that you can not even tell that this block is more than one piece of wood!
I mixed some brown, black, and dark green acrylic paint to make a grayish brown color and painted the wood block. With the primer, it only took 2 coats of paint for good coverage.
I painted the M the same color as the block. Then I mixed some brown, black, and gold acrylic paint and brushed it lightly over the top of the M, making sure not to give it good coverage. Then I quickly wiped much of the paint back off.
I think that extra lighter coat of paint on top gives the letter a "used" feel like it really was used as a stamp! And it helps add that metallic touch of an old letterpress stamp.
Once everything was painted and dry it was time to glue my monogram to my wood block.
I used my trusty Beacon's 3-in-1 adhesive.
This stuff is like a hot glue gun in a bottle.
All the adhesive power, none of the burns!
I made sure I had my 1/4" edge all the way around my new "stamp" as I glued the letter down.
Although the letter was made of paper mache, it still made the front of the stamp a little forward heavy when it was standing upright. And with that 1/4" gap on the bottom of the stamp, it had a tendency to tilt slightly forward. To remedy that I added a small bit of that material you put under your rugs so they don't move around. Then I painted it black so as not to be noticed.
Its amazing the transformation paint can have!
Another happy monogram project to check off the list! Thanks so much for letting me share this project with your readers, Carol! And I invite everyone over to my place to have a look around!

Saturday, April 9, 2011

Faux Oeuf en Chocolat aka Faux Chocolate Egg

I thought I'd share a project I did earlier in the month for a guest post over at The Scrap Shoppe. It was inspired by a graphic that had been put up at The Graphics Fairy, a vintage chocolate label! Did that have my name written on it or what?


I started with a plastic egg from Michaels that I painted a couple coats of  a deep chocolate brown. I used Folk Art’s Coffee Bean.
IMG_4973
Once the egg was completely dipped in chocolate, I was ready to decorate!
IMG_4979
I printed out my image from The Graphics Fairy, sealed it with a Krylon matte finish spray sealer and then tore around the edges.

These eggs have a flat spot on the back so make sure you apply your pic to the rounded side! I used Mod Podge to apply. If only they’d make a chocolate scented Mod Podge!

Once that was dry, I went over the whole thing lightly with some gold paint. I just scrunched up a plastic bag and dabbed the paint on all  over.

I had some brown and cream self adhesive pearls ( Michaels) and some dark brown paper flowers in my stash that I used to embellish the front of the egg.
IMG_4980
IMG_4985
IMG_4987
I put one whole strip of brown pearls in the middle of the label, and then used individual cream pearls as the centers for the flowers and randomly on the label.

Finally, I used self adhesive scrapbook borders by K&Co ( Sheer Simplicity , neutral collection) to go around the egg to finish it off. This collection contains neutral browns and beiges and metallic gold so I used the brown and gold of the same pattern, with the straight sides back to back.

IMG_4986

So there you have it, a chocolate egg with 0 calories!
Linking Up At: 

Monday, April 4, 2011

Visiting At The Scrap Shoppe Today!

Congrats to my friend Michelle from The Scrap Shoppe who exactly one week ago today, added a new little boy to her family! She's a great planner aheader so while she's out on her "BML" (Bloggy Maternity Leave) she lined up several of us to guest post. Today's my turn so if you want to see "eggsactly" what I'm sharing, come on over to:

Tuesday, November 30, 2010

"Homemade Holidays" Guest Post

I guest posted yesterday over at Michele's blog "The Scrap Shoppe" . She's hosting a fun series called: 
I shared some more of my altered candles.
You'll need: 


  • Glass Jar Candle ( also known as prayer candles, Novena candles) You can find these lots of places.  I first found them at the grocery store but subsequently ordered a case of them from Dollar Tree's website. 
  • Scrapbook or wrapping papers
  • Embellishments...ribbon, buttons, beads, die cuts etc.
  • Mod Podge


I like to combine patterns and textures so I used three different papers:
Decide which paper you want as your base. Cut to 8x8 then tear top and bottom edges. Cut remaining papers to 8 inches length and decide how wide you want the next layer, I did 4 inches for the middle,  and then 3 for the top paper. Tear top paper across the top and bottom as you did for the base layer. Mod Podge your papers together to form your candle wrap. Should look like this:
Patterned paper base, music paper middle, patterned paper top
Mod Podge candle wrap to candle. Cover top with more Mod Podge and you'll have this:
You can make the "wrap" cover as much or as little of the candle as you like. Now it's time to embellish which is the fun part! I used various things I had on hand like buttons, self adhesive rhinestones, ribbon, silver tinsel pipecleaners.  I chose a couple of diecuts from a package by K&CO and adhered to the center with Mod Podge. Then I added these strips of rhinestones ( Michaels Dollar Section):
I also added some buttons using a dimensional adhesive or you can use hot glue:

And some more coordinating self adhesive rhinestones on top of the buttons. To finish, I like to wrap the top "lip" of the candle with ribbon or you can use wire, beading thread or whatever you can think of. I used some vintage looking ribbon yarn and a silver tinsel pipe cleaner on these.

Hopefully this made sense but if you have any questions, please leave a comment  or email me! There's really no right or wrong here. Thanks so much Michele for having me over for Handmade Christmas! 
Also linking up at: