Showing posts with label paper flowers. Show all posts

Thursday, August 31, 2023

BFF Open House


Happy Friday Eve all. Thanks for hanging in with the two-week party. First and foremost, I hope any and all in the midst of Hurricane Idalia are safe and those who were in the path of Hilary are drying out and recovering. 
think
We avoided Hilary for the most part. Great timing to take a trip to Las Vegas but since we're not night owls we mostly saw some epic lightning from the dry comfort of our hotel room. 

Thirty-two years ago TODAY, I married the man who's still the only one who's able to take me out of my usual serious self. The one who still makes me laugh. The one who surprises me with "just because" things. The one with whom I've shared ups and downs, joys and sorrows, sickness and health. I'm so thankful to have had a true partner and friend. 

OK! I think extra features are appropriate since I was gone for two parties! 


From Simple Joys,  Priyam once again shows us that you don't need fancy machines to make a gorgeous bouquet of  Paper Flowers


Keeping it floral and perfect going into Fall, The Apple Street Cottage shared this GORGEOUS Milkweed Pod Wreath


If you've ever passed on pretty glass plates because you weren't sure what to do with them, check out these Glass Garden Flowers shared by Selep Imaging. Like finding hidden treasures in the garden. 


Thrifting Wonderland shared a beautiful Fall Transition Tablescape. Natural and elegant.


With Pumpkin Season upon us, these 15 Minute Dollar Store Bandana Pumpkins from Creatively Beth are a MUST!


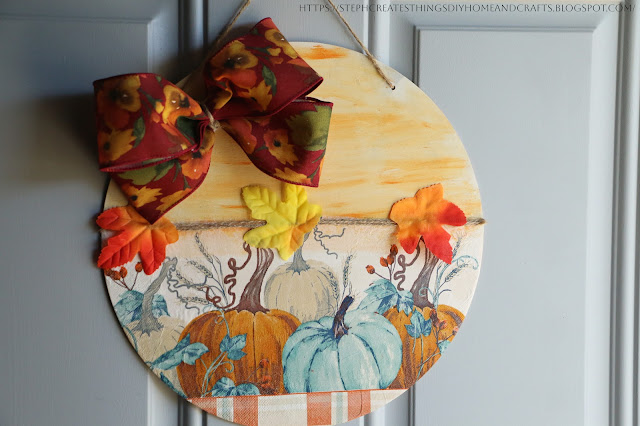
Another Dollar Tree transformation by Steph Creates with this Decorative Fall Wood Hanging.


Finally, how yummy do these No Bake Mini Nutella Cheesecakes look and sound? From My Thrift Store Addiction

Thanks to all who linked up and can't wait to see what you've all been up to over the past couple of weeks!


You are invited to the Inlinkz link party!

Click here to enter

Monday, July 5, 2021

Home Decor: Repurpose Paper and Coffee Filter Flowers Into Giant Wreath


I hope everyone had a safe and Happy Fourth. I'm hoping we get some peace and quiet tonight because the dog was not happy last night. And when the dog's not happy, no one's happy! We're getting organized in our new home and took a few minutes this morning to whip up something for my new office. 

In my last office, I had an accent wall for which I'd made a border of flowers that ran along the top. I couldn't bring myself to toss them when I took it down and knew I had an oversized wreath form that I was going to use for something in our old house but never did, so it was pretty easy to visualize this oversized wreath. It was quick, easy, and a great way to re-purpose a bunch of rolled and layered paper and coffee filter flowers I'd already made. 

Supplies: 
  • Giant Wire Wreath Frame ( I don't remember the dimensions but it was the biggest one Michaels sells)
  • Rolled / Layered Paper Flowers. You can design your own or use patterns for your cutting machine. 
  • Coffee Filter Flowers. I made these freehand. I love coffee filters because they retain their shape and don't wilt like tissue papers. 
  • Glue gun and glue. 


I started with the largest of the paper flowers. I had three this size so I did kind of a triangle shape to evenly disperse them. 


Then, I took the smaller paper flowers and distributed them in between, just kind of eyeballing the spacing. 


When I made these, I intentionally made different styles of flowers because I didn't want everything to match. After I had all of the paper flowers placed, I started adding the coffee filter flowers which again, I didn't make all the same. 


These were easy to fluff back up since they'd gotten a little squished being boxed up! I filled in the bare spots, fluffing along the way until the wreath form was filled in. It went very quickly and now is the first thing I've hung on the wall in my new office! 


Sharing At: 


Tuesday, October 1, 2013

Bewitchingly Vintage Witch Hats and A Giveway From Oriental Trading Company!

Vintagey Witch Hats

I continue to be drawn to more muted and vintage Halloween décor. I mentioned earlier that I was planning on switching up my mantle this year from Poe inspired to Shakespeare. It was the Three Witches from Macbeth that inspired this project.

It was perfect timing when the folks from Oriental Trading Company gave me the opportunity to review and play with some of their Halloween crafting goodies. This post is sponsored by Oriental Trading Company. Project idea and opinions are mine.

Oriental Trading Company

If you're not familiar with Oriental Trading Company or haven't been there in a while, in addition to a great selection of party supplies and project kids that are great for kids, they have really really expanded their crafting supply section. I was able to go through the ordering process which was straightforward and easy, and my shipment arrived quickly.

The hats themselves are not actually hats. They started out as these:

Paper Mache Cones

Plain paper mache cones. I covered them using torn and twisted kraft colored butcher paper and Mod Podge  and glued them to a cardboard circle base.

PA010958

Since I knew I wanted them to be old looking, I wasn’t precise and just kind of went over the form until it looked like a witch’s hat. When dry, painted with black paint. Now for the fun stuff!

Oriental Trading Co Papers

I chose some of the Halloween papers from Oriental Trading Company along with epoxy poison labels. I used the papers to make layered flowers that I scrunched and crumbled. After all, the witches from Macbeth would not be seen in pristine new hats.

Halloween Paper Flower

Using some of the die cuts and stickers I also received, I made accessories for my hats, keeping with a poison potion theme.

Witch's Brew Hat

Arsenic and Venom Hats

Waste not want not, so I used from of the scraps of paper to embellish the hats going around one of the cones, and one of the brims.

PA010962

Bewitching Hats

I had so much fun with these and cannot wait to play with some more of the goodies that were sent to me so check back!

The best part is,  one of you will get to play with some goodies of your own because the awesome folks at Oriental Trading Company are offering one of my readers the chance to win a $25 gift card to their site! It's easy to enter (using Rafflecopter) and winner will be announced next Tues ( 10/8). Good luck!

Saturday, June 2, 2012

Vinyl Butterfly Plate With Removable Rolled Flowers


Butterfly Plate

 I  did this project recently for the Expressions Vinyl Blog.  I felt guilty calling it a project because it's so stinkin' easy.


I love putting vinyl on anything and everything. I also change my mind a lot and sometimes want the flexibility to change a theme. Vinyl is perfect for that! I found this plain square glass plate at Cost Plus and knew it was a perfect canvas. I Mod Podged a piece of scrapbook paper on the underside of the plate, but you could also leave your plate completely blank. 


I have been wanting to do something with a butterfly motif and the hardest part was deciding which image to download from the Silhouette online store. I decided on this swirly one. I re-sized it to fit and cut it out using a leafy green Expressions vinyl.

Green Expressions Vinyl Butterfly

I am definitely not a dainty clean crafter. Just keeping it real here. Sometimes stuff gets stuck to the mat but it mostly comes off pretty cleanly.

Vinyl Scraps and Punch

I’m also a “I can’t throw that away because there must be something I can do with it “ crafter ( aka as Mr. Chocolate would say a HOARDER). I’ve seen this idea sold in craft stores to decorate your walls…using vinyl as the adhesive to attach paper flowers or lightweight wooden embellishments.

I adapted it to my butterfly plate. Punched circles out of scrap vinyl, and made rolled flowers from some paper scraps:

Rolled Flowers

I hot glued the flowers to the vinyl, peeled off the back and stuck to my plate.  Done and done. And if I decide I want to take the flowers off and/or change my butterfly for something else, peel away!


Butterfly Plate


It doesn't get much easier. If you don't have an electronic cutter or die cut machine, try punches on your vinyl.

Sharing At: 


Wednesday, June 30, 2010

La Cage Aux Fleurs

I've wanted a birdcage for the longest while but have either not found one in good shape or for the right price. I finally found one over the weekend for a price I could live with ( of course because I'm looking I won't find one as inexpensive as I want) at an antique store. It started out like this before it was ready for its appointment with my very first ever can of, "I think I'm in love", Oil Rubbed Bronze spray paint. Where have you been all my life? 
I wasn't sure what I wanted to do with it but then I remembered that the first of each month is Frenchy's "French Obsession" party at Chateau des Fleurs and since there's pretty much nothing I can't tie to a movie title, the movie "La Cage Aux Folles" popped into my head ( trust me, a psychiatrist would change professions after playing word association with me!) and I knew I didn't want to do anything birdy with my birdcage because that would be um, LOGICAL, so I decided on "La Cage Aux Fleurs" since I'm currently obsessed with flowers. Still with me? It's exhausting huh? 
Here's what I ended up with ( didn't get pix along the way because my camera battery was charging):

Inside:

I made flowers from book pages and some kraft colored paint masking paper, put a black button in the center, and an antique gold rhinestone on top of the button. Made a couple more flowers from just the book paper. I had some ribbon I'd saved from a present that I wrapped around the top of the cage and another piece I tied to the loop thingy on top. 

At the same place I got the birdcage, I found a mason jar of chandelier crystals so I cleaned up four of the biggest ones and attached them to the cage with jump rings. Inside the birdcage there's a nest attached to a branch that I found at Michael's on sale for $1.49!!  I propped that up inside the cage, and what's on the bottom are the scraps I tore from around the circles I cut to make my flowers, along with two more book paper flowers. I used all my bits and scraps!
The center front decoration is from a bag of ephemera I bought at a stamp show...some wired bead strands and a fabric flower. I hot glued the edges of the ribbon to the cage so they'd spread out.

Mr. Chocolate is relieved I didn't intend to keep an actual bird in my birdcage!