Showing posts with label Gold Leafing. Show all posts

Tuesday, January 17, 2023

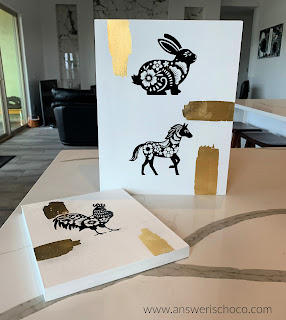
Home Decor: Family Chinese Zodiac Wall Art


Lunar New Year, most popularly known as "Chinese New Year" (but celebrated in other Asian countries) is this coming Sunday. This year is the Year of the Rabbit which is my Chinese Zodiac sign and also happens to also be a milestone year for me. For as long as I can remember, I've always loved rabbits. Even before I knew I was one! In thinking about doing a project I decided to do one that incorporated my sign, as well as my husband's and son. Since this is the first project I'm sharing in the New Year, it makes sense that it's a New Year project, right? 

Supplies:
  • Wood Art Boards (I used 11x14 and 8x10)
  • Acrylic Paint
  • Chinese Zodiac Images (Designbundles)
  • Vinyl (Cricut Glossy Black)
  • Cutting Machine (I used my Cricut Explore Air 2)
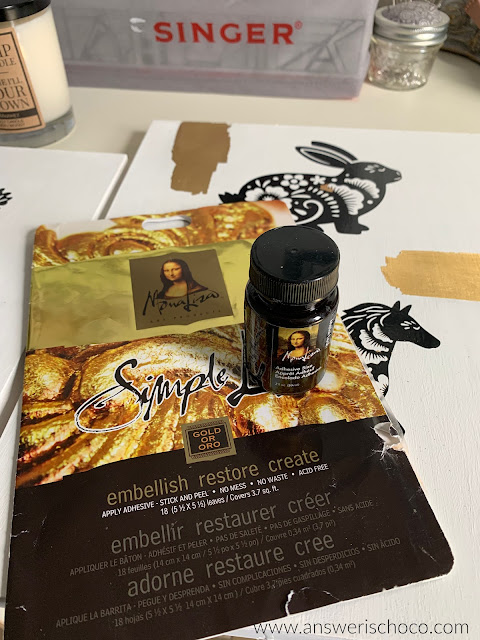
  • Gold Leaf Adhesive and Gold Leaf (I used Mona Lisa)


You can find wood art boards in the fine arts sections of craft stores and at art supply stores. I have a few leftover from when I found them on clearance in the arts and crafts section at Target. I wanted a clean graphic look so while red is customary, I chose to match my neutral home decor and painted the boards white and used black vinyl with gold leaf accents. 


A couple of coats of paint (Apple Barrel, White) and you're all good. Allow to dry thoroughly or else your vinyl won't stick properly and the transfer tape will pull up the paint. 


Confession time! I initially planned to put all three Zodiac signs on one board and thought I'd given myself enough space between when I sized the images. I didn't. So after cutting and weeding and not wanting to do that over, I just painted the smaller board and put mine and my husband's on one, and our son on it's own. The two of us made him so this worked in my brain! 


This was a great project that let me test some new skills I learned in a workshop by Abbi Kirsten which was how to use a PNG file to create an SVG file in Inkscape! I bought the graphics from designbundles.net.  


Since gold is another color you see in Chinese art, I decided to add some splashes of gold leaf. I love the Mona Lisa products (Michaels) which are easy to use. I just did some freehand brushstrokes where I wanted to gold leafing, let dry per the instructions on the bottle (actually a little less since the air is so dry where I am) and then applied the leafing using a strong bristled stencil brush. 


Wishing everyone health, peace, and prosperity in the Year of the Rabbit / 2023!

Sharing At: 


Monday, May 2, 2016

Girlfriend Gifts : Gold Foiled Herb Pots


I don't get together with friends that often, so when I do I like to bring a little something. I think as makers, it's in our nature. 

I had the opportunity to work with some goodies from Oriental Trading Company to make these little Herb Pots. 

OTC Supplies used for these: 
  • Unfinished Square Flowerpots 
  • Patterned Texture Paper Pack
  • Dictionary Tags

Other Supplies: 
  • Mona Lisa Brand Gold Foil Simple Leaf and Adhesive
  • Misc Craft Paints
  • Mod Podge 

I painted the unfinished pots with cream acrylic craft paint. Once dry, I added strips from the patterned paper pack as shown. 


Once the paper strips were dry, I applied the gold foil adhesive to the top and side edges.  The adhesive takes about 20-30 minutes to dry to a tacky state. Once there, I applied the gold leafing randomly. I wanted to match the pattern in the paper so I didn't want complete coverage. I even roughed it up in places. 


I wanted the Dictionary Tags to coordinate with the pots so I applied scraps of the paper I used on the pots along  gold glitter paper and stickers from my stash. 


Since I am not much of a gardener or green thumb ( unless it's green glitter!) I was thrilled to find these all in one herb kits at Target. I included two of these in the pots. 


I wrapped the completed pots with strips of tulle, and finished off with the tags.

Sharing At:


Monday, February 1, 2016

DIY Wall Art


Art is subjective and therefore it's subject to what you like. I don't want Art majors and MFAs after me so that's my humble but subjective opinion but as a result, I'm not one to spend a lot of money on it (mostly because of reality!)  and my walls tend to be decorated with things I make. This project is no different. 

I wanted something for a bare wall in our master bath so when canvases were recently 50% off at Michaels I decided to play around with some paints and some gold leafing. I'd seen a couple of ideas on Pinterest that inspired me. 

Supplies Needed: 
  • Pre-stretched canvas  (I used 18x24 from Michaels)
  • Paints ( I used Acrylics)
  • Glue (ideally, specific to leafing)
  • Gold Leaf  (Art supply section of craft stores or where art supplies are sold) 


I went into my paint drawer and just pulled out a bunch of stuff. I gravitate towards neutrals and our bathroom is very neutral but I decided to stretch a bit and pulled out some blues as well. 


Next I applied the gold leaf to my canvas. There is a specific type of glue you're supposed to use with the leafing but I forgot I was out and wasn't going to the store. I used Mod Podge and let it get tacky but not dry and applied the leaf. Not perfect but it worked. 


Then I just kind of went to town with the paints. I brushed some and stippled some. And then brushed some more and stippled some more until I was satisfied. In some cases the gold leaf got a little muted by the paints ; in some cases not. After the paint was dry I added a little more leaf here and there. 


And since my canvas came in a two pack, I have another one to play with!

Sharing At: 


Monday, October 12, 2015

Creepy Crackled and Foiled Skulls


I had a lot of fun making these creepy crackly skulls for my mantle. They are so easy to do and look like they took a lot more work than they actually did. 

Supplies Needed: 
  • Ceramic Skull ( Mine was from Oriental Trading Company)
  • Black Acrylic Paint ( I used Craft Smart from Michaels)
  • Gold Acrylic Paint ( I used Martha Stewart Yellow Gold Metallic) 
  • White Glue ( I love back to school supply shopping for this craft staple)
  • Gold Leaf ( I used Simple Leaf by Mona Lisa available where fine art supplies are sold)  

Paint your skull gold ( or whatever base color you've chosen. 

When your skulls are dry, paint a coat of white glue over them. . 

When glue is still tacky but not dry ( temp and humidity make this hard to time so just keep an eye on things) paint over with the gold paint. Watch the crackle magic happen. You can hasten the effect with a blow dryer but the longer the paints cure, the more crackling you'll see. 

Optional: Improvise words to Rolling Stones "Paint it Black" and sing while you paint ie "I see a gold skull and I want it painted black" .  Or not :)


Metal leafing intimidates a lot of people but it shouldn't. It's easy ( messy at times!) but the effect is so worth it.  Follow the instructions on the leafing package. I usually use the leaf sizing glue but I was out. Mod Podge to the rescue. Just dabbed it on randomly where I want the leafing , applied the leafing by laying it over the glue and using pressing down w/ my fingers. I used a dry paint brush to brush away the excess and went on to the next spot. 

And Voila


After I was done I used some of the scrap leafing to highlight raised portions of the skull like the teeth, eye sockets etc. 


Sharing At