Thursday, November 20, 2014

BFF Open House Link Party #185: Thanksgiving Crunch Time!

The Answer Is Chocolate

ONE week! This time next week, most of  the US will be taking a collective tryptophan induced nap so party hearty this week while you're still awake.  Hard to believe that Thanksgiving is just one week away. Here are some great ideas you still have time to incorporate into your holiday planning. 


Whether you set a formal table or go more casual, The Pin Junkie has some great ideas for place cards that add that extra touch. 


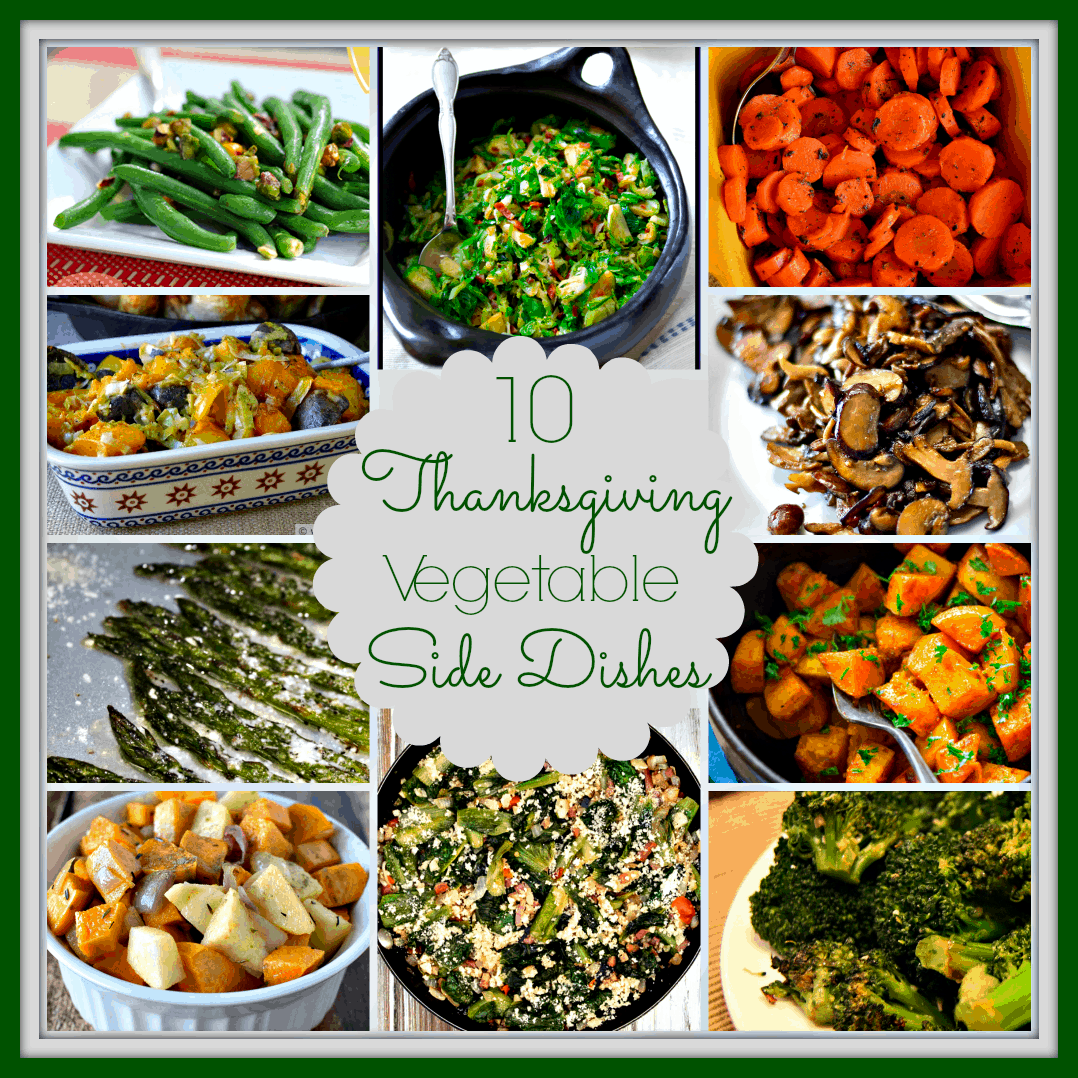
Everyone has their favorite Thanksgiving side dish but if you're looking for some new veggie options, check out Upstate Ramblings for some great options. 


Whether you think of them as such or not, you probably have some Thanksgiving Family Traditions. If you're looking for some additional ideas, Lou Lou Girls has you covered. Some really lovely ones! 


OK. If I have one gripe about Thanksgiving ( I know...not really the time to have any gripes) it's the lack of chocolate! So I'm always on the lookout for something I can add to the dessert options like these Chocolate Wacky Cupcakes With Vanilla Buttercream Frosting yes please and thank you from SimpleReipesClub

Now onto this week's party!


Cornhusk Altered Candles


Sharing the details of the guest post I did for Mod Podge Rocks earlier this week. As you can see from a few projects, I'm a little obsessed with cornhusks this year! 

For this project you will need: 
  • Plain glass prayer candles ( I got mine at Dollar Tree)
  • Cornhusks ( wherever Mexican food ingredients are sold these are used for tamales) 
  • Mod Podge ( my go to is the Matte formula)
  • Dimensional Mod Podge ( I used gold) 
  • Craft Paint
  • Your choice of paper(s)
  • Ribbon
  • Coordinating paper scraps
  • Glue gun and glue sticks

Apply your choice of paper to your candle with what else? Mod Podge. I used paper from a roll I found in the paint section at the hardware store. I think it's normally used to cover glass when painting things but I love it because it's thin, absorbs the Mod Podge beautifully and is a neutral color you can paint or stamp or leave as is. Measure enough to fit around your candle. I tore the top and bottom edges of the paper because I like torn paper. I also scrunched the paper up to give it a more rustic feel. 


Apply enough Mod Podge to cover one side of the paper ( you can see the torn edges and "scrunching" ) and then attach the paper to your candle. I find it's easiest to leave the paper where it is, lay the candle on its side and then roll until it's covered. Once secure, apply another coat of Mod Podge to seal. 


While this is drying, you can make your cornhusk leaves. You may have seen that Mod Podge can be used to preserve Fall leaves. I figured it might work on cornhusks too! Cut leaf shapes ( I just did this freehand) from  your cornhusks. If they are really really stiff you can mist with water to make them more pliable. Apply Mod Podge to both sides and once dry, you can use as is or as I did which was to paint the tips with some glitter craft paint.  If they curl a bit wait until fully dry and you can flatten them out by bending them in the opposite direction.


Once the paper was dry on the candle I went around it with a piece of washi tape paper but you can also use a coordinating piece of scrapbook paper, book page etc.  Hot glue the leaves together as shown then glue to your candle. I added some scrap velvet ribbon at the top of the leaves. 


To finish, I grabbed some paper scraps from my stash and made rolled paper roses.  Waste not want not. I had some scrap cornhusk pieces so I painted those silver and glued the rose on top of them as shown. I edged the top of the candles with the ends left over from the washi paper.  Finally, I filled in the center with gold dimensional Mod Podge. 


Sharing At: 


Tuesday, November 18, 2014

Fairytales Do Come True...Guest Posting at Mod Podge Rocks


My dear readers, if you're a reader of my blog you know that next to chocolate the thing I love most is Mod Podge. Suffice it to say I am over the moon to be guest posting at the epicenter of all things Mod Podge: Mod Podge Rocks!! Sharing these altered candles featuring my Fall obsession, cornhusks. 

Thank you Amy for having me! 

Saturday, November 15, 2014

Thanksgiving 2014 Banner: Cornhusks are Back!


This week's link party is still going strong here so please link up! 

Sharing my Thanksgiving mantel for this year. You might recall my Cornhusk Wreath shared here.  I had some cornhusks left over and couldn't wait to play with them some more. 

Life is always challenging. This year has been no exception. Yet despite challenges, we have much to be thankful for. So it seemed an obvious choice for a banner.  The banner was pretty simple. I cut the letters THANKFUL from metallic brown paper using my Cricut ( Expression...not Explore...trying to win one of those or if anyone wants to hook me up with the Cricut people!) and matted as shown on cream and gold card stock . 


I have a container full of punches I haven't used in a while and found this one that looks like acorns so punched the bottom corners of the cream cardstock. Used gold glitter washi tape to edge the top of each panel. 


I decided to make some cornhusk leaves and  feathers. Feathers are really popular right now and they fit right in with my idea.  


I cut leaf / feather shapes from cornhusks, coated them with Mod Podge to make them less brittle and edged the tips with gold glitter paint. I used Martha Stewart gold. 


I attached my leaves / feathers to the bottom of each letter using my glue gun and added a punched maple leaf to a couple of the  letters 


For some of the letters I did leaves. For others I did feathers. Same shape as the leaves but I notched the edges and cut some additional feathers from kraft cardstock. 


I'm happy with the mix of rustic and glitz. I also had fun re-mixing pieces from prior years.  Some of my favorite pieces from my mantel this year: 


Script Tissue Paper Pumpkin from 2012 and turkeys I found at JoAnn's for 75% off a few years ago and painted. 


Dollar Tree glass candles ( wrapped in Dollar Tree tissue paper) that I did for New Year's 2014 and ended up keeping out all year. More JoAnn's turkeys. My white pumpkins from Halloween are still holding on. Just a little longer little guys. 


And this year's Cornhusk Wreath

Less than two weeks to T-Day! 

Sharing At: 


Thursday, November 13, 2014

BFF Open House Link Party #184

The Answer Is Chocolate

T-Day minus exactly two weeks people! TWO WEEKS. And then you know what happens right? Full speed til Hanukkah and Christmas. And not judging anyone because I'm pinning tons of Christmas ideas but I am a stickler about no Christmas decorations until after Thanksgiving.

Lots of great ideas at last week's party. Here are just a few!


Heather from Woods of Bell Trees some great ideas on transitional decorating perfect for this time of year between holidays. Love the pumpkins and pinecones that work thru Thanksgiving and then the other pieces that go into Christmas. 


The Gracious Wife has a lovely roundup of Thanksgiving table decor and centerpieces. 


I am in serious love with these pinecone cookies from Ooh La Lovely

Make a platter of  pinecone cookies and these adorable acorn cookies from momdotcom using mini Nutter Butters and Hersheys kisses. Perfect for your Thanksgiving dessert table. 


Now onto this week's party!


Sunday, November 9, 2014

Dollar Tree Altered Pumpkin Candleholders

Dollar Tree Thanksgiving Candle Holders

I picked up a couple of extra foam pumpkins at the Dollar Tree during Halloween shopping. Like most projects I do, I knew I’d do something with them but not exactly what. Since the tag said they were carvable, I thought maybe I could use them as the base to hold glass candleholders , also from Dollar Tree. No clue why this thought came to me...just did.

For this project you will need:
  • Dollar Tree ( or other carvable foam pumpkins)
  • Glass candleholders (Dollar Tree)
  • Craft paint
  • XActo knife
  • Twine
  • Charms
  • Hot glue gun
  • Paper Roses
Dollar Tree Pumpkin

Using the bottom of the glass candleholder as a guide, I traced a circle around the top of the pumpkin and cut out the top with an Xacto knife:

Carved Dollar Tree Pumpkin

Yay…no pumpkin guts to deal with. Inside the rim looked a little rough so I covered it with some Mod Podge and tissue paper. It doesn’t really show in the finished project but I wanted to be safe  just in case.

Painted Dollar Tree Pumpkins

Paint pumpkins with a couple coats of craft paint (I used taupe).

Tip:  use push pins to make it easy to pick them up and hold while painting.

When the base color is dry, dry brush with white. The bumpy texture of the pumpkin really shows through with the dry brushing.

Dollar Tree Pumpkin Makeover

Glue paper roses around the top of the pumpkin (you can see the tissue paper I used to rim the inside of the pumpkin) .

Dollar Tree Makeover 1

Now on to the candleholders.

Dollar Tree Vase Makeover

Wrap the twine around the top of the candleholder and tack in place using hot glue.
Twine Wrapped Vase

Hot glue charms to center:

Oak Leaf Charm Vase

Place candleholders inside pumpkin base.

Dollar Tree Thanksgiving Candle Holders

Sharing At:
The Girl Creative


Thursday, November 6, 2014

BFF Open House Link Party #183

The Answer Is Chocolate

Happy Friday Eve once again! Can you believe Halloween was already a week ago? I can't. Before you know it Thanksgiving will be here. Time is not slowing down. 

Here are some ideas from last week's party perfect for entertaining, decorating and gift giving. 


Do you love strolling through Restoration Hardware or flipping through their catalog? Do you find yourself oohing and ahhhing and saying "no way" at the prices? Rachel from Holy Craft did and knocked off a $550 piece from RH for next to nothing. 


Seeing "caramel apple" and "nachos" in the same sentence is not something I would expect to see. But Bonnie from The Pin Junkie managed to combine them into this dessert that is a must try! Plus there is just no easy way to eat a whole caramel apple is there? 


Teri from A Creative Princess has a simple but perfect idea for fall decorating using clay pots. You could do smaller versions for a centerpiece or make a few of these as gifts. 


I'm going to let Sharon from Her Organized Chaos explain this week's chocolate feature in her own words: Must I really explain this cheesecake? You can just imagine the taste with the name.Oh Sharon, yes I can...yes I can!

Now on to this week's party! 


Wednesday, November 5, 2014

Lazy Frame Makeover and Thanksgiving Printable

Frame Makeover After

This quick frame makeover was the laziest project in the history of lazy projects. It took longer to make the printable than update the frame.  I love neutrals and black and white in case you can’t tell. I did try for a few years to do the color thing and I LOVE nature's colors this time of year , especially here in the PNW where the leaves are brilliant right now. But I went back to my comfort zone this Thanksgiving.

Frame Makeover Before

See ….proof! I had a metallic orange frame that’s been part of my décor the past few years. It just wasn’t going to go with what I had in mind for my mantel this year. I thought about painting the frame which wouldn’t have been that hard, but I was tired and I did mention this was a lazy project right?  Thank goodness for self adhesive glitter tape!

For this project you will need:
  • Simple frame
  • Glitter tape ( I used Recollections from Michaels)
  • Printable
I dis-assembled things, cleaned the glass, and said goodbye to the previous printable. Then I just went around the edges of the frame with my (black)  glitter tape. This does not require advanced crafting skills. This does not require ANY crafting skills.

Then I printed out the printable I made in PicMonkey. I couldn’t decide on a font so I made three versions.

Gather Together

Gather Together Scriptura

and the one I printed out

Gather Together Delicious Cake

Oh did I mention I'm sharing them? Click on to bring to full res, right click to save as. 

Confession. I goofed on my sizing when I printed it but waste not want not. Instead of reprinting, I just mounted it onto some gold cardstock that was the right size for the mat. Done and done!

Frame Makeover After 1