Hope you all had a wonderful Valentine's Day. I may just be on chocolate overload but I'm sure I'll get over it. Just a reminder that this month's Open House Link Party here at The Answer Is Chocolate will be this Friday, February 18.
I'm super excited to have a sponsored giveaway to go along with this month's party so definitely don't want to miss this one! You'll just have to come on Friday to find out what it is :) I'm sure your eyes will be smiling! See you Friday !!
Tuesday, February 15, 2011
Monday, February 14, 2011
Happy Valentine’s Day
Wishing you a day filled with Lots of LOVE and of course, chocolate!


Awww...Mr. C just brought these:
Sunday, February 13, 2011
Sweet Treats for My Sweets
I spent the afternoon today making some treats for my two favorite guys. No not you Johnny Depp. Mr. Chocolate and Chocolate Chip (aka, son).
We were at Costco yesterday and they had chocolate dipped strawberries for sale and Mr. Chocolate said “I bet you could make those” So it was kind of an Iron Chef throwdown. OK it’s not like it’s hard.
We were at Costco yesterday and they had chocolate dipped strawberries for sale and Mr. Chocolate said “I bet you could make those” So it was kind of an Iron Chef throwdown. OK it’s not like it’s hard.
Dry…make sure you dry your berries
Melt…I used dark chocolate candy melts
Dip…Grab your berries by the hair ( or if they have them, stems) and dip
Drizzle…I drizzled w/ melted white chocolate
Claim it was REALLY REALLY hard!
For the cookies, I used my tried and true chocolate chip cookie recipe, then did the dip and drizzle steps from the berries.
Tried and True Chocolate Chip Cookies:
- 2 sticks butter ( not margarine), softened
- 3/4 C Sugar
- 3/4 C Dark Brown Sugar
- 2 Eggs
- 1 Tsp Baking Soda
- 1 Tsp Salt
- 1Tsp Vanilla
- 2 1/2 C Flour
- Chocolate chips
Cream butter, add both sugars and cream well.
Add eggs, and mix thoroughly
Add salt, baking soda, vanilla, mix well.
Add flour mix well. I use an electric hand mixer up to this point
OK about the chocolate chips…
I don’t measure I just add some, mix with a spoon, decide not enough, add some more until I’m satisfied.
Chill dough for at least an hour. Form into balls , bake on ungreased cookie sheets ( or you can line w/ parchment paper) @ 375 for approx 10 min ( ovens and cookie sheets vary…I like mine just when they start to brown on top) .
Chase cookie dough stealers away with wooden spoon while threatening to never make cookies again.
Friday, February 11, 2011
Last Minute V- Day Crazy Idea and Oops
I didn’t do tons of Valentine’s decorating but figured my cooking this weekend would be Valentine-y. So I thought hmmm…I should have a Valentine’s table and hmmm… don’t want to buy anything and I’m really not a tablescaper so hmmm….make some placemats. OK.
Naturally I used scrapbook paper because doesn’t everyone make placemats out of scrapbook paper? Some people do! I googled it. I thought this would be a perfect use for some “clear” contact paper I picked up on one of my Dollar Tree trips. More on that later. Here’s what I started with:
Misc papers, K&Co self adhesive scrapbook borders, contact paper.
I played around like I was making scrapbook pages…tear here, border there, sticker here, use up some scraps etc. :
Then the big plan was to cover each “pagemat” with CLEAR contact paper. One problem: what I thought was CLEAR was in fact…WHITE. Duh! So now what genius? To the stash!
Pulled out these that I’d picked up somewhere on clearance:
Clear overlay transparencies! Take that contact paper. I figured these would provide just as much wipeability as my “I thought it was CLEAR” contact paper, so I adhered them to my pagemats with my tape gun. And waste not want not, I used the white contact paper to cover the backs so they’re wipeable too! They won’t last forever but they’ll last long enough and then I’ll just cut them up for something else ‘cause that’s what we do!
Oh yeah…if you click on the lip thingy, it’s a printable
Linking Up At:
Thursday, February 10, 2011
BFF aka Blog Feature Friday#9: Food, Wine, and Mod Podge!
How did it get to be Friday already? Don’t know. Not complaining! Before we get all sugared up this weekend on Valentine’s treats ( chocolate of course!) it’s time for another:
This week, I’d like to introduce you to Katie from Food, Wine, and Mod Podge!
Katie combines her love of all of these things into her blog. No, she doesn’t combine food, wine, and MP all together although I suppose if one has enough wine, anything could happen! No, Katie has her blog neatly organized into sections devoted to each of these. Let’s look at food first:
Wouldn’t these be perfect for Valentine’s Day:
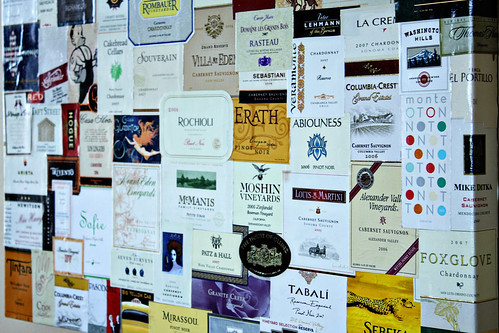
But what’s good food without good wine? If you’re like me and a wine ignoramus, Katie will educate you as well as show you some more great recipes that use wine, and then…what to do with all the wine labels you have leftover. Hint. Don’t. Throw. Them. Away. She made this for her hubs for their anniversary out of wines they’ve shared. Awwww!
I put those instructions of what to eat vs make in case you’ve had too much wine.
Last but not least, Katie’s crafty and as you might have guessed, loves Mod Podge. What’s good food without some food themed décor? Katie did this recently using her Silhouette :
 And where would a crafty cook and wine connoisseur be without a wonderfully Mod Podged recipe book?
 So go visit Katie for some wonderful inspiration and just remember you drink or cook with the wine and use the Mod Podge!
This week, I’d like to introduce you to Katie from Food, Wine, and Mod Podge!
Katie combines her love of all of these things into her blog. No, she doesn’t combine food, wine, and MP all together although I suppose if one has enough wine, anything could happen! No, Katie has her blog neatly organized into sections devoted to each of these. Let’s look at food first:
Wouldn’t these be perfect for Valentine’s Day:
peppermint chocolate meringues
Katie’s food section provides lots of delicious from scratch recipes with great pictures and step by step instructions. You will be hungry after scrolling through it!
Mod Podge Collage of Wine Labels…Make This
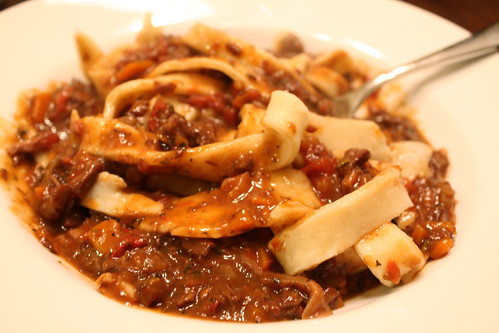
Ragu With Homemade Noodles…Eat This!
Last but not least, Katie’s crafty and as you might have guessed, loves Mod Podge. What’s good food without some food themed décor? Katie did this recently using her Silhouette :


Tuesday, February 8, 2011
I Finally Said It On Something!
Last year ( why does that sound like SOOOO long ago? ) I was lucky enough to win a giveaway from Say It On The Wall over at Craftily Ever After.
Say It On The Wall is home to all kinds of awesome vinyl sayings and designs that you can use to adorn everything! I picked out what I wanted right away ( and it shipped super fast) but then I got busy with the holidays and only just got around to using one of the things I got. So what did I do?
I started by re-purposing a 12x12 tile from another project:
which I covered with a piece of scrapbook paper, Paper Adventures Beachy Shadow Wash:
I loved this message when I picked it and even more now that I have it on something!
Say It On The Wall is home to all kinds of awesome vinyl sayings and designs that you can use to adorn everything! I picked out what I wanted right away ( and it shipped super fast) but then I got busy with the holidays and only just got around to using one of the things I got. So what did I do?
I started by re-purposing a 12x12 tile from another project:
which I covered with a piece of scrapbook paper, Paper Adventures Beachy Shadow Wash:
I added a couple of coordinating scraps at the corners and then put my vinyl piece on:
Easy peasy. To finish, I added some paper flowers from Recollections at Michaels topped off with buttons:I loved this message when I picked it and even more now that I have it on something!
Sunday, February 6, 2011
Keep The Roses, Give Me The Chocolate
OK, I admit it, I like the roses too! But with Valentine's Day only a week away, I started looking online for some fun dessert ideas and thought I'd share some of them with you all. I haven't yet decided what I want to make for our Valentine's dessert but here are some things I'm considering:
From Hershey's:
| Fudgey Valentine's Cake |
| Double Chocolate Cheesecake |
From Martha:
 |
| Rich Chocolate Heart Cakes From Country Living: |
 |
| Chocolate Peanut Cheesecake |
From Better Homes and Gardens:
 |
| Rum Laced Chocolate Fondue |
I'd probably leave out the rum but I do have that new fondue pot....
Decisions decisions!
Subscribe to:
Comments (Atom)


