Showing posts with label vinyl. Show all posts

Monday, October 8, 2018

Easy Paper Hoop Project : Halloween Edition


I was meeting a couple of girlfriends for Brunch and I always like to bring a little girlfriend gift. I whipped these up quickly because my week hadn't gone as planned and I didn't even take a pic of the "final final" so not even sure I should post but...

I was inspired by this Christmas idea from The How To Home

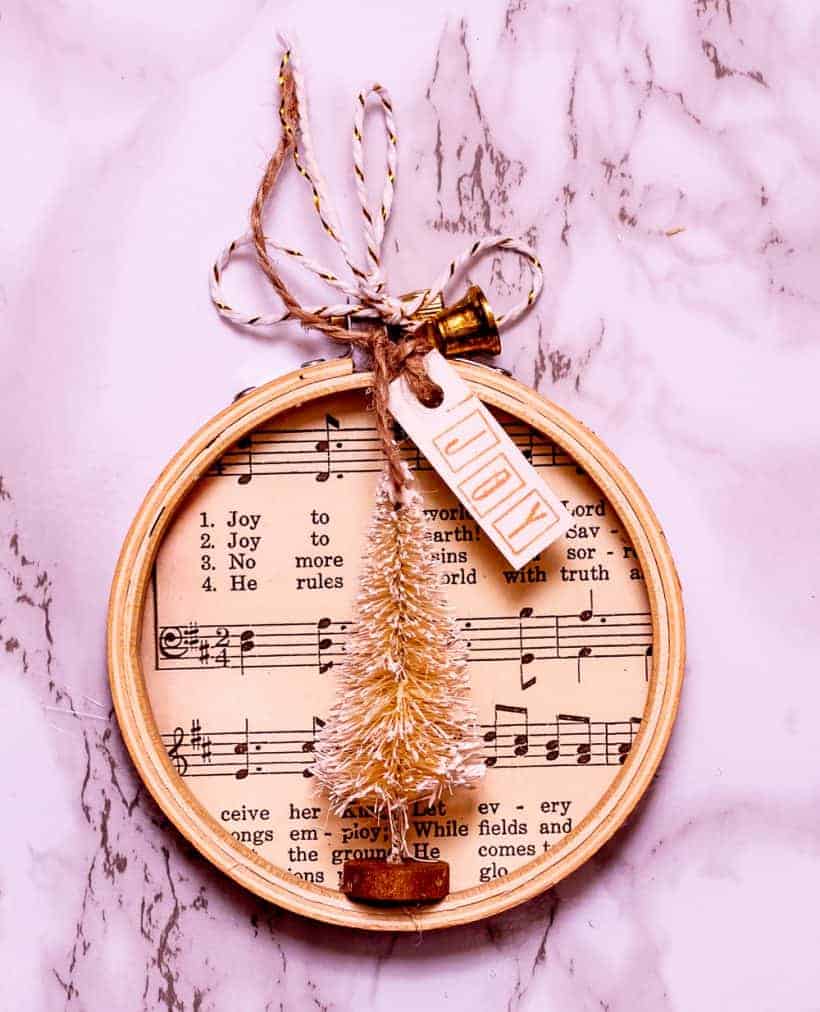
and have these planned for Christmas. But I thought "hey, I could do something easy peasy for Halloween" to take my friends. 

Supplies: 
  • 3" Wood Embroidery Hoops 
  • Paper of choice
  • Vinyl decal ( I cut mine using my Silhouette but you could use pre-made or use stickers or diecuts!)
  • Embellishments 


This was a great way to use some papers from prior Halloween cards. I chose two sheets , traced the outer hoop, and cut out the circles. 


Glue to the back of your hoop using hot glue.  I chose a Halloween themed image from the Silhouette Library and added each of their initials in the center. 


Applied the vinyl to the center of the hoops and voila! 

I finished these ( bad blogger...forgot to take a picture!!) with a black organza ribbon bow at the top and tied a Halloween themed enamel charm with black and white baker's twine. And me, being me, added a few clear sparkly rhinestones o the broom and monogram. Super easy. Super fast. And I think super cute!!


Sunday, October 8, 2017

Girlfriend Gift: Glass Block Sugar Skull


One of my girlfriends loves Sugar Skulls. Like she dressed as one for Halloween one year loves Sugar Skulls, so her birthday present was easy peasy this year...both the decision on what to make her and making it! 

I used a textured glass block that I had in my stash. I thought it was perfect for this since the texture reminded me of melted sugar. 

Supplies 
  • Glass Block ( you can find these at every craft store)
  • Black Vinyl
  • Misc. Embellishments ( I used cording, rhinestones, and tassels from  my stash)

I looked for and found a Sugar Skull image I liked in the Silhouette Online Store, purchased, and downloaded. Sized it, cut it and proceeded to do my least favorite thing in the crafting world, weeded it. 


Lots of little bits and pieces to make sure to remove but SUCCESS!


Centered and applied the vinyl. I cleaned the surface of the glass block with alcohol to make sure and get up any oils etc. so the vinyl would stick well. 

I debated about putting lights inside and tried it and decided I liked it better w/out the lights since they competed with the detail of the vinyl image.  Plopped the thingy that seals the opening into place ( and gave her the extra toppers that come w/ the glass block in case she wants to fill it with anything or add lights) and then finished off by tieing several types of ribbon and fiber around the block and finished it all off with a cluster of misc charms and beads. 


I also added some clear self adhesive rhinestones which are hard to see because they blend into the glass. They stand out much better in person. 


To package it, I pulled some paper scraps from my stash and cut out some flowers using a Tim Holtz die. Repurposed a kraft paper bag using the papers, flowers and some of the Washi tape that was part of my last year's birthday present from the same girlfriend.  She knows me too well because look what she gave me this year: 


SWOON! A collection of gorgeous papers in my favorite colors to play with! See that Sugar Skull paper? Yep it will be coming to another gift for her lol.


Wednesday, August 23, 2017

What Good Are (Altered) Wings Wall Art


I teased these when I shared my last project: Another Altered Cabinet Door. I might need to change my blog name to something w/ "altered" in it . 


I saw these wood wings earlier in the year at Michaels when they first came in and went back and forth on them mostly because they had a whole selection of different wings and I couldn't decide. That became easier when after procrastinating, there were fewer to choose from but the ones that remained were 70% off. Score! I mean they were originally only $19.99 but I got them for $5.99. Deal. 

Supplies: 
  • Wooden Wings
  • Acrylic Paint
  • White Glue
  • Leafing Glue
  • Silver Leaf
  • Vinyl Quote
  • Misc. Embellishments 
I had all of the other supplies in my stash which Mr. Chocolate calls "The Michaels Annex".


Paint with your basecoat color of choice. I used Craftsmart gray. Since I'm partial to a chippy / shabby / crackled look, I didn't care about complete coverage. 


If you prefer a more opaque look, go over w/ another coat. 

Did a combination of my fave white glue crackle and dry brushing over the grey using white acrylic paint. While the paint was drying, I laid out my quote in my Silhouette software and cut w/ my Cameo. The quote is by the poet Atticus: 

This is the same font I used for my vinyl ( it's called Ambrosia) and of course now I don't remember where I downloaded it from!  

I cut out my quote using black matte vinyl and since I'm easily frustrated w/ vinyl projects and inevitably muck something up that results in swear words , I trimmed the words into individual pieces to minimize the muck up opportunity. 


This also made it easier to lay out the words. Once I was happy with where I wanted them, I applied them to the wings. 


Never content to leave anything alone ( what fun is that?!) I decided to add some silver leaf to the tips of the wings and pulled out this pair of plaster wings I had in my stash, along w/ some adhesive rhinestone swirls. 

Metallic leafing is such a rich accent. I love adding bits and pieces of it to things. You need a good leafing glue ( called size) and I like the Mona Lisa brand. Basically paint where you want your leafing to go using the glue, wait 20-30 min (weather conditions matter so if hot, shorter time) until tacky and then apply your leafing. You can find many tutorials on how to use metal leafing on Pinterest and You Tube so won't go into that here. 


It hangs in our entryway which I pass everyday on my way to my office and it's a great reminder to me to be fearless, try new things, challenge myself. 

Monday, October 17, 2016

Signs of Halloween


Even though I thought I was done w/ my Halloween decorating, I went on a little bit of a sign making binge while we were on storm watch this weekend.  Being cooped up in the house is a good way to do some stash busting! 


These were all made from inexpensive things I'd picked up along the way and done the same way. Paint and vinyl. Easy peasy. 


Supplies:

  • Wood pieces to paint
  • Craft paints in colors of choice
  • Vinyl
  • Vinyl cutter
  • Misc. embellishments


For the "Wicked" sign, I started with a plain wood box I found at DAISO ( Japanese Store where pretty much everything's $1.50). 

The large Broom sign was one of those " no idea what I'm going to do with this but it's $.99" sale finds at Michaels.

The three piece Broom sign was from a bag of wood pieces bought on another trip to Michaels. 


The process is the same for all the signs. Paint, dry brush, apply vinyl. 

Paint with the basecoat color of your choice ( I used Folk Art Titanium White and Extreme Glitter White;  Martha Stewart Metallic Gold ) . For the white signs, apply one or two coats of the plain white and then one coat of the glitter white. For the Wicked sign , two coats of the gold paint. When dry, dry brush lightly with black paint. 


Either while you're waiting for your paint to dry or the power to go out, cut your vinyl. I used images from the Silhouette store and cut on my Cameo.  When your signs are dry, weed and apply your vinyl. 


Saturday, January 28, 2012

Valentine's Banner from Coffee Filters and Christmas Ornaments

I finally got to sit down and play today! I had the general idea for this in my head but it was greatly helped along when Rachel from Holy Craft shared a tutorial on coffee filter flowers that made me really want to bring the idea for this banner (that’s now on our bedroom mirror)  to life.

LOVE Banner (2)

The banner is a combination of coffee filter flowers and paper mache heart shaped Christmas ornaments I picked up 50% off after Christmas.

Paper Mache Heart

I covered the heart with a gray paper from Echo Park. I had some great lace ribbon trim in my stash and hot glued that around the edge of each ornament.

Paper Covered Heart

Here’s a better shot of what the ribbon looks like.

Lace Rose Trum

I cut out the letters L O V E on CoCo, my Silhouette Cameo, and put one letter on each heart.

Paper and Vinyl Hearts

Then I made my flowers. 5 coffee filters per flower and following Rachel’s tutorial.

Dollar Tree Coffee FIlters

Thank you Dollar Tree. 160 coffee filters for $1!

Coffee Filter FLowers

I made 5 flowers so I had one for each end and to go between the letters. I strung the hearts on some silver tulle using the thread that was already attached and then clipped the flowers using clothespins, then strung the banner across the mirror. And while this might be Valentine’s themed, with the colors I used I can actually leave it up permanently.

LOVE Banner

Sharing At:
homework


Friday, September 3, 2010

Stashbusting September Project #1

It's three days in and I haven't set foot in a craft store! Yeah me! That may also be because I haven't left the house but.....pesky details. I went to the closet of magical mystery and pulled out some stuff that I picked up to be used "someday".
ONLY THE TIP OF THE ICEBERG
I decided on a project using a cabinet door I picked up at a salvage place. Everyone keeps cabinet doors on hand for no reason right?
I had some vinyl left over from my "Wish Upon A Tray" project and the lightbulb went on. So I painted it black. The cabinet door. Not the lightbulb.
FIRST COAT
added a second coat and then tried the white glue crackle technique. "Make The Best of Things"  has a great tutorial on this. I will NEVER buy crackle medium again! Love this. Best part was that during school supply shopping, I bought a half dozen or so bottles of white glue at Staples for maybe $2 total. Less than the cost of a small thing of crackle medium.
SMEARED IT ON W/FINGERS
After it gets tacky but not dry, add another color of acrylic paint and wait for it to dry. Or not...I was not patient so used my craft dryer ( aka an old blow dryer) to speed things up and I can't be sure, but I think the heat made it crackle more:
I just did the edges so it would look like a frame if that makes sense. I added a couple of strips of scrapbook paper on the raised panel in the middle; used my "dream" vinyl leftover from my earlier project; added an embossed metal strip from the magical mystery closet (which means it was something I picked up on sale somewhere that I knew I'd use someday) along with some dimensional flowers (Jolee's Boutique I think) from another project which I dry brused w/ gold paint and silver Rub n Buff; and a butterfly from a bag of ephemera I'd bought at a stamp show. And: 
STASH BUSTED! OK, TINY DENT MADE!

You can check out the other projects in the T Shirt Diaries "Stashbusting September" challenge here

Linking Up At:
UndertheTableandDreaming All Thingz Related