Showing posts with label scrapbook borders. Show all posts

Wednesday, April 18, 2012

Altered Canvas: Stashbusting Tale of Crazy Michaels Lady

One of the most dangerous sections of Michaels for me is their used to be  $1 section that’s now 2 for $3 (sorry Michaels, I’m still not over that although it hasn’t deterred me).

Key Canvas (2)

Despite my grumbling about the whole 2 for $3 thing, that section is a treat for me. It gets even better when that section goes on sale. Yes, that is me... the crazy lady doing the happy dance and talking to herself in that section and digging through the bins trying not to drop stuff because she didn't think she needed a basket because she came for just one thing. You’ve been warned.

Last year, I went a little wackadoodle over rub-ons. Completely justified since they don’t take up a lot of room and can be used on everything and I really truly will use all of the ones I bought ( someday).

Then when I was there on a trip not too long ago, I did an extra happy dance because that section had these cool mirrored pins in all kinds of shapes , ON SALE, and one of the shapes was a key that happened to go with key rub-ons I bought last year! Breathe.

Michaels Key Pin

Now this would have been cute as a pin,  but I’m not much of a pin wearer. So naturally I snapped the pin back off.

I had an 8x10 canvas in my stash that I covered with some shabby paper by Little Black Dress and then went to my scraps and pulled out some coordinating pieces. Layered them on the canvas w/ Mod Podge.

Key Canvas (3)

Reduce. Re-use. Recycle. I used the paper the pins came on and glued those to the canvas. Didn't even tear them or cut them just used as they came.

Tore a sheet from a notepad ( from the same section) and stuck that in the middle. Enter my last year’s rub-ons, an adhesive scrabook border and done and done.

Key Canvas (4)

Key Canvas

Easy, inexpensive, and “green” since I used packaging from the pins.

Sharing At: 

Thursday, September 23, 2010

Stashbusting September Project#11: Crafting Chicks Inspired Banner

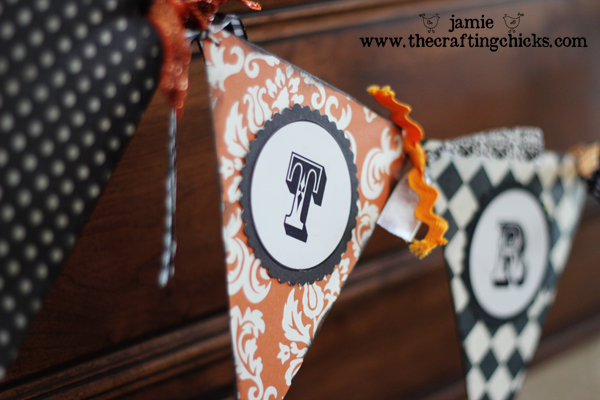
This is more like "Six Degrees of A Project" because it was inspired by my daily visit ( OK make that one of my daily visits!) to One Pretty Thing which led me to The Crafting Chicks to this project Trick or Treat Banner


which led me to the inspiration to make my own. Whew! Still with me?

Since I'm still stash busting (DAY 23 and though they taunt me, I haven't been to visit my friends Michael or JoAnn) I had to use what was on hand ( because that's SUCH a problem!). I adapted Jamie's idea and created the words "TRICK OR TREAT" in my graphics program and pulled some coordinating papers from my stash:
I cut out the letters ( putting a border around the letters helped me cut them out easily) and I cut starbursty thingies to go in back of them using my Cricut. Cut triangles from the polka dot paper and using coordinating scraps, tore pieces to go along the top of each triangle. I mounted the letters to the triangles using foam dots, strung (why does that look weird?) on twine, and tied cream and black ribbon between the letters:
Hard to get a good picture that fits the whole thing in
I haven't done my mantel yet but put this up temporarily to get pics.


Now go on over to The Crafting Chicks because they have the coolest SPOOKY banner up today!

Linking Up At:

Chic on a Shoestring Decorating
A Little Knick Knack


Tuesday, July 20, 2010

Getting Ready For Vacation and Tuesday Hops

I'm sure normal people just go on vacation but not me. Maybe it's knowing that I'll have limited time to make things while I'm on vacation that I have to make things for my vacation? So I'm either prepping projects I can work on while on vacation or making things to use on vacation. Anyone else do that? One of the things we like to do is keep track of the things we do on our vacations. It's easy to think you'll remember so that when it's time to scrapbook that vacay, you'll just know but HA! The older I get, the easier that sounds and the harder it is. So I started keeping travel journals which I can refer back to when doing my scrapbooks or when I just need a mental vacation. This time of year is perfect to find these:
And, as you can tell by now, if they're on sale like they often are at back to school time...I buy multiples! I think I got this last year as a pack of 2 and they were 2 packs for $1 or something. 

Trace the shape onto your choice of scrapbook paper. I went outside my usual neutral pallette:


and cut out a front and back cover in  coordinating papers. I Mod Podged these onto the composition book and tore some other coordinating papers to collage on. I had some chipboard frames I picked up on clearance that I covered with a scrap of the coordinating paper:
I didn't want to put a lot of heavy embellishments on my journal because it was going to be in and out of my bag so I used a combination of rub-ons, clear alphabet stickers, and things left over from other projects that were printed onto clear label paper to decorate. Of course I couldn't leave it blingless, so I had to put some self adhesive rhinestones on it :) 


Welcome to those stopping in from :

Tuesday Tag-Along 
Update to respond to a question from the comments:
I tore a wide strip of a third piece of paper to cover the spine. Applied Mod Podge to it and folded it over the front and back so about 1/2 of it shows on each side. Hope that makes sense!

Linking Up At:


Thursday, June 17, 2010

Card Tute

Welcome to those stopping in from Smart and Trendy Moms 

Thanks for coming over and visiting my blog!


Here's a card that doesn't require either stamps or any cutting or die cut machines. It's especially easy if, like me, you're one of those people who picks stuff up when you see $.97 and $1.97 stickers on things so you have them on hand when an idea strikes. I use a lot of neutrals in home projects so when it comes to cards, I get to play with color a lot more and since I'm a bit of a paper addict ( a bit?) well let's just say I have pretty much every color in the rainbow and then some. Anyway, start with a basic card. My go to size is  5x7 because I buy A-7 envelopes in bulk when they're on sale. You can cut your own or buy a package of blank cards. I used to buy cardstock in every conceivable color but lately, I just use white or cream as my base card and let the colors come from the scrapbooking paper and accents. This is cheaper since you can almost always find white or cream cardstock on sale.
So there's my 5x7 ( which if you're cutting your own is 10x7 scored at 5 inches) and a package of scrapbooking borders I picked up for $1.97 at JoAnn's. When my husband is looking for me he doesn't call my cell, he just has them page me. Just kidding. Mostly.

I found a piece of scrapbook paper that coordinated and cut out a panel (6.75x4.75) with a smaller white panel (5.75x3.75).  I had some rub ons that I picked up guess where, and put corners on the white panel.


Top pic: Rub-ons and panels. Bottom pic: Two of the borders from the package cut to 6.75 and layered
For my focal, I used two paper flowers from packs I picked up at a stamp show, used one of the flowers from the border for the center and put an adhesive rhinestone in the middle.

Last thing I did, and these are something I always have on hand, took some clear alphabet stickers and spelled out "BIRTHDAY" on a scrap piece of paper, tore it to fit where I wanted and:


OK last last thing....some of the borders were left over so I put those on as accents in the top right and bottom left corners.  It's for a teenager,  young woman, and I was going for not too old, not too young, but fun. And if her mom is reading this, don't show her! It's going in the mail right now!