Showing posts sorted by date for query crackle. Sort by relevance Show all posts

Tuesday, July 12, 2022

Home Decor: Blending Traditional and Modern


 As I've mentioned, our new home is very modern. And while it would be fun to buy all new things, I live on a planet called Reality. Plus DIYing and making things over is what we do. Our prior homes have been more traditional and I wanted a way to make some pieces I still love fit in with this more modern aesthetic. Plus, it's better for the environment as well as the wallet to re-purpose right? These pieces were already thrifted finds I'd painted once so painting them again was no big deal. 


These were some candleholders I found several years ago at Goodwill. They didn't match so I painted them to match and painted them again! 


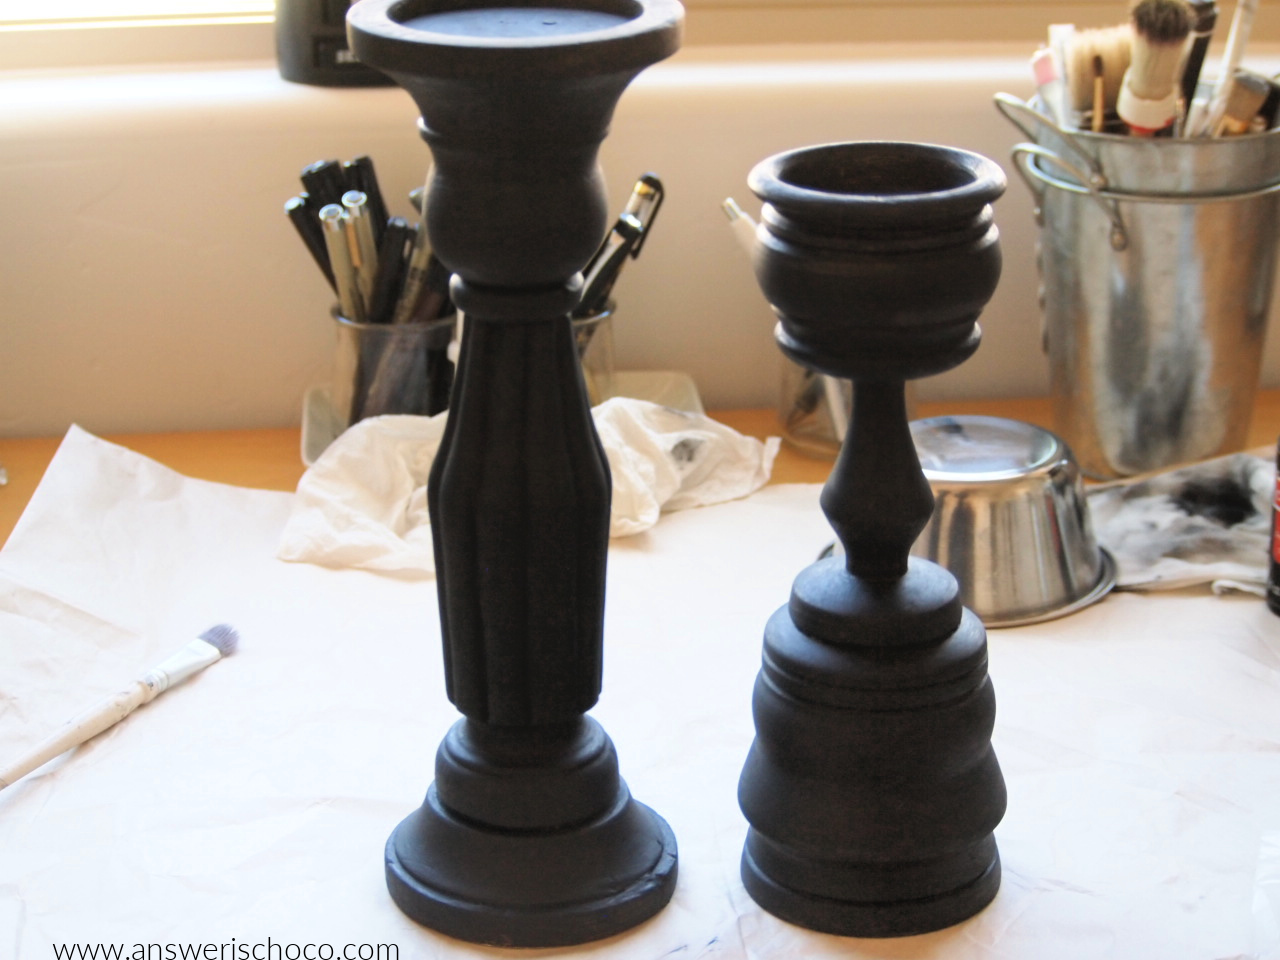
We have a lot of black accents in this house so I started by painting them with a couple of coats of black acrylic paint. I still love a vintage look so I didn't leave them solid, and dry brushed them with a little bit of white. 


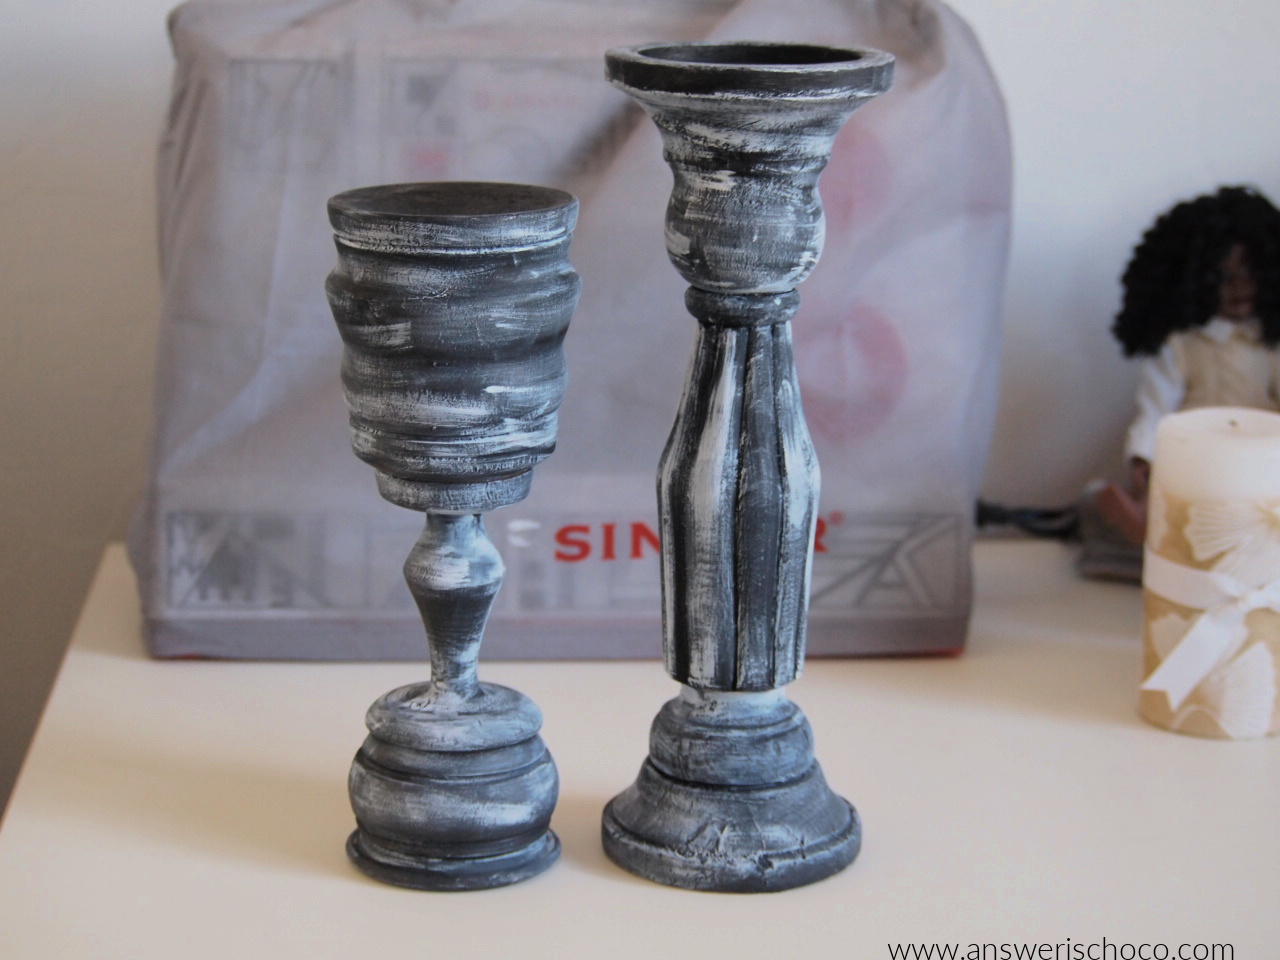
To finish, I used Silver Leaf Rub N Buff to accent some of the raised areas to make them pop. Originally, I thought I'd re-do the candles too. They're decoupaged onto the candles but the powder room also has a wood cabinet and I decided I really liked how they went with it. 


I also knew I wanted to place a small table I'd also previously thrifted and painted. Again, I wanted to emphasize the black but again, I still like my vintage / distressed look. 


I originally painted it a light tan with white drybrush. I painted the legs solid black and  for the bottom did a crackle effect with white using my tried and true white glue crackle technique. 


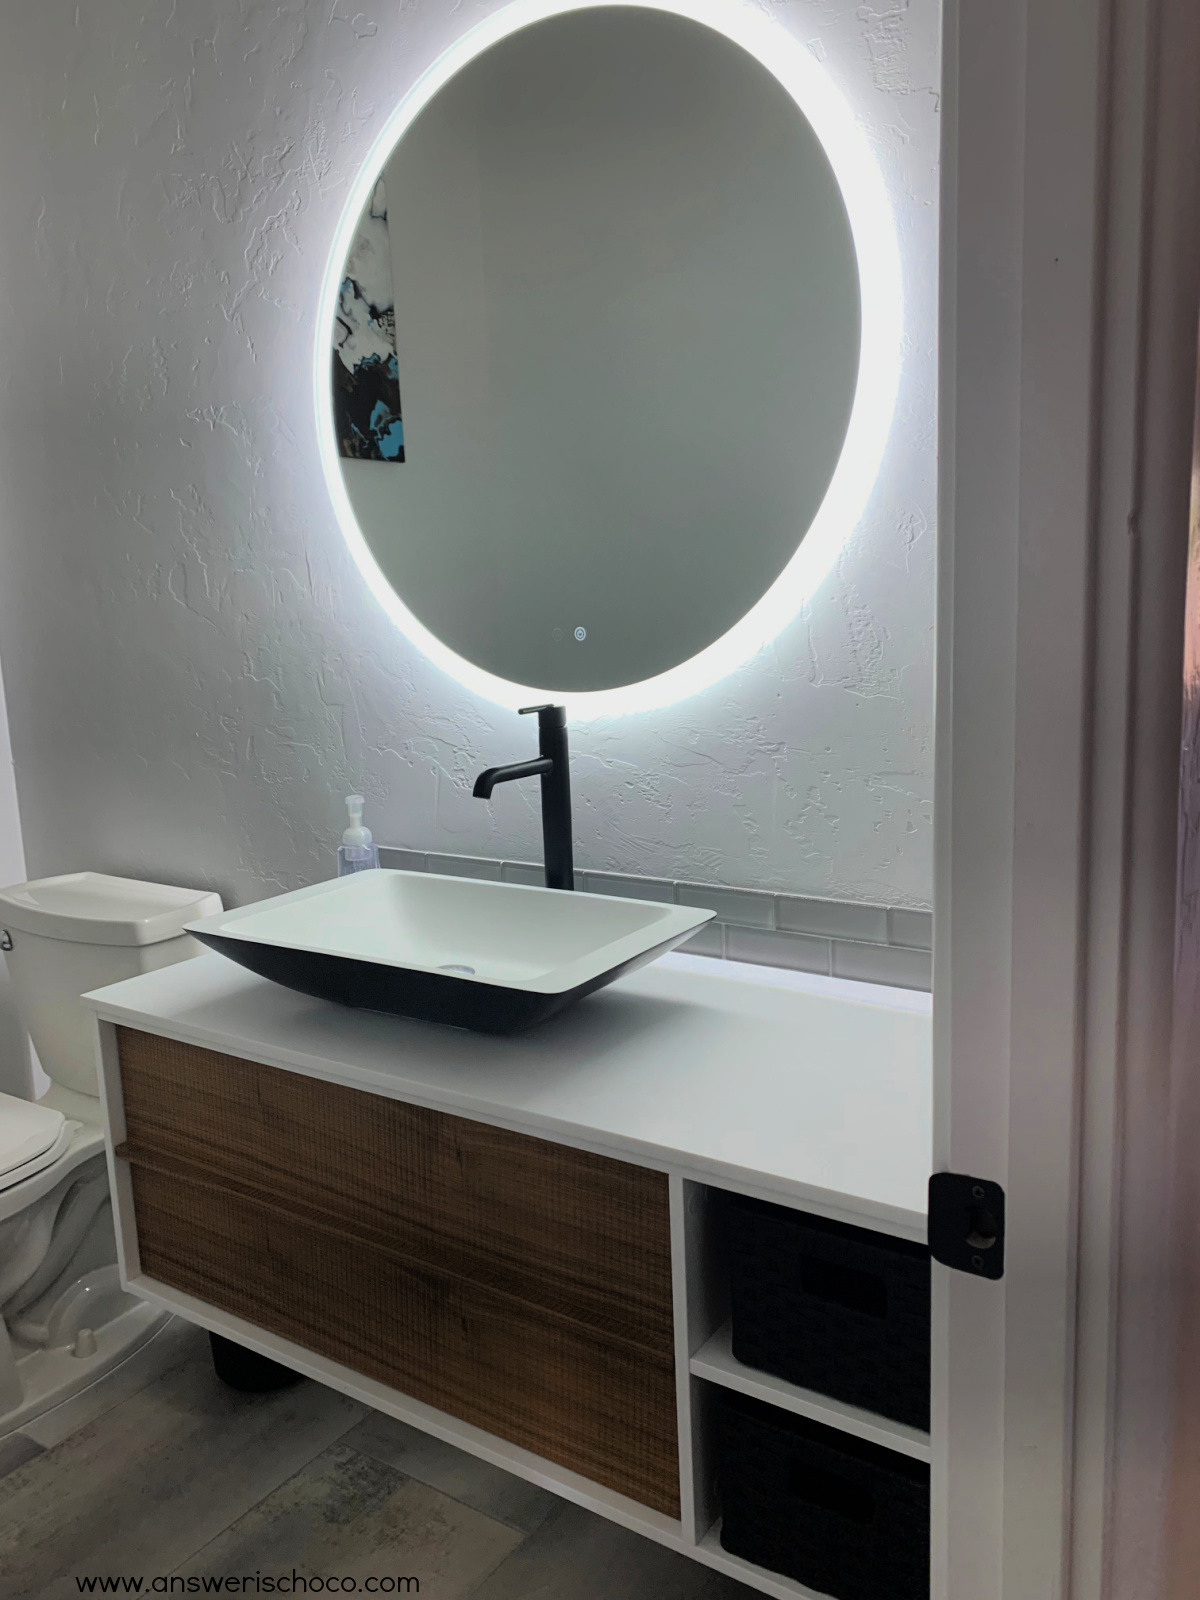
I applied the same Rub N Buff around the edges of the top and shelf of the table. We had a Longaberger basket we bought years ago that matched the cabinet as well as a beautiful wood bowl from my husband's family that I thought would be perfectly displayed on this table, and the black captures the essence of the sink. 


I feel like the silver accents on the candleholders and table work well with our floors, the black and white with the sink, and the browns with the cabinet! We added a couple of black storage baskets from Target to hold extra supplies like toilet paper. I'm really happy with how it all came together mixing traditional and modern. 


Sharing At:


Sunday, November 21, 2021

Christmas Decor: Layered Christmas Stocking


"It's the most wonderful of the year" also the busiest but definitely fun! As a Maker, it's definitely my favorite. And another favorite this making season continues to be layered cut files that so many Makers keep coming up with and sharing, I can hardly keep up! For this project I used one from a collection of Layered Ornaments from one of my favorite creators, Kimberly from Sweet Red Poppy. Whether you sew, do papercrafts or just love pretty things, you really need to check out her blog! 

NOTE: This project assumes familiarity with how to use your machine's software. 

Supplies: 
  • Layered SVG Files (I used the stocking from this collection by Sweet Red Poppy)
  • Cutting Machine (I used my Cricut Explore 2. These also work for Silhouette)
  • Gold Foil, Cream, Silver Glitter cardstock (All, Recollections from Michaels)
  • Background Paper ( I used sheets from the White Christmas stack, Michaels)
  • Display Case Frames (Michaels)
  • Foam Dots
  • Embellishments (I used Wood Stars from Dollar Tree)


For the smaller stocking, I used a silver display case frame from my stash. I pick these up whenever they're a buy one get one at Michaels. The 8x8 frames come 3 to a package and the 12x12 come two to a package so when they're a BOGO it's a great deal! For the 12x12, I thought I had silver but alas, no so to the craft paints! Here's where what some might call a craft fail, I prefer to call a happy accident! I took the frame apart since I was going to paint it. Set the glass and insert aside. 


You might think I used a crackle medium. Nope! I took out some silver chalk paint and apparently it's a wee bit old and had separated. Oops. I stirred and shook it but when I applied it it crackled itself! While I thought I was going to go with a solid silver finish, as I watched this happen I was actually quite happy. Ergo, happy accident! 


The next step was to prepare my layers. The stocking comes in five layers but I wanted it simpler so I hid two of the layers and used the ones shown sized to 6 inches tall for the smaller stocking and 10 inches for the larger. 


Once you've sized your layers, cut them on your machine. Here are my completed and cut layers. 


Once you have all of your layers assemble using foam dots/squares/tape. For the top layer I cut the squares in half to fit the more narrow border. 


Working from the back of your layers, place the foam squares around the cutout, then flip and attach to your base layer. Repeat with the top layer. 


The reason I only did three of the layers is because I'd chosen a star background paper and was excited to use these wood stars I found at the Dollar Tree ( once again..."why didn't I buy more of these?!") because I went back and gone, baby, gone. I put small drops of glue (Ranger, Glossy Accents) on the back and applied to the stockings as shown. 


Squeal! I instantly fell in love with this White Christmas Hot Buy stack at Michaels. This week (11/21-11/27) they're my favorite...buy one get two free so get thee to a Michaels if you are looking for some pretty holiday scrapbook paper. I chose the paper I wanted for my background and cut one sheet to fit the 8x8 and trimmed the other to fit the 12x12 and then adhered to the inside of the frame back using double sided tape. Then I adhered the stocking using more double sided tape and assembled the frames. 


I am so happy with how they turned out! The color combinations are endless. I am so addicted to these beautiful and intricate layered files. 


Sharing At 


Sunday, October 3, 2021

Halloween: Jeweled Doll Head Pumpkins


This week's BFF Open House link party continues here

Since our nest has been empty, my Halloween decor has become much more "Gothelegant" which is a word I just this second made up to combine gothic and elegant. Lots of jewels and metallics. Less whimsical ( although I do have some of that too!). But let's just say about the Darth Vader meme "Come to the dark side, we have cookies" is a perfect fit for me! I've wanted to do something with an old doll head but my thrifting trips the past few years haven't yielded the kind of doll head I want so I'm still on that particular hunt BUT I found some creepy plastic doll heads in the Halloween stuff at Walmart and they just spoke to my deep dark little Wednesday Addams heart! 


Supplies 

  • Doll Heads ( Walmart, $4.88 pkg of 3)
  • Foam Pumpkins ( Dollar Tree, while things are still $1)
  • Glass Candle Holder (Dollar Tree, ibid)
  • Craft Paints (Apple Barrel Gloss Black, Craftsmart White)
  • School Glue (Elmers)
  • Glue gun / glue and strong cold bond glue ( eg E-6000, I used Beacon 3 In 1)


"They're creepy and they're kooky, they're altogether spooky". 


Dollar Tree has these foam pumpkins every year and they're great. You can paint them. You can cut them. You can wrap them in fabric. So many possibilities. For this project I painted them. 


They take paint really well and this Apple Barrel Gloss only needed one coat. Then I did my go to glue crackle. 


To finish the pumpkins, I went over the glue with white paint and then used my craft room blow dryer to hasten the crackling. 


The doll heads were already pretty perfect but what fun is that? I got out my silver Rub N Buff and just added some spots of it here and there. 


This highlighted the scars already on the heads and then I dry brushed and wiped off some black paint so it would get in the cracks. 


Creeptastic! Now it's time to glam them up. I had some clear flat backed jewels in my collection so I randomly glued them onto the skulls and finished with smaller self adhesive rhinestones. Glamtastic! 


Once you're satisfied with your jewels it's time to assembler. I used hot glue to attach the skulls to the painted pumpkins and then the Beacon 3 In 1 to attach the pumpkin to the candleholder. I have found that hot glue doesn't always last on glass but it will work, just may come loose after a while. 


It's so good to be back! 


Sharing At:

Featured At: 


Tuesday, September 28, 2021

Halloween: Crackled and Jeweled Floral Sugar Skull Wall Art


I FINALLY got back to my craft room to make something last week! After the Summer from H*LL, the near septic abscess that tried to kill me followed by weeks of recovery, a move, and then surgery to remove the abscess host ovary and more weeks of recovery, it hasn't exactly been a productive Summer. But doctors know things and it was almost like clockwork when my energy level finally started coming back around week 5 post-op. 

Supplies: 
  • Wood Art Board (Target Clearance but available at Art Supply Stores)
  • Acrylic Paints (Folk Art and Craftsmart)
  • White School Glue (Elmers but store brand will work too) 
  • White Vinyl, Transfer Tape (Cricut)
  • Jewels (Art Minds, Michaels)
  • Dimensional Glue ( Glossy Accents, Ranger)

Before all of this started, I'd stumbled on these fabulous Art Boards at Target which screamed "buy me" especially since they were on clearance for something like $3 so of course I bought all the ones they had! Seven of them for what two cost at regular price. 


I had this mega pack of purple jewels from a previous project so it became the inspiration for my color choice of Purple, Black and White which will fit right into my primarily Black and White Halloween decor.


I painted the board with a coat of Folk Art Violet Pansy. I didn't care about a perfect finish because that's not my thing and besides, I knew I was going to add black with the purple showing through the crackle. 

My go to process for achieving a crackle finish is good old white school glue. I stock up on it during school supply season! Apply it straight from the bottle and then spread it trying to use complete strokes in one direction. 


You want a medium coverage of the glue. Too thin and it won't crackle. Too thick and you won't have a smooth surface. Let this coat dry to tacky. I use my handy craft tool...an old blow dryer set on cool, to speed up the process. You don't want the glue completely dry. Go over the glue layer with the black paint, using the same one direction brush strokes as the glue layer. If you're patient, you can let this air dry. If you're me, grab the blow dryer again, this time set on warm to help the crackling process. 

Q: "Can I use my heat gun?"
A: NO! It's too hot and everything will bubble and peel which might give you a cool effect but it won't be THIS effect. 


Don't worry if the glue shows through. Once dry, it dries clear. Even though I help the drying process with the blow dryer, set it aside to dry completely which gives you time to work on the vinyl piece. I found this image on Creative Fabrica ( Disclosure: I am an Affiliate so if you use this link to purchse, I do receive credit to their store).


Download your image  then bring it into the Cricut Design Space Software ( these files work with all of the different cutting machines but I used my Cricut) and size accordingly. I cut this from white Cricut Vinyl, using my Explore Air 2. 


Weed your vinyl (if you're new to vinyl, weeding is the process of removing the vinyl from the negtive spaces to reveal your image) and then apply the Transfer Tape (this is clear tape, I used the Cricut brand, that allows you to position and apply the vinyl to your surface). 


Position your transfer tape lightly on your surface until satisfied then use a scraping tool ( I use the one that came w/ my first ever Cricut or they sell them at craft stores and you can also use an old credit card etc. ) to apply your vinyl to your surface. Peel off the transfer tape.  I do this slowly vs ripping off like a bandaid in case there are spots the vinyl isn't sticking. It allows you to maintain the positioning and fix any issues. 

Then it was time for the jewels! I used a strong glue (Glossy Accents by Ranger) to adhere these and just randomly placed using the different sizes and shades. 


Et, voila! 


I haven't hung it up yet because I haven't started my Halloween decorating yet but I absolutely LOVE how it turned out and I have some other projects planned using this color scheme! Happy Haunting Season! 


Sharing At: