Showing posts with label Gift Tags. Show all posts

Monday, December 19, 2022

Alcohol Ink and Gold Leaf Hanukkah Candles


Sharing some Hanukkah candles I made for friends. While I'm not Jewish, the Hanukkah story resonates with me as one of perseverance against the odds and a reminder to never give up. Always thrilled when recipients of things I make are happy with them!

Supplies: 
  • Plain Tall Jar Candles (Dollar Tree)
  • Alcohol Inks
  • Gold Leaf and Adhesive
  • Gold Adhesive Foil (Cricut)
  • Digital Cutting Machine ( I used my Cricut Explore Air 2)
  • Mod Podge Matte
  • Vinyl Gloves


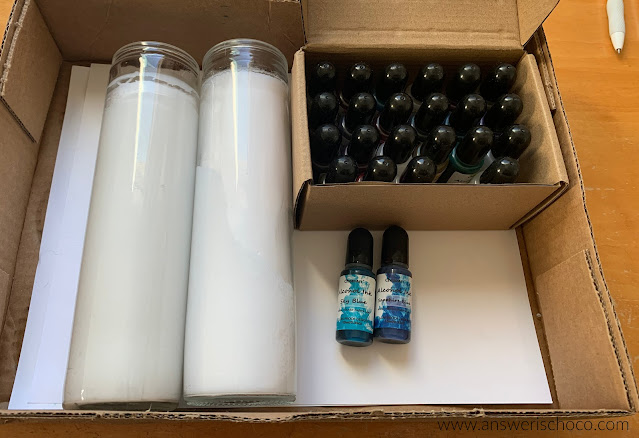
I ordered a box of alcohol inks from Amazon and selected two shades of blue. Remove the stickers from the candles and clean with alcohol to remove any residue. 

NOTE: Make sure and protect your work surface. I used an empty box. 


This was my first time using alcohol inks so I just winged it. I turned the candles upside down and then started dripping the inks down the candle, alternating the two blues. The ink dries quickly, but just to ensure it was really set, I let them sit for a couple of days after I was all done. 


I decided to seal them so went over them with a coat of Mod Podge Matte. Once that was dry, I applied gold leaf adhesive (Mona Lisa) around the top, then applied gold leaf using a stiff bristled stencil brush. 


Gold leafing is MESSY so I used the same box to catch the excess. 


In Cricut Design Space, I chose a font I liked and sized the word "Hanukkah" to fit the length of the candle, then cut it out using a gold adhesive foil. Then applied to each candle. 


I also made some gift tags for the recipients to use for their own Hanukkah gifts. I love using scraps to make gift tags, so I grabbed coordinating colors along with some sequins and washi tape to embellish. I cut out some dreidels and stars from some of the scraps. 


I cut out the tag bases from blue cardstock, then just went about decorating them. 


Happy Hanukkah to all those celebrating! 

Sharing At:


Monday, December 18, 2017

TagMania! Gift Tags Gone Wild


Every year I make gifts of gift tags. They're something everyone can use, easy to mail since I have friends all over,  and a great way for me to use up scraps.  I love seeing these small bits come together and never really have a plan.  So far I've made 9 sets between Christmas and Hanukkah lol. I think I have a problem!


There is the traditional collection with lots of red and green ( or burgundy and cream) with some splashes of black that remind me of Santa's suit.  This year, I added tiny jingle bells to some of them. 


But since not everyone decorates in traditional colors, there are the contemporary sets with lots of bright colors and silver and gold. 


They're easy to package as gifts. Perfect for girlfriend or hostess gifts. 


They're perfect for when you find a bag of last year's tags and ribbon you saved because you're a maker and you re-invent things. 


They're great for when you saved a branch from the greens you cut from your yard to add to your Christmas decor and you get an aha moment and make a wall hanging in 5 minutes and you get to give your husband that look that says "you doubted me ? " 


OK my name is Carol and I think I may have a slight tag problem.


Wednesday, December 16, 2015

Tagmania: Pretty and Practical Gifting


Being addicted to paper as I am, I hate to see any beautiful papers go to waste. So I've had a lot of fun making gift tags to give as gifts figuring who can't use more gift tags this time of year? I know I've wrapped many a present and then realized I had no way to personalize it / indicate the recipient. 

This is one of those things that the more you make, the more you want to make! 

Simple process: 
  • Gift tags (you can buy packages of ready made tags or cut your own. I cut mine using my Silhouette)
  • Paper scraps
  • Random embellishments : rhinestones, washi tape, punched shapes buttons, etc. ( this is a great way to use up onsie twosie leftovers)


These are some I made for a Hanukkah gift. I cut the dreidels using my Silhouette, randomly covered them w/ embossing ink and then embossed with gold embossing powder. 


One friend of mine decorates her tree in bright greens, pinks, purples so I coordinated these tags around those colors. To embellish I used punched glitter stars, snowflakes, sequins, and glitter ribbon and had some Japanese Mizuhiki cord in my stash that coordinated. 


Tip: I apply the papers slightly wider than the tag and then trim the edges all at once so they're uniform. 


I used the same idea for these in black, white and green, using white Mizuhiki cord on some. 


After seeing these, Mr. Chocolate asked "where are our tags" so guess what I'm working on ? 


Sunday, November 23, 2014

Metal Embossing: Fired Copper Plaque

Embossed Metal Plaque

Sharing a a gift / décor idea using one of my favorite techniques that looks a lot harder than it is:heat fired  embossed copper.

For this project you will need:
  • Embossable copper (you can find at art supply stores, Michaels, JoAnn etc.)
  • Die or image to trace
  • Heat source ( pencil torch, micro torch, something w/ a flame)
  • Wood plaques
  • Paper scraps
  • Mod Podge
  • Washi Tape
  • Stamps, colored pencils, ink
  • Embellishments
Painters Masking Paper

First step is to prepare the plaques. I have a roll of this masking paper in my stash that I use in a number of projects. It’s thin, accepts Mod Podge and/or paints easily and most of all is cheap. Look for it in the paint aisle of your HW store. Measure to fit your plaque, cut to size and then crinkle to give it texture before applying.

Paper Covered Plaque

You now have a canvas you can play with. I used some paper scraps, inks and washi tape to make my background.

Diecut Copper Sheets

I used a Memory Box die to cut the oak leaves. Run through a die cutter ( I used a Cuttlebug). TIP: If you don’t have a die cutter, print out an image that you want, lay it on top of the metal sheet ( put a magazine or rubber mat under the metal) trace on top of the image with a stylus and then cut with scissors.

Embossed Copper

Once you have your shape you can use a stylus to draw lines, details etc into it. I just did this freehand.

Heated Copper Leaves

Using your pencil torch ( you can find these at the hardware store) apply flame to your copper pieces. USE LONG TWEEZERS NOT YOUR FINGERS TO HOLD METAL! Here’s a video that shows the basic process.

If you have a gas stove you can also hold the metal over a lit burner.  The thinner the sheets, the faster the process so watch closely until you get the effect you want. If you don't want to play with fire, you can skip this part and/or use a different metal.

Since I like to age things, I dry brushed my finished metal pieces with black craft paint and then wiped off just to dull them a little. Once done, glue to your prepared plaque with a strong adhesive ( I used Liquid Fusion) and embellish.  I used scrap velvet ribbon tied in a simple bow and some pinecones I found on a walk.

Oak Leaf Acorn Plaque and Tag

Now that you’ve made a lovely gift, the presentation should match don’t you think? I used a stamp with acorns and oak leaves on the envelope for the card and the gift tag and stippled inks on the envelope.  I also used some of the masking paper and scap paper from the plaque for the tag.

Here are some other metal embossing projects you might like:

Embossed Metal Snowflake Tile

Embossed Metal Christmas Ornaments

Sharing At: 


Wednesday, July 18, 2012

Photobucket

Christmas Tag Collage

Welcome back to another Workshop Wednesday! I hope you’re getting lots of good ideas to get ahead of the holidays. If you’re following the hop, thanks for coming over from Mine For The Making!

This week’s project: Gift Tags.

You shop for, make , and wrap gifts. Then if you’re like me, you forget or run out of time for the tags. I have been known to be making a last minute tag on Christmas morning.  Not this year!
This week I’ll show you how to be ready AND bust some scrap stash. If you work with scrapbook paper for any reason, you’ve likely got scraps.

Christmas Scraps
Or you’ll tell me you do so I feel better. My scraps have scraps. I went to my scrap stash and pulled a bunch of coordinating colors out. I also remembered to pick up some blank tags when they were 50% off at JoAnn’s. I spent less than $5 for both packages…40 tags.

Other options: tags from the office supply store , cut your own with a die cutter, or using a template.

Xyron'd Tags

You can use whatever kind of adhesive you have (tape runner, glue stick, double sided tape etc.). I  have um, several sizes of the Xyron adhesive machines. I used the 5 inch one to apply adhesive to my tags. In a stroke of pure genius luck the two sizes of tags I had fit side by side.

Sticky Tags

Peel your sticky tags off of the backing paper and then attch to the underside of your paper. Trim around your tags. Cover your entire tag and then grab some more scraps and tear, glue, trim ….whatever you feel like. A great way to use smaller pieces up.

Vinyl Scraps

I save my vinyl scraps too because I just know there’s something I can use them for. Too small for your electronic cutter. Go old school: PUNCHES! I used a snowflake punch and a Martha Stewart “JOY” border punch.

Tag Embellishments

I may have a slight problem with self adhesive rhinestones, pearls etc. I know I never use all of any one package so I have a stash of partially used ones. Out they came for the tags! Washi tape too.

There’s no rhyme or reason to these, just kind of wing it. I had some self adhesive scrapbook borders from other projects. Threw some of those on too.

Large Tags 


Small Christmas Tags

Got buttons? The stockings and lights on a couple of the tags are buttons from my button stash. Basically if it’s small enough to fit on a tag…

Christmas Tags Closeup


Chevron tag

Went over the swirl pattern on this paper scrap with iridescent Stickles glitter glue and then stuck clear rhinesones on the ends. Tore off pieces of washi tape and stuck them.

Here’s one important thing to remember. I wait until I know I’m completely done adding papers, tape etc. to my tags to punch holes. That way you punch through all the layers you’ve used cleanly and only one time.

Small Christmas Tags

To finish, I used some ribbon yarn I had on hand. So if you’ve got paper, you’ve likely got scraps. If you’ve got scraps, you’ve got the makings for gift tags! Hope this gave you an idea you can put to use.

Next stop: Michele at The Scrap Shoppe!