I’m definitely going through a timepiece phase right now. Everywhere I look I see clocks and clock ideas. I am in absolute
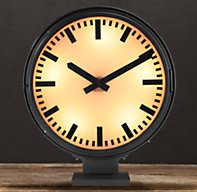
LOVE with the oversized railway station and vintage clocks at places like Restoration Hardware and Pottery Barn. I’m not in love with the prices.
$995 and $1545 um NO!
Still I like the look so I got one of those ideas that you aren’t really sure how or where you’re going to end up?
Come with me on my little journey!
I started out with Elmer’s Foam Board and the lid to a cookie tin. Traced the cookie tin on the foam board, cut out a circle and them smooshed the circle inside the tin. You want a snug fit.
That little gouge doesn’t matter because I cut another circle from some textured cardstock which I glued on top.
The clock face is black vinyl cut using the Tim Holtz Weathered Clock die. I put that on top of the cardstock layer and then mixed up some Envirotex Lite resin which is super easy to use but you need to use it immediately. You can read more about Envirotex
here.
Painted the back and sides of the lid with black acrylic paint and painted a furniture leg I picked up at my favorite architectural salvage place for $1. I added a silver bottlecap and wooden ball to the top.
Once the resin was set ( several hours…not patient!), I glued the “clock” onto the “stand”. I added the hands of the clock afterwards on top of the hardened resin for no particular reason. Just did.
It doesn’t tell time but I think it tells a story. I can look at it on my mantle and imagine I’m somewhere on a trip, waiting in an old railway station on my way to sight see. My imagi-cation is about as close as I’m going to get right now!
I also got to play with my new portable / collapsible light box that Mr. C got me for Christmas! I think it will be a so much fun I won't even miss not going anywhere :)
PS...if you are trying to win a Silhouette Cameo, peek over at my sidebar.
Expressions Vinyl is giving one away!! GO . ENTER. NOW! Ends 1/25.
Sharing At:


")

