Showing posts with label Dollar Tree. Show all posts

Monday, February 14, 2022

Cardmaking: Layered Geometric Heart Valentine's Cards


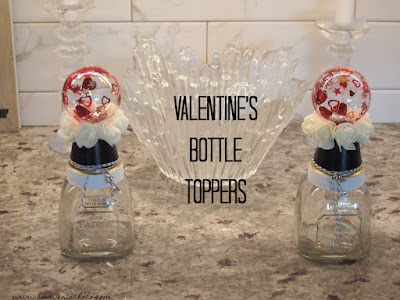
Happy Love Day Creative Peeps! Whatever you're doing (including not doing) today, wishing you a day filled with love...for self, partner, spouse, friends, family...however you define it! 

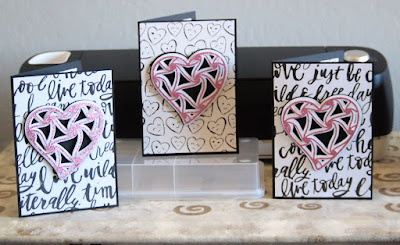
Sharing the cards I did this year which continue my obsession with layered cut files! 

Supplies: 
  • Black, White, Pink Glitter Cardstock
  • Scrapbook Paper
  • Layered Heart SVG file 
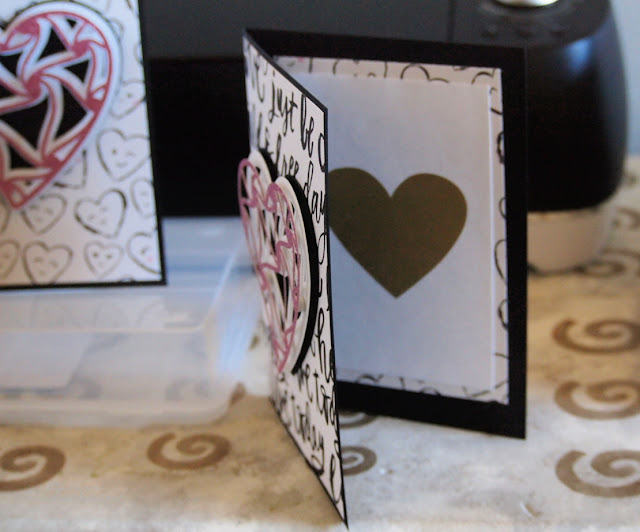
  • Foam Dots
  • Heart Shaped Scratch Stickers
  • Digital Cutting Machine


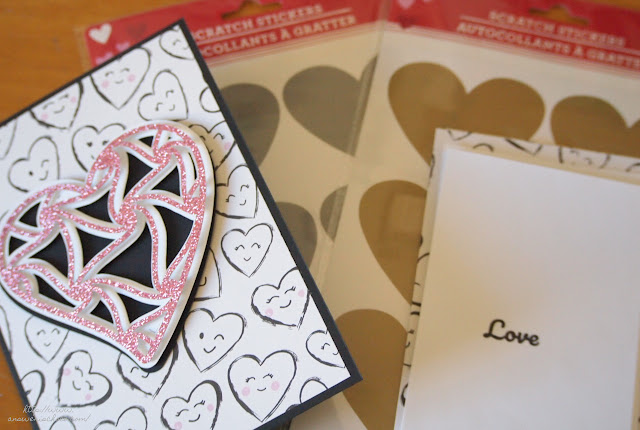
The star of these are the Scratch Off stickers I used for the interior which I found at Dollar Tree and like so many of my Dollar Tree purchases I'm asking : "Why didn't I get more?!"

The file I used for the heart is from Creative Fabrica. It comes with several more layers than I used and I deleted the ones I wasn't going to use in Cricut Design Space. I cut the hearts using my Cricut Explore Air 2. The SVG file can be used with other cutting machines. 

For the cards themselves I used black cardstock and scrapbook papers from American Crafts "The Color of Memories" collection (SKU #s 348947 and 320417) I found a JoAnn. The pink glitter paper is by Recollections from Michaels. 


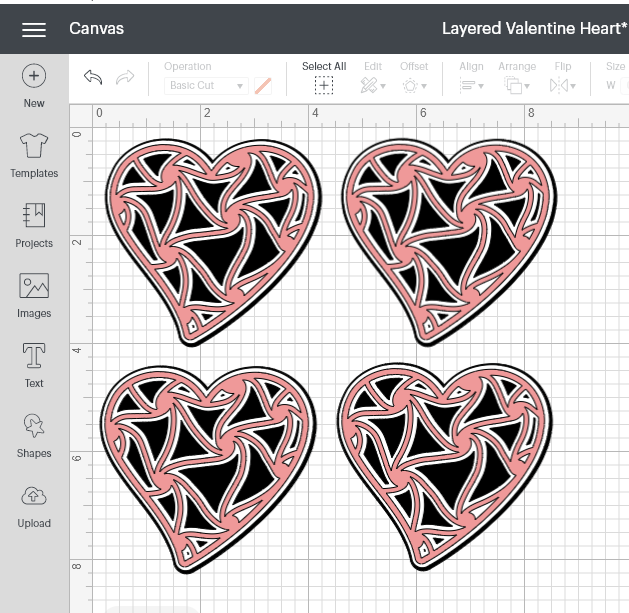
It always helps me to change the colors in Design Space to the actual colors I'm working with, Keeps things straight in my brain! Sized to fit my cards, then cut each layer. To assemble the hearts, I used small foam dots and then used my tape runner to adhere to the card. 


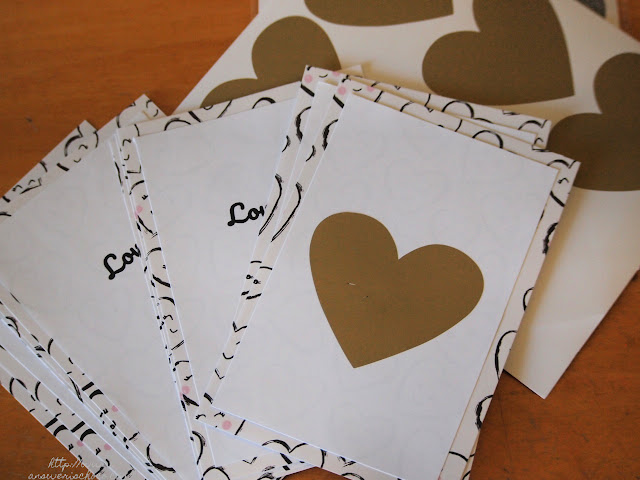
I printed the word "love" on white paper, trimmed and mounted on the American Crafts paper and then applied the scratch off sticker over it. I wrote a little "scratch here" note when I signed the cards. I hope they do some other shapes with these scratch off stickers! Aren't the cool?! 


I love sending cards to family and friends and these were a hit! 


Saturday, January 22, 2022

Valentine's Decor: Unplanned Clay Pot Bottle Toppers


NOTE: This week's link party continues here

Some of my favorite projects are ones I didn't plan. I mean I had a conceptual idea for these but I started out thinking I was going to make them into Gumball Machines! Then I decided I didn't want to but didn't know quite what I was doing with them. Even when I finished, I didn't plan to put them on bottles. I thought I'd put them atop those glass candle sticks you can get at Dollar Tree and then realized when I went to get them from my craft closet, I only had one. And that's when I saw the empty tequila bottles I'd saved because I liked the shape! Welcome to how my brain works. Still here? 

Supplies: 
  • Small Clay Pots (Dollar Tree)
  • Foam Roses (Dollar Tree)
  • Valentine's and Star Confetti (On Hand)
  • Acrylic Paints (On Hand)
  • Glass Ornaments (On Hand)
  • Clear Dimensional Glue (On Hand)
  • Paint Pen (On Hand)
  • Baker's Twine (On Hand)
  • Charms (On Hand)
  • Bottles (On Hand)


First step was to clean residue from the clay pots. I just use baby wipes from the Dollar Tree for this. Then I painted the rim of the pot white, the base black, and went around the rim with a gold paint pen. 


I grabbed clear acrylic glass ornaments from my after Christmas sale stash, cleaned the outsides with glass cleaner, and removed the hanger. 


I grabbed some Diamond Glaze which is magical stuff that you can use as glue or for mixed media projects. I poured about a tablespoon into the ornaments then discovered some of the confetti was too big to fit through the opening but was able to push them through by folding them. They sprung back flat once they were inside the ornaments and the smaller confetti fit just fine. Swirl the ornaments to distribute the confetti. Used the handle of a small paintbrush to move some of the larger pieces. I let the ornaments dry overnight to ensure they were good and dry. 


Using hot glue, I glued the ornament cap upside down as shown. It now functions as a base for the ornament which I also used hot glue to secure. 


I found these foam roses at Dollar Tree so I pulled those out and then hot glued the around the bottom of the ornament. 


To finish, I wrapped some black and white baker's twine over  where I'd gone around with the gold paint pen, securing in place with a couple dots of hot glue. Then I finished with some charms from my stash. 


A little ironic that I used French themed charms on Tequila bottles but...


The best part? The clay pots sit perfectly atop the bottles so I didn't even glue them together meaning I can make more of these clay pot toppers for a different season and use the same bottles! Or, next time I'm at Dollar Tree I can remember to pick up another glass candlestick! 


Sharing At


Tuesday, November 16, 2021

Thanksgiving Decor: Gather Dollar Tree Sign


I know lots of people went straight from Halloween to Christmas decorating but I'm contrary and like having my Fall / Thanksgiving decor in between! No judgement...that's just me. I swear I'm going to end up owning every single one of these Dollar Tree signs but I can never pass them up! They're an easy way to decorate and easy to do whatever you want to them from paint to decoupage and many things in between. I decided to do this one in the palette I used for my Thanksgiving Cards

Supplies: 

  • Gather Sign (Dollar Tree)
  • Acrylic Paints in choice of colors. I used Delta Ceramcoat Mulberry and Craftsmart Bright Gold
  • Dimensional Glue. I used Ranger Glossy Accents
  • Craft Foil. I used Recollections from Michaels in Copper
  • Coordinating Sequins 


I always start these by painting the interior of the letters, then the edges, then the back and front. For me, it helps ensure I don't leave bare spots in the nooks and crannies!


These take paint really well so it only took one coat. Next I dry brushed with the gold. 


I really wanted just a hint of gold so I kept it very light. After that, I added some copper accents using the same foil I'd used for the interior sentiment of my cards. 


NOTE: I thought plain Elmers was going to be enough because I was going for a very light effect with the foil...kind of like a dry brush...it was not! So I brushed on some dimensional glue ( Ranger Glossy Accents ). You can put the foil down almost as soon as you brush it on and then I burnished with the handle of a pair of scissors. 


I grabbed some bright gold sequins along with the metallic brown ones I'd used for my cards and just randomly placed them using the same Glossy Accents. 


You can get a better feel for the copper in this pic. I layered the sequins, using the large gold ones and then smaller brown ones. 


Easy. Pretty, Inexpensive. Three of my Crafting food groups! 


Sharing At: 


Tuesday, October 12, 2021

Halloween: Supercalifreaking Easy Dollar Tree EEK Sign


I love these whatever they're made of seasonal signs I find at Dollar Tree. You can paint them, decoupage them, glitter them, vinyl them or do whatever your imagination comes up with. I chose paint and dots! 

Supplies: 

  • Eek Sign (Dollar Tree)
  • Black and White Acrylic Paint ( Craftsmart, Michaels)
  • Dotting Tools ( See Below for Pic)


This is the unfinished sign. I did the insides of the letters and the edges with a small brush first, then painted the front and the back in a couple of coats of flat black Craftsmart paint. 


You want to make sure you get all of the nooks and crannies of the letters so it just takes a little patience. Spray paint would also work. 


Once you've got your sign painted, time to "dot it up". I bought a set of Ball Stylus dotting tools on Amazon and they really are great for making consistent dots. I also love that the paint wipes easily off the metal. From here, just go with whatever your flow us. I used different sizes and eyeballed my pattern. These are great for mandalas too. 


I started with larger dots and then filled in using smaller ones, filling in the exclamation point the most. 

Et voila!


Sharing At: 


Sunday, October 3, 2021

Halloween: Jeweled Doll Head Pumpkins


This week's BFF Open House link party continues here

Since our nest has been empty, my Halloween decor has become much more "Gothelegant" which is a word I just this second made up to combine gothic and elegant. Lots of jewels and metallics. Less whimsical ( although I do have some of that too!). But let's just say about the Darth Vader meme "Come to the dark side, we have cookies" is a perfect fit for me! I've wanted to do something with an old doll head but my thrifting trips the past few years haven't yielded the kind of doll head I want so I'm still on that particular hunt BUT I found some creepy plastic doll heads in the Halloween stuff at Walmart and they just spoke to my deep dark little Wednesday Addams heart! 


Supplies 

  • Doll Heads ( Walmart, $4.88 pkg of 3)
  • Foam Pumpkins ( Dollar Tree, while things are still $1)
  • Glass Candle Holder (Dollar Tree, ibid)
  • Craft Paints (Apple Barrel Gloss Black, Craftsmart White)
  • School Glue (Elmers)
  • Glue gun / glue and strong cold bond glue ( eg E-6000, I used Beacon 3 In 1)


"They're creepy and they're kooky, they're altogether spooky". 


Dollar Tree has these foam pumpkins every year and they're great. You can paint them. You can cut them. You can wrap them in fabric. So many possibilities. For this project I painted them. 


They take paint really well and this Apple Barrel Gloss only needed one coat. Then I did my go to glue crackle. 


To finish the pumpkins, I went over the glue with white paint and then used my craft room blow dryer to hasten the crackling. 


The doll heads were already pretty perfect but what fun is that? I got out my silver Rub N Buff and just added some spots of it here and there. 


This highlighted the scars already on the heads and then I dry brushed and wiped off some black paint so it would get in the cracks. 


Creeptastic! Now it's time to glam them up. I had some clear flat backed jewels in my collection so I randomly glued them onto the skulls and finished with smaller self adhesive rhinestones. Glamtastic! 


Once you're satisfied with your jewels it's time to assembler. I used hot glue to attach the skulls to the painted pumpkins and then the Beacon 3 In 1 to attach the pumpkin to the candleholder. I have found that hot glue doesn't always last on glass but it will work, just may come loose after a while. 


It's so good to be back! 


Sharing At:

Featured At: