Showing posts with label Cricut Design Space. Show all posts

Tuesday, October 17, 2023

Layered Dia de los Muertos Canvas


Living in the Southwest, I am surrounded by beautiful Sugar Skull imagery and art. Our Friday tradition for years now has been Mexican food and one of the things that was a factor in where we chose to live when we moved last year, was a nearby place to continue this tradition. We definitely found that and they know me by voice when I call in our order each week. I included them in seasonal cards last year and this year I wanted to do something more so my brain came up with this Sugar Skull Canvas. 

Supplies:
  • 5x5 Canvas
  • Multi-surface paint, black (I used Craft Smart from Michaels)
  • Scrapbook papers / lightweight cardstock
  • Self Adhesive Rhinestones
  • Layered Sugar Skull cut file (I used one from Cricut Design Space)
  • Digital Cutting Machine (I used my Cricut Explore Air2)

I chose pink, yellow, and turquoise papers to cut my skull. I knew I was going to do a black background and rhinestones and thought these colors would really pop. I sized the file accordingly and then cut the layers using my Cricut.

I used foam squares to attach the layers as shown.


Once the layers were constructed, I set aside and painted the canvas. I really love this multi-surface paint because fewer coats are needed. This just took one!


It was still wet here but it dried perfectly! Once it was dry, I attached the skull to the canvas with a few dabs of superglue. 

To finish, I used different-sized self-adhesive rhinestones to decorate!


And now, I'm hungry and it's not yet Friday! 


Sharing At:


Tuesday, February 7, 2023

Papercrafting: Black White Gold and Pink Valentine's Cards


I will always LOVE making Valentine's cards for family and special friends. Over the years, like other holidays, these have become part of people's Valentine's decor which makes my own HEART soar. This year, I grabbed some graphic metallic papers from my supply shelves and kept them fairly simple by using this image from Cricut Design Space and going with a color palette of black, white, gold, silver and metallic pink!

Supplies:
  • Patterned Scrapbook Papers 
  • Glitter Scrapbook Paper
  • Metallic Cardstock 65 lb
  • White 110lb Cardstock 
  • Digital Cutting Machine and Images
  • Foam Tape
  • Self Adhesive Rhinestones 


I neglected to take in process pictures but the process is pretty straightforward. 


I browsed Cricut Design Space for an image I liked and found this one. I subscribe so I was just able to add to my canvas. One thing I like to do in Design Space is change the image as close to the colors I want to cut which helps me remember what to cut! This image cuts in three pieces. 

I sized the grouped image to fit my card, then cut out each section. The main heart from gold glitter paper; the other two hearts from silver and metallic pink papers. 


For the card base, I cut white 110lb cardstock (Recollections) 10x7 to make a 5x7 card. I use my Martha Steward scoring board and bone folder to get a crisp fold. Then I cut the metallic papers 6.75x4.75 and the patterned metallic papers 6.5x4.5. Layered these as shown on the card and then attached the heart pieces using foam tape. The smaller hearts nestle in the cutout spaces of the larger heart. 


To finish, I added black and iridescent self-adhesive rhinestones to the smaller hearts. 

Not to leave out those who will be celebrating LOVE day with their furbabies, I made a couple of pet-themed cards too! 


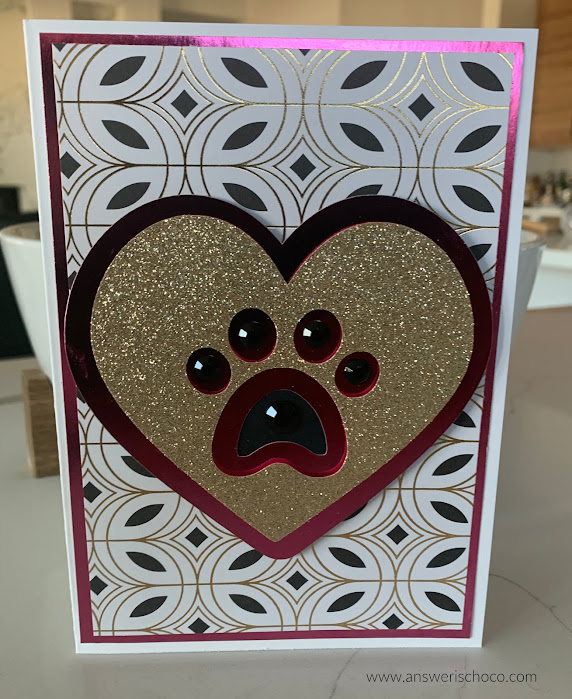
Similar to the other cards, I found an image in Design Space and cut out using the same papers and finished the paw with self-adhesive rhinestones!


Sharing At:


Monday, November 7, 2022

Fall Decor: Textured Copper Wrapped Candles


Thanks all for understanding about my party oops on Thursday. I think Fall allergies are the culprit. There's no better medicine than creating though, right? Had fun making these Copper Wrapped Candles which were easy and make a statement! 

Supplies: 
  • Dollar Tree Plain White Glass Candles
  • Cricut Textured Copper Vinyl (JoAnn)
  • Cricut Design Space Image #M9BB7EA
  • Digital Cutting Machine (I used my Cricut Explore 2)


I got my candles at Dollar Tree but they can be found wherever Saint candles are sold. You can remove the sticker or leave it. I left it and just made sure the vinyl seam was in the back. The Cricut vinyl is available wherever Cricut products are sold. I got mine at JoAnn when they had a 40% off sale. I have a Cricut Design Space subscription so I found an image I liked and then sized to fit the candle. 7.5 height x 8 inch width. Doing this again, I would cut 1/2 inch shorter in height I think. 

This is the image I used which, if you're not a Design Space subscriber is $.99 to purchase. 


Once the vinyl was cut, I weeded (peeling the top layer from the backing). Normally, this would bethe piece you discard, using what remained on the backing paper. I chose to use it to make a candle wrap! 


Clean your candle with glass cleaner or alcohol (especially if you used a product to remove the label) and then with the vinyl sticky side up, lay the candle on its side and carefully roll it until covered. 


That's it! 


Want to know what I did with the vinyl that remained on the backing paper? Come back tomorrow and I'll show you! 

Sharing At:


Wednesday, October 5, 2022

Halloween: Spooky Season Layered Bat and Moon Cards


Halloween cards just may be my favorite cards to make. I love using non-traditional colors and for this year's, I went with a brilliant royal blue as a color accent to go with shiny silver and gold.  

Supplies:
  • Black 110lb Cardstock (Recollections,Michaels)
  • Metallic Blue,Silver,Gold Cardstock (Recollections,Michaels)
  • Foiled Halloween Scrapbook Paper (Spook Hill, Michaels)
  • Layered SVGs (Bat is from Creative Fabrica Moon is Cricut Design Space)
  • Digital Cutting Machine
  • Adhesive Tape Runner
  • Coordinating Sequins
  • Self-adhesive Rhinestones
  • Dimensional Glue (Glossy Accents, Ranger)


I selected the foiled skull and stars papers from the Spook Hill stack I had from last year. When I'm making multiples, I like to have my cards and panels all cut ahead of time, as well as any images I'm using. That way when it's time to assemble, I'm just focused on that. 

Card Size: 5x7 so cut 7x10 and score in the middle. 
Blue Panel: 4.75x6.75
Foiled Papers: 4x6

After deciding on my images, I brought into Cricut Design Space and then cut everything out. 


The Bat SVG comes with four layers but I went with three. Black base, white middle, gold top. For the moon, I used the offset option in Cricut Design Space to create the gold layer and cut the image from silver paper. 


I used spray adhesive to attach the Bat layers and then foam dots to attach the silver layer to the gold layer for the moons. 


I assembled the cards as shown and then used double-sided tape to attach the moon and foam tape to attach the bat. To finish, I used bright gold sequins and clear rhinestones to decorate the moon and bat. 


The blue reminds me of the night sky!


Wednesday, July 14, 2021

Papercrafting: Layered "Moonogram"


I mentioned that I'm going to be a "Fairy Grandmother" since my bestie's daughter is having a baby. The nursery is coming together with a very cool ombre wall done by one of our other friends and has Moon elements. I made this layered "Moonogram" to complement that theme. 


Supplies: 

  • Black Cardstock
  • Lavender Glitter Cardstock
  • Coordinating Scrapbook Paper ( Let's Wander Stack by Recollections from Michaels)
  • Shadowbox Frame (Michaels) 
  • Moon SVG (Creative Fabrica
  • Digital Cutting Machine ( I used my Cricut Explore2) 


As always, I needed to choose what papers I wanted to use. I had a general sense of what I wanted to do but the papers were key! I went with black, since like me, the mom to be is non-traditional and has a lot of black and white in the nursery, a lavender glitter paper and a sheet of very celestial looking paper from the Let's Wander Stack by Recollections. 


The next step was to design the "Moonogram" so I popped over to Creative Fabrica (disclosure, I am an affiliate there) to look for a Moon themed SVG and found this bundle which was perfect: 


I uploaded the "Man in the Moon with Stars" and the "Man in the Moon" images to Cricut Design Space. Then I chose the letter of the baby's first name in a font that would work well with the Moon images and used the Slice function in Design Space to make the cut out layer of the letter adding stars as well. 


I assembled the "Moonogram" layers using foam squares. 


Then I cut the background paper to fit the frame and attached the "Moonogram". 


The paper, with the gold foiling was already pretty but I'm a more is more person so I wanted to add some more bling and when I saw these jewels at Michaels ( on sale for $5!) they had to come home with me for this project. 


I like how they almost look like raindrops. To finish, I used the interior of the star images from the top layer of the "Moonogram" and attached those with foam squares. 


I need to adjust the letter ever so slightly to straighten as I look at these pics but I'm so happy with how this turned out! 

Sharing At: