Thursday, August 30, 2012

BFF Open House Link Party #68: William Shakespeare Edition

Doesn’t it seem like Summer just started? And here we are at the end of August already!


So what’s up with the title you’re thinking. . Thanks to old Will, 21 years ago tomorrow ( Friday ) I married the guy I met in a College Shakespeare class  5 years earlier. I chose the class specifically for its content; he needed an English credit and it fit into his schedule.
The Tempest – Act 3, Scene 1
I would not wish any companion in the world but you
We still debate about who liked who first ( he totally liked me first) and we were just friends for four years before we actually dated. Then “twu wuv” ( Princess Bride). I love you Mr. Chocolate and hopefully you won’t be too mad at me for getting all mushy gushy on my blog.

Now, whatcha been up to this week? Who’s going to be the first to share a Halloween project? Let’s see!

link party rules-001

Monday, August 27, 2012

Green Craft: Turn A Cheese Box Into A Gift Box


I recently shared this project over at the Expressions Vinyl blog but wanted to share it here with all of my readers.

I know I'm not the only one who looks at something for its crafty possibilities before recycling or putting it in the trash. I've seen some other crafty peeps use these cheese boxes and had been saving one to play with. 


Laughing Cow Box

I used my box to trace two circles onto the scrapbook paper you see in the background, cut them out and then applied them to the box using Mod Podge. 

While that was drying, I went to work on what would be the focal point of my box. I alternate between my Silhouette Cameo and my Cricut Expression, both of which I love to use to cut vinyl. I used the Cricut for this.

Damask Decor

I used the Damask Décor cartridge and a taupe vinyl scrap and cut out my image ( #30).

Damask 30 Cricut

Here’s the vinyl all cut out and placed on the top of the box. I liked it well enough at that point but never being one to leave anything alone, I went to my embellishment stash and decided on a paper flower and some chocolate colored self adhesive pearls.

Vinyl Embellished Gift Box

The whole thing took maybe an hour and most of that was drying time for the Mod Podge.  Simple, inexpensive, uses what you might already have on hand. Now I just have to finish the gift that is going inside the gift box!

Damask Vinyl Box

Sharing At:

BFF Open House #67 Wrap Up and Features

Thanks everyone for joining in the fun another week. Here are just a few of the fabulous projects that were shared:

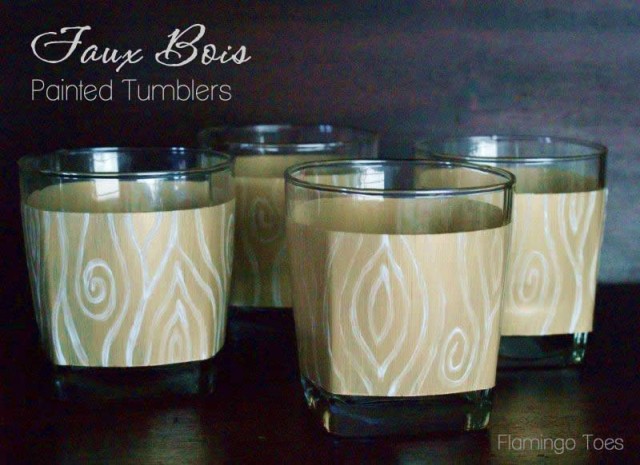
Bev from Flamingo Toes shared thise Faux-Bois painted tumblers. Be sure to check out her tutorial for the glass painting technique she used.

I have yet to make one of these yarn wreaths but the gals over at Six Sisters Stuff have definitely inspired me to try with this cute ruffled wreath!


Sometimes the prettiest things are also the simplest. Like this trash can from the Dollar Tree wrapped in burlap. Go see Rhonda at The Messy Roost for another high impact low cost idea.
And finally, if you want to see the CUTEST party ever ( I could have featured this entire party!) go visit Jennifer at One Thrifty Chick to see this amazing Curious George extravaganza!
IMG_5357
Thanks again to everyone who linked up and hope you have a creative week!

Thursday, August 23, 2012

BFF Open House Link Party #67

Hey there, howdy, and hello and welcome to another party! Nothing too exciting on this end. College Boy is settled in his new dorm and we’re adjusting to the empty nest again. We’re in high back to school time so I’ve been seeing some really fun projects. Let’s get right to it!

link party rules-001


Don’t forget to spread the party love and go visit each other!

Tuesday, August 21, 2012

Ribbon and Jump Rings Necklace Part Deux: Cream and Amber

Ribbon Rings Amber

I had so much fun with the Ribbon and Jump Rings necklace I shared last week that when I found myself at Michaels again this weekend ( they really need to give me my own parking space) I went looking for another one of the ribbon necklaces I used.

No more black ( eeek! boo! it’s my signature color!) but they had the same one in cream so I decided to branch out! Hello , my name is Carol and I’m a neutral-holic.

Cousin Trinkettes

I also picked up a package of these Trinkettes beads by Cousin (fear not colorful people they come in loads of colors) and while I was scrounging around in the clearance bin again, came across these gorgeous amber-crystal-cabochony thingies. $1.99. SCORE.

Ribbon Rings Closeup

Similar to the black necklace I made, I strung large jump rings onto the ribbon necklace, over all of the layers.

Rings on Ribbon

Total number of jump rings: 11 It made sense to  me to have 5 on each side and one in the middle. No reason other than that's what felt right. You could use more. You could use less.

Then I put some of the Trinkettes beads on some of the large jump rings and the amber cabochony thingies on other jump rings and used smaller jump rings to attach everything together. I’m very technical! Seriously. This is super super easy and there are several different types of ribbon necklaces avail even if you don’t find this exact one by Bead Landing because I bought them all.

Ribbon Rings Closeup

Cabochony thingy, Trinkettes beads, cabochony thingy Trinkettes etc.

Look Mom, I didn’t even use the black beads ( YET!). And yes I did drive to another Michaels looking for another black ribbon necklace. No luck. There’s another Michaels I’m checking out this weekend. Sssssshhhhhh.

Sharing At: 

Monday, August 20, 2012

BFF Open House Link Party #66: Wrap Up and Features

Thanks for another wonderful party! Every week I am excited to see what gets linked up and every week, you don’t disappoint! Here are just a few of the fabulous ideas that were shared.

If you have a Superhero or comic lover in your life, then you NEED to check out this adorable inivte from Michele at The Scrap Shoppe:


Love Ikea? Love washi tape? See how Jess from Cox’s Corner brings the two together:


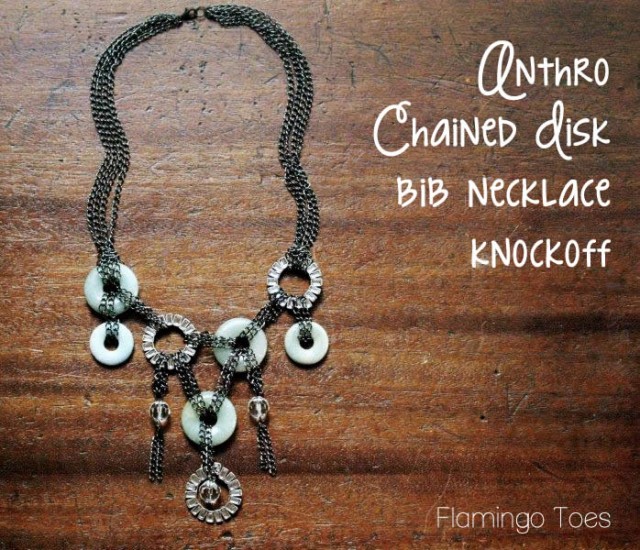
Bev from Flamingo Toes is also known as the Anthropologie Queen for her amazing ability to knock-off jewelry that costs a fortune at Anthropologie for a fraction of the cost. I also always love her interpretation more. This necklace did not disappoint and make sure and check out her entire series:


Got paint chips? Head over to The Single Nester for the how to on this fab idea how to use them:


And finally, want to feel less guilty about indulging in some brownies? Head over to Mommy’s Sweet Confessions for the recipe for these:


I’m pretty sure the zucchini nullifies the calories!

Hope to see you all again on Friday. Make it a creative week!

Thursday, August 16, 2012

BFF Open House Link Party #66: Hot Flash Edition

At least our weather is making me feel like I’m having one! The PNW is not known for its blistering hot Summer days and the rest of you think we’re wimps. Guilty as charged!

So what’s everyone been up to this week? College boy is on his way back to school and I know lots of you are getting your little and not so little ones off too. Let’s see what wonderful creations everyone’s made since last week!
link party rules-001

Wednesday, August 15, 2012

Ribbon and Jump Rings Necklace

Ribbon Rings Necklace

Sometimes the idea for something comes when you aren’t trying so hard to think of one. At least that’s true for me. I am one of those people who likes scrounging around in the clearance section of places like Michaels which is what prompted this project. I found this pre-made ribbon and cord necklace by Bead Landing for $1.99!

Ribbon Necklace Supplies

The Darice beads and jump rings I already had in my stash from one of those previous scroungy trips. This was super super easy to make.

I strung some of the biggest jump rings onto the necklace ( over all of the ribbons/cord). Added as many as I felt like which ended up being eleven.

Ribbon Rings Necklace

Then I put some of the Darice beads on a large jump ring and attached to some of the rings already on the ribbon.  In my stash, I found some leftover washers from a Washer Charm Bracelet I made last year with washers from The Dollar Tree, and put those on a couple of the large jump rings, and then added one more bead/ring combo to the middle jump ring on the ribbon. Added a toggle clasp to each end.

Ring and Ribbon Necklace


Ribbon Rings Necklace

Sharing At:


Tuesday, August 14, 2012

Daycation: Seattle Great Wheel

Seattle Great Wheel

Dorothy from The Wizard of Oz was right. Sometimes what you’re looking for is right in your own backyard or words to that effect.


We had what I call a “Daycation” last week where we spent the day doing fun touristy things in our own city, Seattle. We started the day with a nice brunch at a locally owned restaurant and then headed to the Seattle waterfront.  June saw the opening of a fun new  attraction, The Seattle Great Wheel. If you’ve been watching the Olympics and have seen the London Eye, ours is similar but smaller.

Great Wheel

The “wheel” sits on the end of Pier 57 and goes out over the waters of Puget Sound. It’s 175 feet high and has 42 climate controlled gondolas including one “VIP” car which at $50 per ticket we did NOT ride in! We stuck to the regular tickets of approx $14 per adult.

Great Wheel Tix

These tickets are perfect for scrapbooking right? Wrong…this pic is as close as that’s going to get since you have to surrender them to board. Boo.

Great Wheel Cars

Each car holds 6 adults and is air conditioned for Summer and heated for the rest of the year.  The VIP gondola is black and has a see thru bottom and did I mention the $50 per person ticket?  You do get some other perks for the price but we were very content with our ride for the not $50 per person price!

You get to spend about 12 min on the ride and get a fantastic view Puget Sound:

View From The Wheel

The weekend we went was our big Seafair celebration which brings lots of Navy ships and the Blue Angels to town. In the pic above is one of the Navy ships in front of Norwegian Cruise Line’s Pearl ship getting ready to depart for Alaska.

The weather couldn’t have been more perfect and it was a fun family outing we got to do before College Boy heads back to school. If you get to Seattle, I highly recommend doing this if you can!  See? We do get some awesome weather!

Monday, August 13, 2012

BFF Open House Link Party #65 Wrap Up and Features

Thanks for another great party! As always , lots of great ideas so if you haven’t visited the other links. I hope you will. Here are just a few to get you started.


Jess, from Cox’s Corner, shared a new twist on the idea of an interchageable wreath. Go check out her wonderful tutorial.

Need a great way to store those Summer Vacation memories? Malia from Yesterday on Tuesday has one. It’s small, portable, and uses something I’ll bet you have on hand.

Mint Tin Upycled Mini Album - Yesterday on Tuesday

Is there anything you can’t cover with washi tape? Rhetorical question! Julie from White Lights on Wednesdays made a super cute washi tape bangle that even used an old painter’s tape roll.


And finally, you know I have to show off something chocolate. These Double Decker Coconut Cream Brownies from Back for Seconds just had me swooning:


Again, thanks everyone who linked up and hope to see you again on Friday. Make it a creative week!

Thursday, August 9, 2012

BFF Open House Link Party #65

Eeeek! Happy Friday Eve everyone…popped into Michaels last Sunday and it was a collision of Halloween and Christmas. OVERLOAD! College Boy is getting ready to head back to school so I will be a hot mess next week. Laying in an appropriate supply of chocolate!

Let’s see what everyone’s been up  to this week!

link party rules-001
Party On!

Wednesday, August 8, 2012

Core Cards Creative Frenzy DT Call

Core'dinated Damask Cards

I love it when an unplanned plan comes together. Core’dinations is having a design team call and it so happens they asked for three cards. It also so happens I needed to make three cards and so VOILA.

If you’ve seen any of my card posts, you know I already love their stuff and use their papers a lot so naturally already had some in my stash. I also have a thing for neutrals so I coordinated my Core’dinations cards using a neutral palette.

I chose a Core Essentials paper in Weathered Tin and a Gemstone paper in Pearl. Also used a floral print paper from my stash:

Core'dinations Papers

You can see the textures in the two solid papers which are fun on their own, but I love running this through an embossing folder to really bring out the texture.

Embossed Panel

I used a Tim Holtz embossing folder (Damask) and ran through my Cuttlebug. TIP: Cut your panel slightly larger than your embossing folder and then trim to size after you emboss. The Core’essentials paper is great for sanding or tearing. I used a sponge-sander-thingy leftover from a pedicure. TMI?

Tim Holtz Die

Speaking of Tim Holtz, I also used one of his dies to cut out some layered flowers for my cards. Some of these I cut from the damask paper. Others I used pieces of my Core’dinations papers.

Layered Flowers

For the patterned paper flowers, I scrunched them up before I layered / glued them together. For the Core’dinations flowers I used the end of a small paintbrush to curl the edges. I just couldn’t leave them flat ya know?

Damask Card Black

This card uses a handmade Japanese paper for the main layer; the embossed Core’dinations panel; “molded” Core’dinations flower with a rhinestone center. I tied black and white baker’s twine around the panel and finished off with a floral charm.

Damask Card Smiles

For this card, the first layer is Core’dinations Gemstone Pearl; embossed Weathered Tin panel, handmade Japanese paper strip and “scrunched” dlowers. Trimmed with rhinestone strip, a chipboard die cut, and “smiles” sticker.

Damask Cards Happy Days

For the last card, I used a Weathered Tin panel as the first layer; embossed Gemstone layer rubbed with Rub N Buff and Ranger Distress ink; a suede paper strip; scrunched floral flower and baker’s twine.

Damask Cards Collage

Wish me luck!