Thursday, October 27, 2016

BFF Open House Link Party


HOW is it the last week of October ? HOW is it Halloween weekend? Inquiring minds want to know. Back with features this week including ...wait for it...a Christmas feature. It's coming. 

But first Halloween. 


How about this giant wood DIY skeleton from Bliss on a Budget? Isn't it amazing? 


The Queen of transformation, Artsy VaVa is at it again. You won't believe how this chest looked before she got done with it. Suffice it to say, it was saaaaaaaaaaad. 


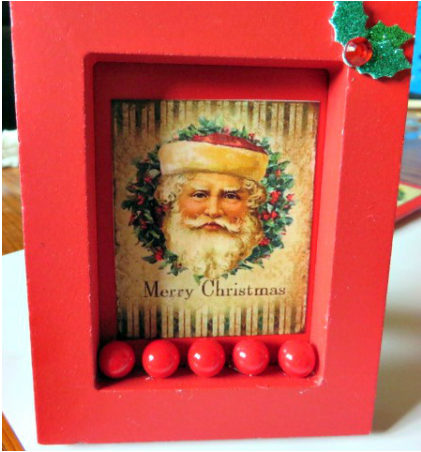
Love this vintage shadow box frame idea from 3 Winks Design. Lots of possibilities not just for Christmas but for any keepsake treasures. 


But back to Halloween. How about these Black Forest Brownie Cheesecake Trifles for a "spooktacular" dessert? YUM! Check out Tinselbox for the details. 

OK now on to this week's party! 


Thursday, October 20, 2016

BFF Open House Link Party


SO, this will be a feature free week because reasons, but hope to be back w/ them next week. Until then, party on! 


Monday, October 17, 2016

Signs of Halloween


Even though I thought I was done w/ my Halloween decorating, I went on a little bit of a sign making binge while we were on storm watch this weekend.  Being cooped up in the house is a good way to do some stash busting! 


These were all made from inexpensive things I'd picked up along the way and done the same way. Paint and vinyl. Easy peasy. 


Supplies:

  • Wood pieces to paint
  • Craft paints in colors of choice
  • Vinyl
  • Vinyl cutter
  • Misc. embellishments


For the "Wicked" sign, I started with a plain wood box I found at DAISO ( Japanese Store where pretty much everything's $1.50). 

The large Broom sign was one of those " no idea what I'm going to do with this but it's $.99" sale finds at Michaels.

The three piece Broom sign was from a bag of wood pieces bought on another trip to Michaels. 


The process is the same for all the signs. Paint, dry brush, apply vinyl. 

Paint with the basecoat color of your choice ( I used Folk Art Titanium White and Extreme Glitter White;  Martha Stewart Metallic Gold ) . For the white signs, apply one or two coats of the plain white and then one coat of the glitter white. For the Wicked sign , two coats of the gold paint. When dry, dry brush lightly with black paint. 


Either while you're waiting for your paint to dry or the power to go out, cut your vinyl. I used images from the Silhouette store and cut on my Cameo.  When your signs are dry, weed and apply your vinyl. 


Thursday, October 13, 2016

BFF Open House Link Party


Happy Friday eve all. Up here in the PNW we are bracing for not one, but two epic storms, one of which may be record breaking. To say I am not looking forward to either of them is an understatement. Hope my fellow NW crafty peeps stay safe. 

Here are some festive ideas from last week's party to add to your Halloween plans! 


Love these Halloween numbers from Much More Creative.  I think I will have to do 25 for Christmas! 


These Halloween Lantern Lights from Lynda Creates would be a fun addition to a mantle, railing or any place you can put them up! 


Very much in love with this Magnolia Pumpkin from Lolly Jane. So elegant and easily something that can stay up through Thanksgiving! 


This week's chocolate feature is one of my favorite ( and easy ) things to make...a festive bark. i need to whip some up for my grown guy's goodie box. Check out this version from Morgan Manages Mommyhood

Now on to this week's party! 


Thursday, October 6, 2016

BFF Open House Link Party


Happy Friday Eve all! Hope the first week of October has treated you well. Let's see some festive Fall ideas from last week's party! 


With Halloween just weeks away, Raven Would whipped up this very realistic looking "metal"  cauldron that would be perfect for storing those treats! 


This festive candle from The Crafty Lumberjacks would go perfectly with that cauldron don't you think? 


While not specifically Halloween, Mich in LA has something that could accessorize a costume...perhaps if you were going as "The Mother of Dragons" from "Game of Thrones"?  Plus she always uses something no one can ever guess in her work. 


And whether you have littles or you're just young at heart, these Monster Cups from Western New Yorker would be a fun addition to Halloween entertaining. 


Wednesday, October 5, 2016

Mr. Skully's Hat and Mrs. Pumpkin's Mask


Continuing with my Gothic Halloween theme, I dressed up a gold leafed skull I made last year. I mean who doesn't make a top hat for a skull? 

My camera battery was dead while I was making this hat but it's a pretty simple construction. 

Supplies Needed: 
  • Heavy scrapbook paper...cover weight or light chipboard weight. I used a chipboard weight glitter paper
  • Strong adhesive or hot glue gun. I used Sookwang double sided tape or the "red liner" double sided tape works as well. 
  • Embellishments ( I really just raided my stash for this)
To make the basic hat, I cut a circle in proportion to the head, with a slightly smaller circle for the top, and then a rectangle large enough to fit the circumference of your circle. Pinterest has lots of tutorials and all of the basic construction is the same.

The fun part is in the embellishments. I used some leftover tulle, paper roses and rolled paper roses that I made from scraps in my stash, along with leftover bits of ribbon and trim and a couple of glittered leaves. 


Mr. Skully needed a friend so I hooked him up with Mrs. Pumpkin, a glittery ceramic pumpkin I picked up for 60% off at Michaels. I decided rather than alter her permanently, I'd just give her a costume to wear that can be removed and she can stay on my mantel through Thanksgiving. 


For this, I just used a black masquerade mask (Creatology, Michaels) and added a nose made from glitter and metallic scrapbook paper, more rolled paper roses, and glitter leaves. Her "eyelashes" are black adhesive rhinestones! 


BOO! Don't they look ready to go to a Halloween Ball ? 

Monday, October 3, 2016

Happy Haunting Entryway


NOTE: This is a sponsored post. Supplies were provided to me. Opinions are mine. 

Halloween is one of my favorite decorating holidays. Over the years I've matured my decor, moving to a more "elegant" ( I hope!) and Gothic look. Each year I've either made or added a couple of new things so I didn't have to invest in a makeover all at once. 

These items from Oriental Trading Company fit right in with my transformation! 

This year I wanted to focus on my entryway and entryway  table. 


The Spiderweb candleabra was a perfect addition with these creepy crawly but not too scary spiders! 

My favorite item I used this year however was this Spiderweb table topper. I absolutely love this thing and need to get a couple more! 


The other thing I chose and with which I'm totally in love is this "Happy Haunting" sign. 


I knew I wasn't going to have a lot of time to make things this year so this is ready to go and can be placed on a wall, table, mantel. Easy peasy. 


I also re-did my railings keeping them simple with some tulle I've re-used over the years but adding Canvas Banners painted with chalkboard paint and hand drawn letters. But to make it stand out I added a gold glittered tulle bow and tied this together with my entryway table by adding the same bow to it. 


I re-purposed some tinsel trees to hold Poison Bottle ornaments. These are square Christmas ornaments with drips of paint inside, scraps of washi paper / tape and embellished with Enamel Labels from OTC. 


Happy Haunting!