Showing posts with label Card Making. Show all posts

Monday, July 1, 2024

Papercrafting: Birthday Card in Two Colors


I finally got back to making! Have a couple of early July birthdays and didn't plan on making matching cards but while looking through the paper stack I realized that the same paper came in two different colors and...

Supplies
  • Recollections Background Paper (Watercolor Stack)
  • Recollections 110lb Cardstock
  • Recollections Foiled Papers
  • Birthday SVG File 
  • Birthday Balloon Stickers
  • Tape Runner
  • Double Sided Foam Tape


I decided on the patterned papers then pulled coordinating solid papers and cardstock from my stash. 


I wanted to accent the gold foil in the background papers and chose gold for the top layer and silver for the layer that would show the present. 


I cut out the SVG file layers, ending with the gold layer, and attached with my ATG Tape Runner, foam tape, and spray adhesive and did the same for the pink card. 


I saved the present cutouts and added some washi tape and rhinestones to accent the cards, then chose some balloon stickers (Dollar Tree) from my stash to embellish te middle balloon. Et, voila!


Sharing At:


Monday, October 9, 2023

Papercrafting: 2023 Halloween Cards


I'm easing back not only into making things but also getting them posted, after my unintentional Summer Break. It doesn't take long to forget the work that goes into taking pictures, uploading and photo-editing them, planning out a post, etc. 

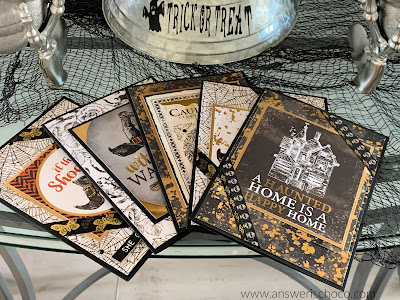
Of course, I never take a break from being on the lookout for supplies and ideas and in early September, I didn't skip or delay picking up a fun Halloween Paper stack at Michaels. I needed an escape from the news over the weekend so I got busy making cards for family and friends. I love that a few people keep these and pull them out each year as part of their decor. 


Supplies: 

  • Witch's Lair 12x12 Paper Stack (Recollections, Michaels)
  • Black 110 lb Cardstock (Recollections, Michaels)
  • Gold Foil 65lb Cardstock (Recollections, Michaels)
  • Gold Star Transparency (Stash)
  • Tape Runner or Double Sided Tape
  • Self Adhesive Rhinestones


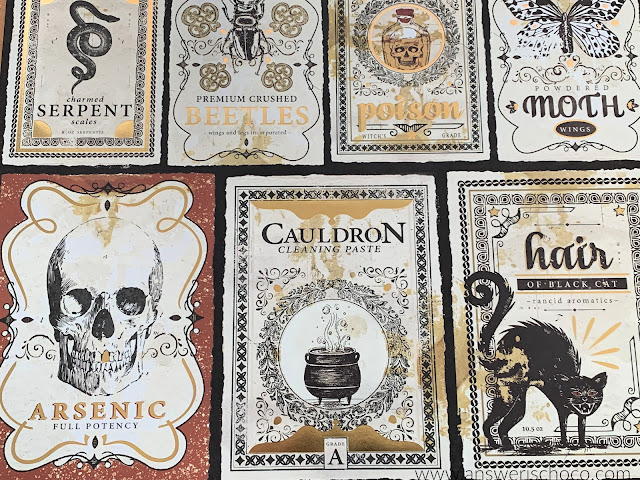
This is the stack I used which comes with a mix of plain, foiled, and panel sheets. As much as I love my digital cutting machines, I love these kinds of paper stacks because the panel sheets are perfect focals for cards. 


I generally make my cards 5x7 which I did for these. Cut the black cardstock 7x10 then score in the middle. For the background panels, I chose a few different papers in the stack. 


The panel pages always come in different sizes. If you're not into card making you can simply cut and frame some of them!


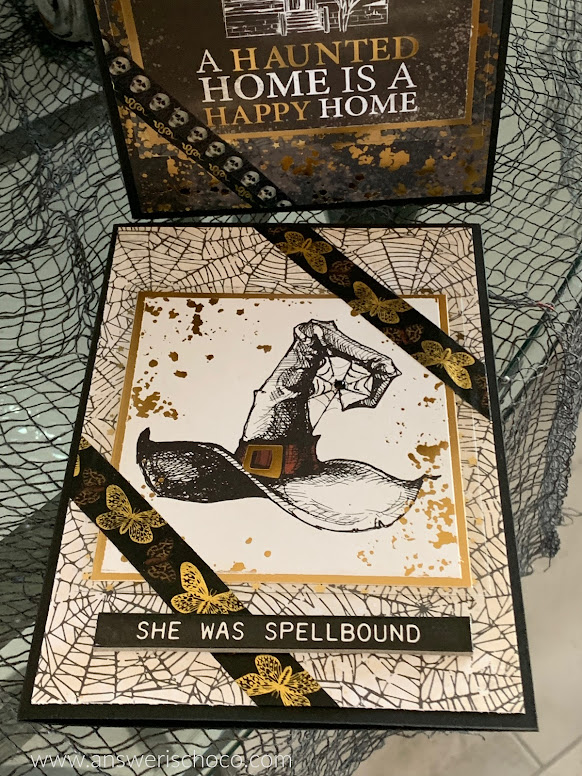
Cut and trim the panels you want to use, and then mat with coordinating paper. I used the gold foil or black cardstock. 


I picked up the coordinating washi tape in the Witch's Lair collection which I attached to some of the panels before adhering them to the background panel.


To finish, I used self adhesive rhinestones to add a little glam! 


Sharing At:


Wednesday, October 27, 2021

Halloween: Haunted Mansion Inspired Cards


"Welcome foolish mortals". I miss Disneyland so much, especially when it's decorated for Halloween. We'd hoped to go this year but COVID...

Anyway, one of my favorite rides any time of year is the Haunted Mansion. I love all the detail they put into the attraction and at Halloween it's totally decorated with a Nightmare Before Christmas theme. If you ever get a chance to do Disney for Halloween, it's so much fun! So when I saw this collection of layered cut files at Creative Fabrica included a "Haunted" Castle, I had my theme for this year's Halloween cards. Disclosure: I am an affiliate so if you buy this file here, I do get a small benefit. 

Supplies: 
  • Halloween Background Paper (I used the Spook Hill collection from Michaels)
  • Metallic and Glitter Scrapbook Paper
  • Black Cardstock (Recollections 110 lb)
  • Halloween Words ( Tim Holtz )
You can buy pre-made cards or cut your own. I cut my own from the Recollections Black cardstock measuring 7x10 to create a 5x7 card. Score down the middle. 

Cut background papers 6.75x4.75. Attach to cards. 

Download cut files and import design of choice into your electronic cutter's software. I used my Cricut Explore 2 and the Design Space software and deleted a couple of the layers, leaving 3 layers to cut. 

I did a combination of colors and mirror and glitter papers. 


Once you have your "houses" assembled, then layer onto prepared cards. Add the chipboard words. I also embellished with a couple of self adhesive rhinestones which the post office just loves! 


Enter if you dare! 


Wednesday, May 5, 2021

Every Child Should Be Celebrated On Their Birthday: Box of Balloons


April was a blur for me with getting my mom back to full health. So with doctors appointments and follow-ups ( many, many, MANY follow-ups) I didn't have a lot of time and even less energy for creating. But on a stop at my regular Starbucks, I got the jolt I needed and not just from the mobile order I was picking up. 

This location that has become my go to during the pandemic (shout out to the Hayden & Thompson Peak store in Scottsdale) and is partnering with an organization called Box of Balloons which works to provide Birthday Boxes to kids who might otherwise not have a birthday celebration. That hits my heart.

I LOVED my birthdays as a child because my Mom and Dad always made sure they were special. This was back in the day when parties weren't events planned like the D-Day invasion. Home, friends, family, but always special. Always a theme with matching invites, decorations, cake etc. I tried to make my son's special because that's what I knew and my husband, whose experience was different, was initially confused but loved making our son's birthdays special too. 

So when I saw this drive for decorations, favors etc. I knew I could put my skills and my tools like my Cricut Explore to good use for a good cause! There's a reason why I grabbed up the "Happy Cake Day" Hot Buy paper stack at Michaels! 


Supplies: 

  • Happy Cake Day Paper Stack ( Michaels )
  • Jewel Glitter Paper Stack ( Michaels  )
  • Paper Scraps
  • Cardstock 


This Happy Cake Day stack is SO much fun. You really need to get it if you see it and no I don't get a commission! It's just a great stack. Foiled and plain papers that all coordinate with each other and so much fun. 


There are a few pages with panels like this that you can cut for multiple cards etc. LOVE these in all of the paper stacks I buy. So I trimmed some from this sheet and another similar one to use as the focal for each card. 

Using cardstock I had on hand ( this was also a great way to use up existing supplies) I cut all the cards 5x7 and kept things fairly simple cutting the coordinating paper panels for the card to 4.75x6.75 and 4x6. I had fun just picking coordinating papers from these stacks and my stash. 


Everything's better with glitter right? So I grabbed my paper scraps which were the perfect size to use to mat the focal panels I'd cut. They really make the cards look festive and fun. I was having so much fun, I ended up making about 3 dozen cards!

But wait! The other thing perfect for birthdays are tags and what's a better way to use up paper scraps than making tags? 


I grabbed a bunch of coordinating scraps and from the larger pieces, I cut some Balloons and Stars using my Cricut Explore and just had fun mixing and matching all of the paper scraps and cutouts. I layered the diecuts and attachd with foam dots to give the tags some dimension and then added bright ribbons. 


I couldn't forget the great team at my go to store. I LOVE the Starbucks Mobile App which allows me to order ahead, pop in and pickup my drink and I must go there enough because different baristas recognize me by name and know if my drink is ready, being worked on, that I want a straw etc. So I also made a long overdue Thank You card for them!


I had this cut file in my collection and used the Slice function in Cricut Design Space to add some coffee beans. I added a couple of the balloons left over from making tags since they're doing the Balloon Box drive, and  used a sheet from another favorite Recollections Stack, "Let's Wander" along with light green glitter paper and white cardstock. 

Being able to do what I love and give back to kids to hopefully make their day just a little brighter was EXACTLY the infusion of inspiration I needed. We're all in this world together. 


Sharing At: 


Monday, October 12, 2020

Halloween: 2020 Cards Using the Spook Hill Stack from Michaels


I make cards all year round for all holidays, birthdays etc. but Halloween through Christmas and Hanukkah is full production mode. If you've been around my blog for a minute, you know that I am a helpless paperholic so I always love taking advantage when Michaels has deals on their "Hot Buys" especially when they're either buy one get two free ( I mean c'mon!) or they're on sale for $4.99. Mr. Chocolate will try to convince you that I own all of them. Not true. But many? Yes, that I admit to! 

I picked up this stack called "Spook Hill" (by Recollections) on one of their buy one get two free ( I get giddy just typing that!) and it was so my style! It includes foiled and non-foiled papers.  Now oddly, I can't find it on their website but it is available on Amazon.


This isn't a tutorial post but almost all of my cards are 5x7 and I used Black Recollections 110 lb cardstock ( Michaels ) for most of them w/ the exception of a couple I made using a heavy piece of 12x12 paper from my stash. 

I went with the color palette of the stack: Black, grey, gold, white. 


I cut panels 5.75 x 4.75 and layered with gold foiled transparencies ( previous Michaels trips!) and cut out some Halloween images using my Cricut Explore which I layered using foam tape. For the Haunted House image, I added windows using paper scraps I had on hand. 

Finished everything with gold self adhesive rhinestones in gold! And yes, those of you who know who you are, they're on their way. Boo!