Thursday, April 30, 2026

BFF Open House


Happy Friday Eve again, everyone and hope you've had a creative week. Allergies continue but meds are helping. Been busy this week with some follow-up appointments following my little hospital adventure last month, but I was able to spend time working on Mother's Day cards, which I'll share soon! 

I also popped into Michaels to see the new Johnathan Adler collaboration! WOW! So many very cool pieces, including a selection of unfinished products you can put your own stamp on. Win-Win! You get the signature Adler design, then you can paint in your preferred color. Definitely worth a look. 

OK, let's take a look at some great ideas from last week's party. 


Steph Creates shared this Simple Yet Beautiful DIY Serving Tray. Can we ever have too many? 


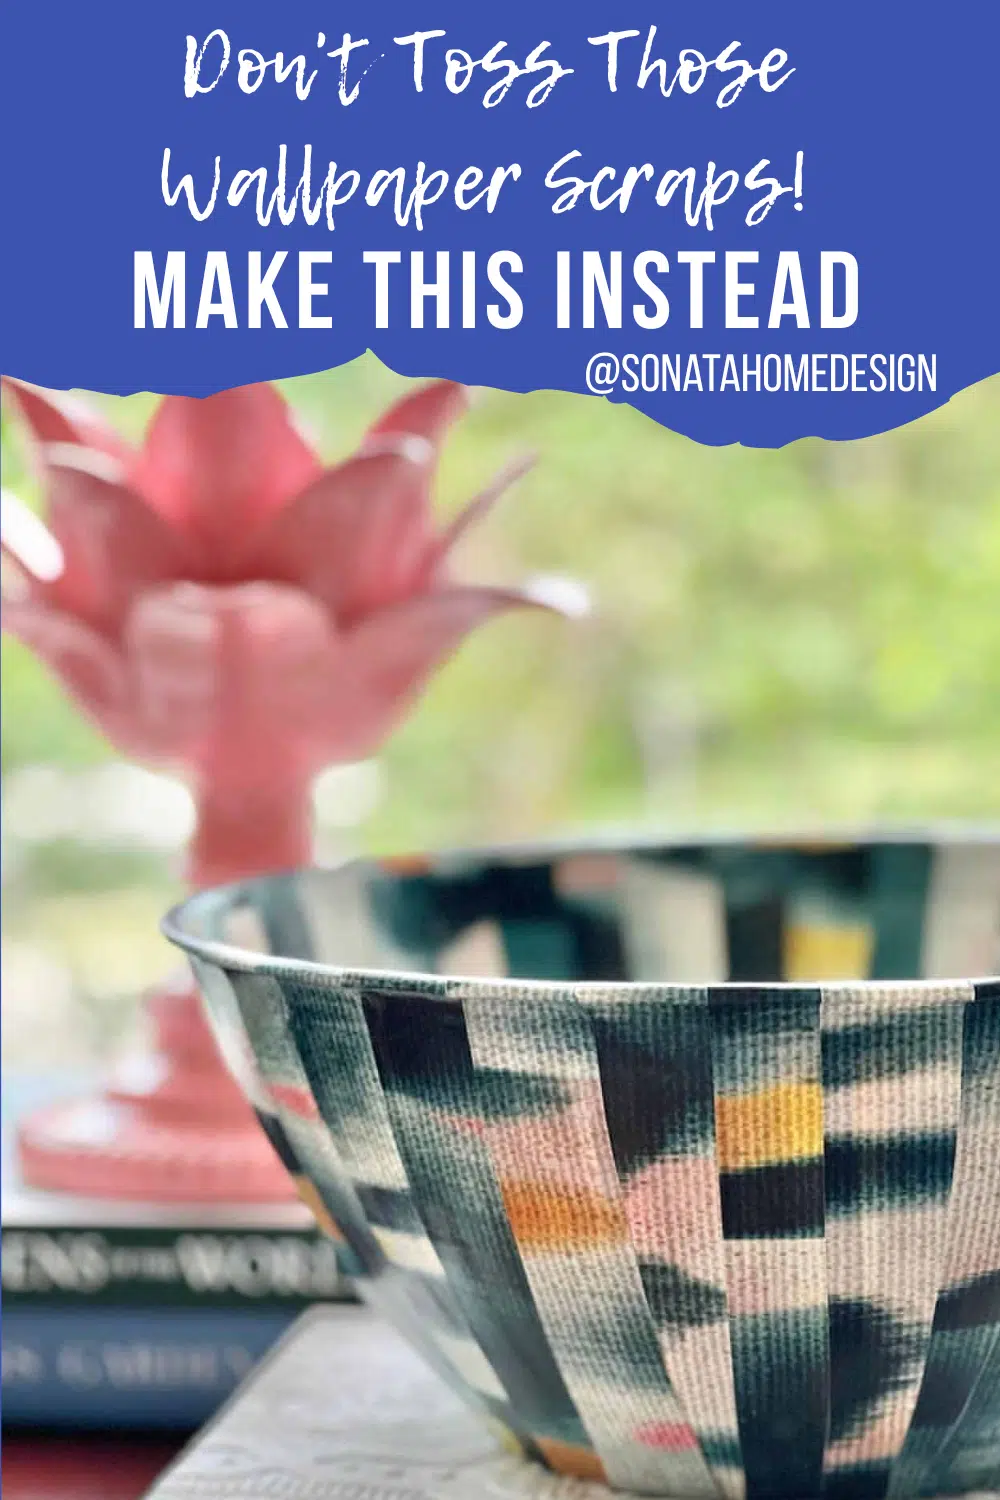
Got wallpaper scraps? Then you definitely want to check out this idea from Sonata Home Design and turn them into a Decorative Bowl


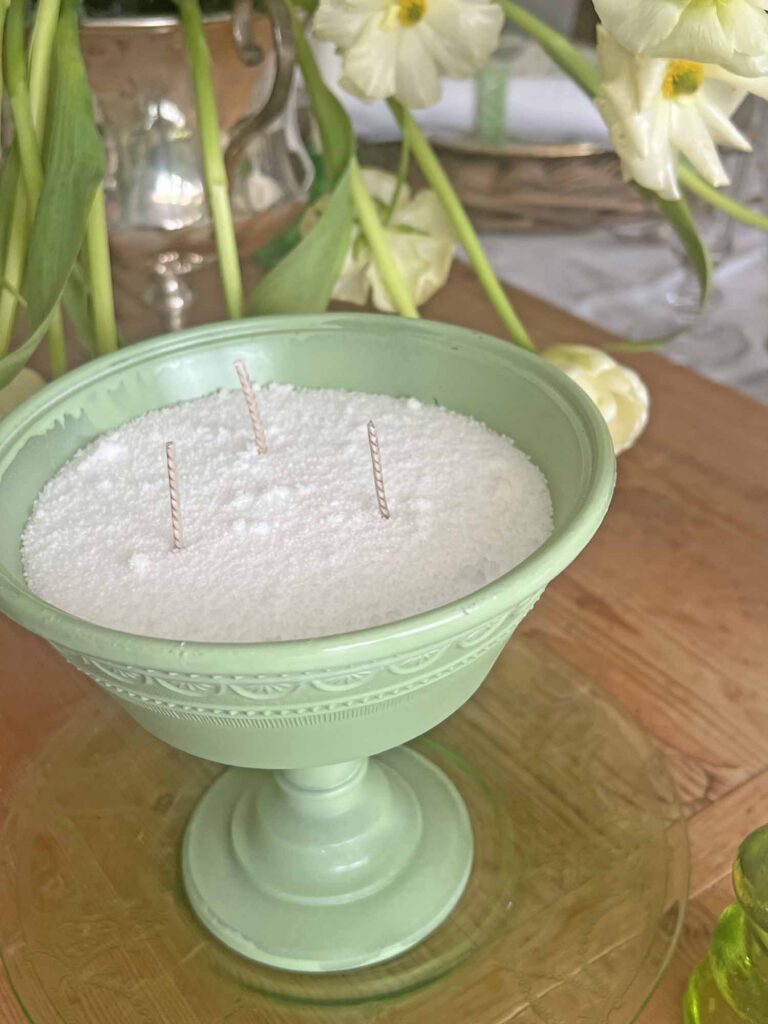
If you've wanted to play with Candle Making, Master Pieces of My Life has got you covered with these Sand Candle Wax candles. No melting required! 

Finally, with end of the school year approaching, Hunny I'm Home DIY shared an easy and fun DIY Teacher's Gift featuring M&Ms, complete with a downloadable tag!


Can you believe it's the last day of April already?! Hopefully, if you've had lots of showers, May will bring lots of flowers. 💐


Given that this party ends on Monday, May 4th...


You are invited to the Inlinkz link party!

Click here to enter

Thursday, April 23, 2026

BFF Open House


Happy,,,sneeze...Friday...sneeze...All! I've been waiting for the allergy monster to arrive and I think it has found me this week. Son's been struggling in Chicago, too, so "Spring has sprung!" And of course when you are trying not to rub your eyes, that's when they itch even more, right? Needless to say, I didn't get up to much creatively this week. Unless you count crumpled tissues as a project! 🤣

Lots of fun ideas shared at last week's party so let's jump right into a few features. 


Petticoat Junktion shared a beautiful Spring Thrifted Makeover! From Vanity Mirror to Wall Decor


Sum of Their Stories shared a fabulous papercraft project. Upcycled Flower Collage from Repurposed Envelopes! 

Press Print Party shared a DIY to make FABULOUS Balloon Mosaic Giant Letters! How perfect for Grad season, Showers, Birthdays, Weddings...you name it. At a fraction of the cost. 


Even as someone who loves to bake, I love a good "no bake" dessert, and 3 Boys and a Dog has a PERFECT one with these No Bake Peanut Butter Sandwich Cookies! YUM!

Thanks to everyone who linked up and can't wait to see what you've been up to this week! 


You are invited to the Inlinkz link party!

Click here to enter

Thursday, April 16, 2026

BFF Open House


Happy Friday Eve, Creative Peeps. I hope you've had a good and of course, creative week! Nothing too exciting here at Casa Chocolate, which is just fine by me. Boring is good, and gave me a chance to play around with a couple of things. I had a chance to play with ideas and techniques I've wanted to play with, so this week I shared:


Some really good thrifting and repurposing ideas were shared at last week's party, and now more than ever, "frugal" the word, so let's take a look at some ideas. 


Thrifting Wonderland shared how she made this handmade card using Thrifted Craft Supplies! Don't sleep on your local thrift stores for all kinds of craft supplies. I've been thrilled to find things at these and you just never know! Plus, have you seen the price of cards?! You can make several for what one costs. 


My Thrift Store Addiction shared a beautiful Garden Armillary Sphere she rescued and refinished. Looks brand new! 

Press Print Party shared how to make No Sew Gnomes. These are for Spring, but could easily be adapted to other seasons, and doesn't a Gnome just make things more fun?


Finally, wouldn't any Spring dessert table be made better with this Strawberry Chocolate Kahlua Swirl Bundt Cake? Yes...yes it would! From Cindy's Online Recipe Box

Thanks to everyone who linked up and can't wait to see what you've got in store this week! 


You are invited to the Inlinkz link party!

Click here to enter

Wednesday, April 15, 2026

Art Techniques: Adventures in Scrape Painting


Have you heard of Scrape Painting? It's something I've wanted to try, and finally did! It involves creating a mask of an image, then, as the name implies, using a tool like a squeegee or other flat surface to pull the paint down in a scraping motion. I'll share some lessons learned as we go along.

Supplies:
  • Canvas or Flat Surface
  • Masking Tape
  • Craft Knife
  • Assorted Acrylic Paints
  • Paint Pens 

For my surface, I grabbed a canvas board I had in my stash. For my image, I downloaded one I found online, sized, printed, and cut out the outline. 


You can either use the canvas as is or paint a background. I wanted a background so I grabbed thse two colors and lightly covered the canvas. 


Once the canvas is dry, then it's time to make your mask, using...masking tape! Layer so each piece slightly overlaps. This avoids lines in your final image. 


Continue applying the masking tape until your surface is covered. To ensure good adhesion, I went over the masking tape with a scraping tool...eg the kind you use to apply vinyl. 


You can draw directly atop the masking tape or trace an image like the one I printed and cut out. I just used a Sharpie for this. 


Grab your X-acto or craft knife, and cut around the interior of your traced image. You want to remove the tape from the interior of your drawn or traced image. Once you have your whole image cut out, it's time to paint!


This is a total free-for-all with whichever colors you want to use. I just dripped these directly from the 2oz bottles, but you can also put the paints in smaller squeeze bottles or, as I plan to do, get some pointed tips to place directly on the paint bottles for cleaner application. Or not! For the next step you'll need a squeegee or a scraper wide enough for your image. I didn't get pics of this part but it's pretty straightforward. 

NOTE: Here's where I messed up! You should just scrape once from slightly above the top of your paints. I missed so I did it twice which overblended my paints, but I'm still good with things! Practice, right? 


As you can see, I got a little bleed on the paints. No worries. The next step will take care of things! 


I grabbed an Apple Barrel Paint Pen in black and went around the image to outline it. Then I took a gold paint pen and added dots and the needles on the cactus. 


I also grabbed my paint-dotting styluses and added some larger white dots in the background, and smaller ones on the cactus pads. 


Despite my goof with the double scrape, I'm still happy and can't wait to do another one of these! 


Sharing At:


Monday, April 13, 2026

"SPRUMMER" Decor: Dotted Bowl Vases


I'm not a big Spring or Summer Maker. So I kind of combine the two seasons in my home decor because it overlaps both seasons. I'm a master word masher, so Spring+Summer = Sprummer!

Last year, I went bright with some Llamas I still love and did a little Tucson-focused theme. I added it to it this year with these bowl vases from Dollar Tree. 

Supplies:
  • Fishbowl Vases, Dollar Tree
  • Variety of Acrylic Paint Colors
  • Dotting Tools, Paint Pens, or Pointed Brush


I grabbed a variety of paint colors and my paint dotting tools and this was a very "go with the flow" kinda project. 


I cleaned the outside of the bowl vases with alcohol, and then started dotting! I randomly went around the vase with white to start, then added colors from there. 


Shown here with yellow and turquoise added. 


Kept going until I was happy! Most of the paints I used are multi-surface use. I don't plan on these needing to go in the dishwasher, so I didn't "cure" them by baking them in the oven. 


For storage reasons, I don't glue things like this together because I like to use things differently so they just rest on these wide candleholders. Also from Dollar Tree. I filled them with some white rocks, and then placed some embossed metal flowers I also made last year atop the rocks. 


That's it! Mr. Chocolate claimed them as his because I don't usually do a lot of bright colors, and he is the King of bright colors!


What do you think?

Sharing At: