Monday, October 17, 2022

Jewelry Making: Spooky Season Jewelry


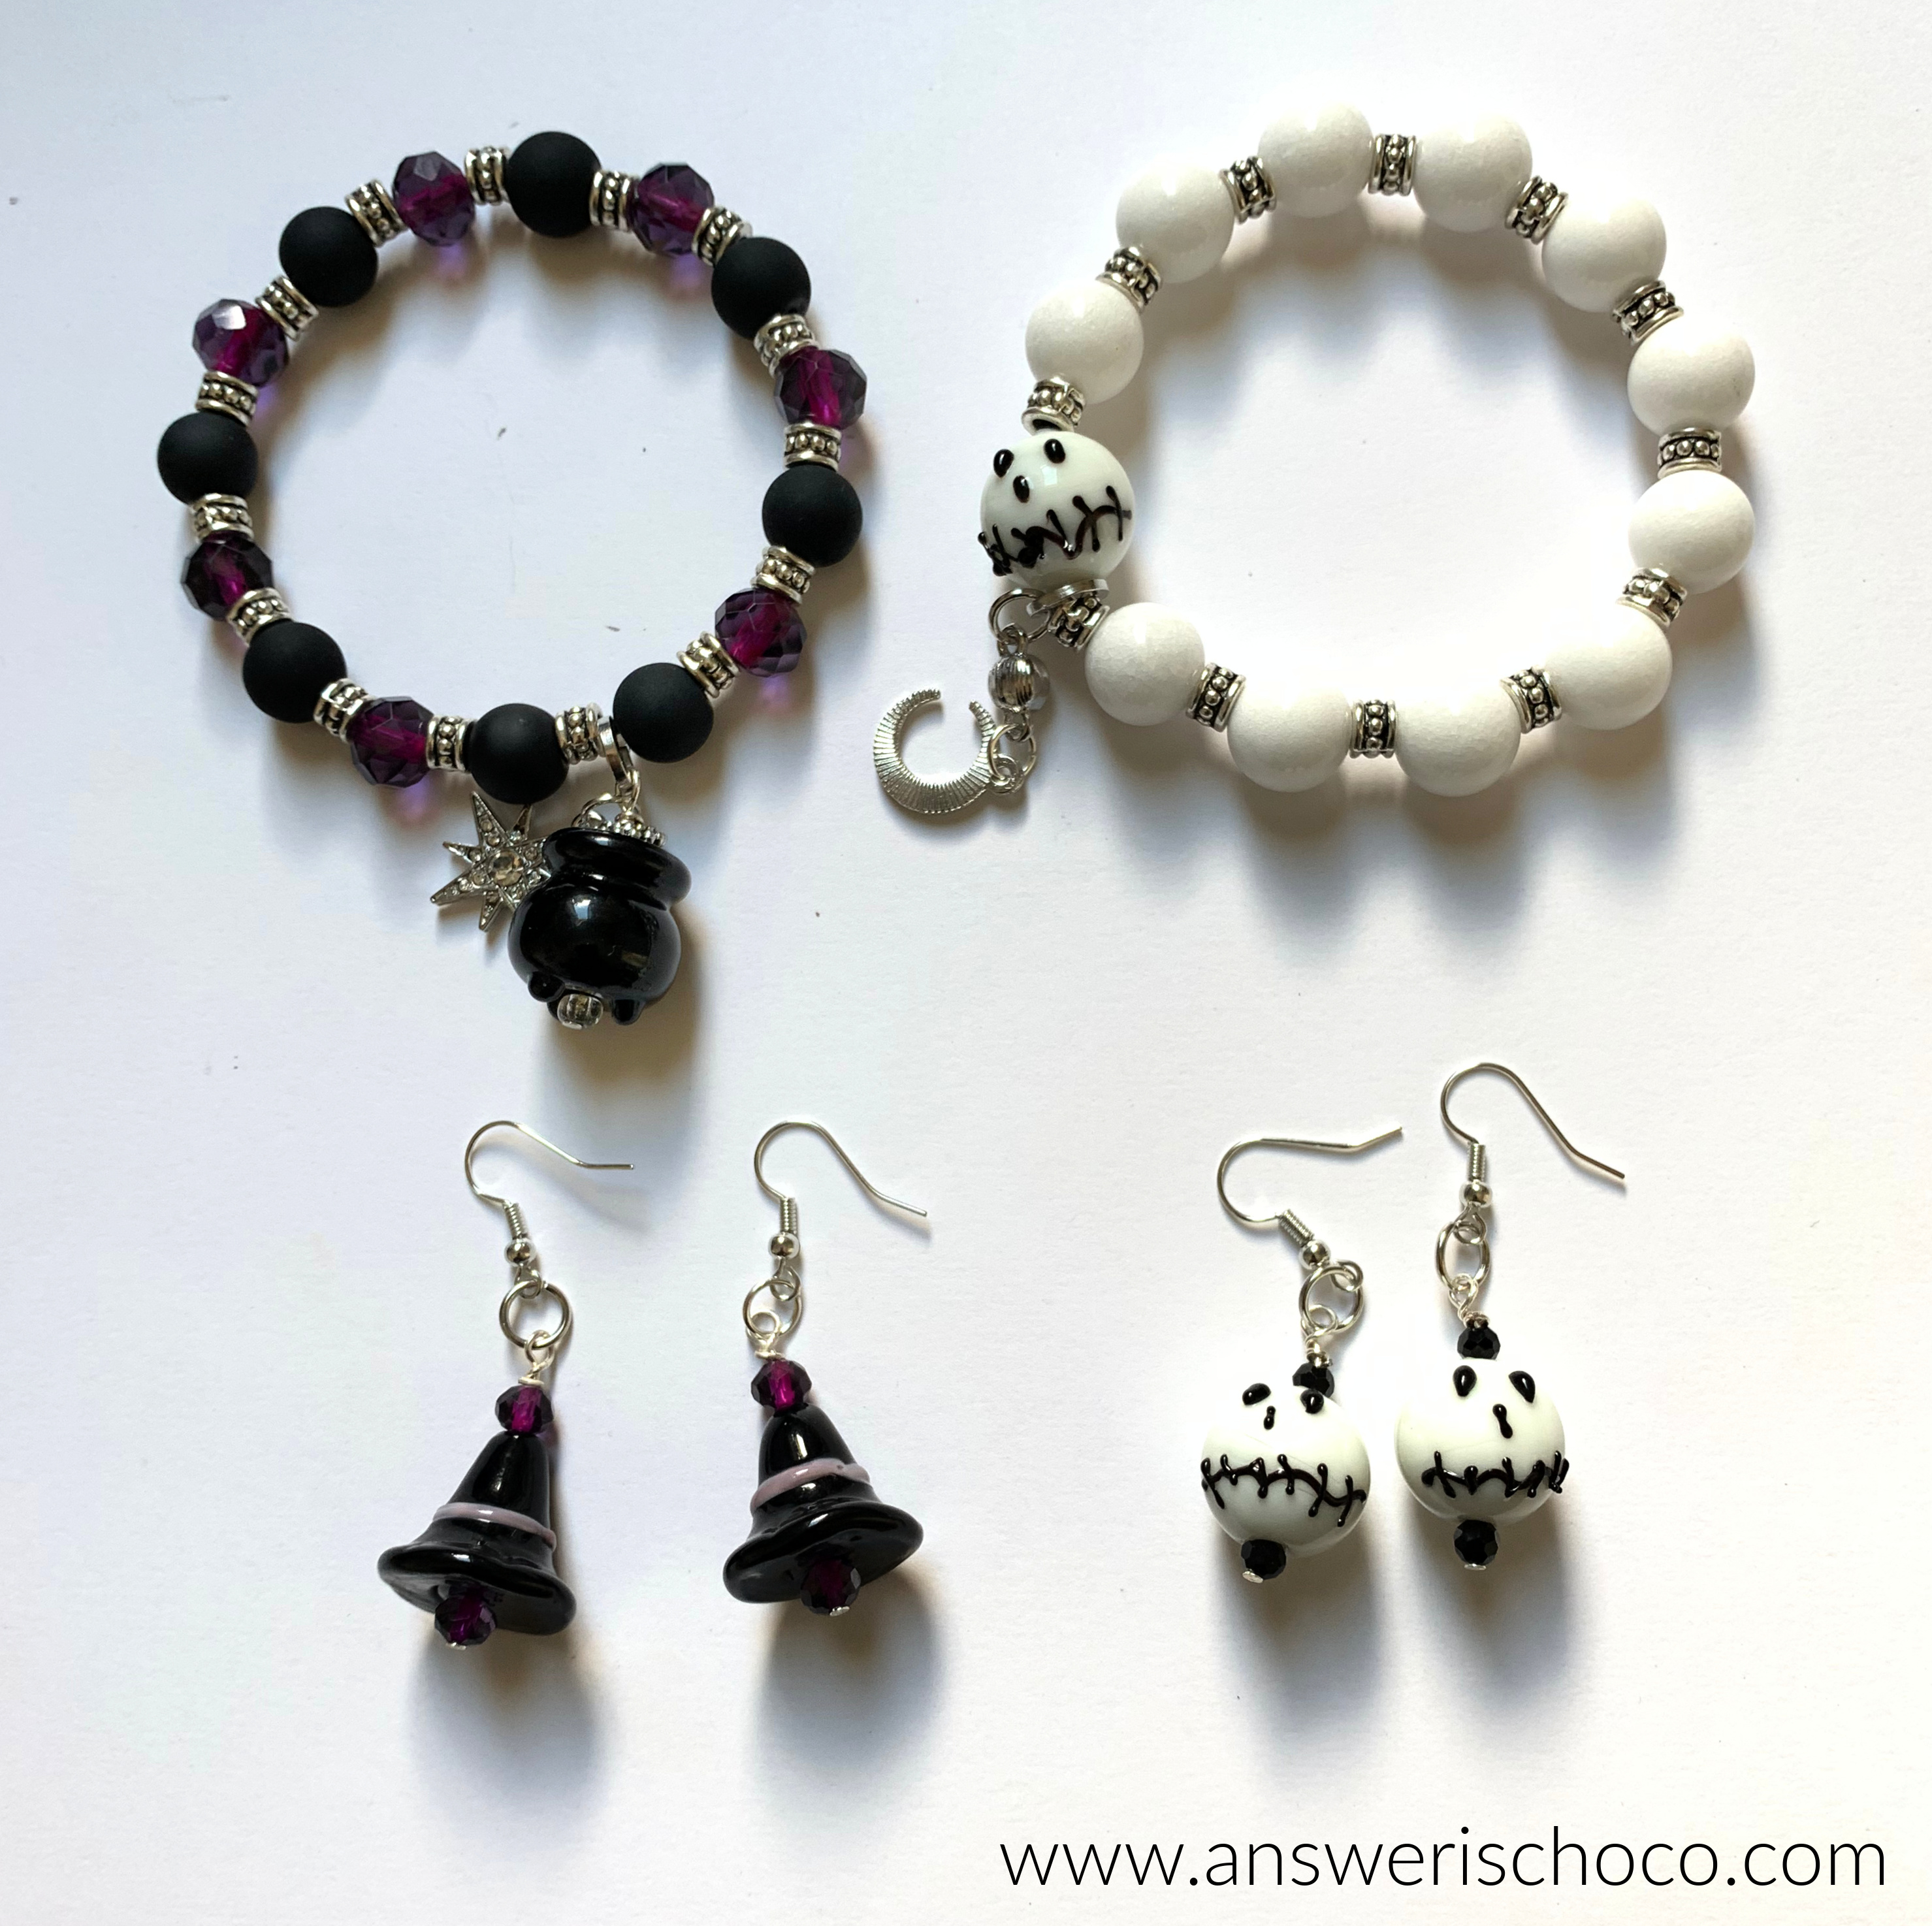
I recently made some birthday gifts for fellow September babies and since Spooky Season would soon follow their birthdays, made them each a coordinating pair of earrings and a bracelet. 

Supplies: 
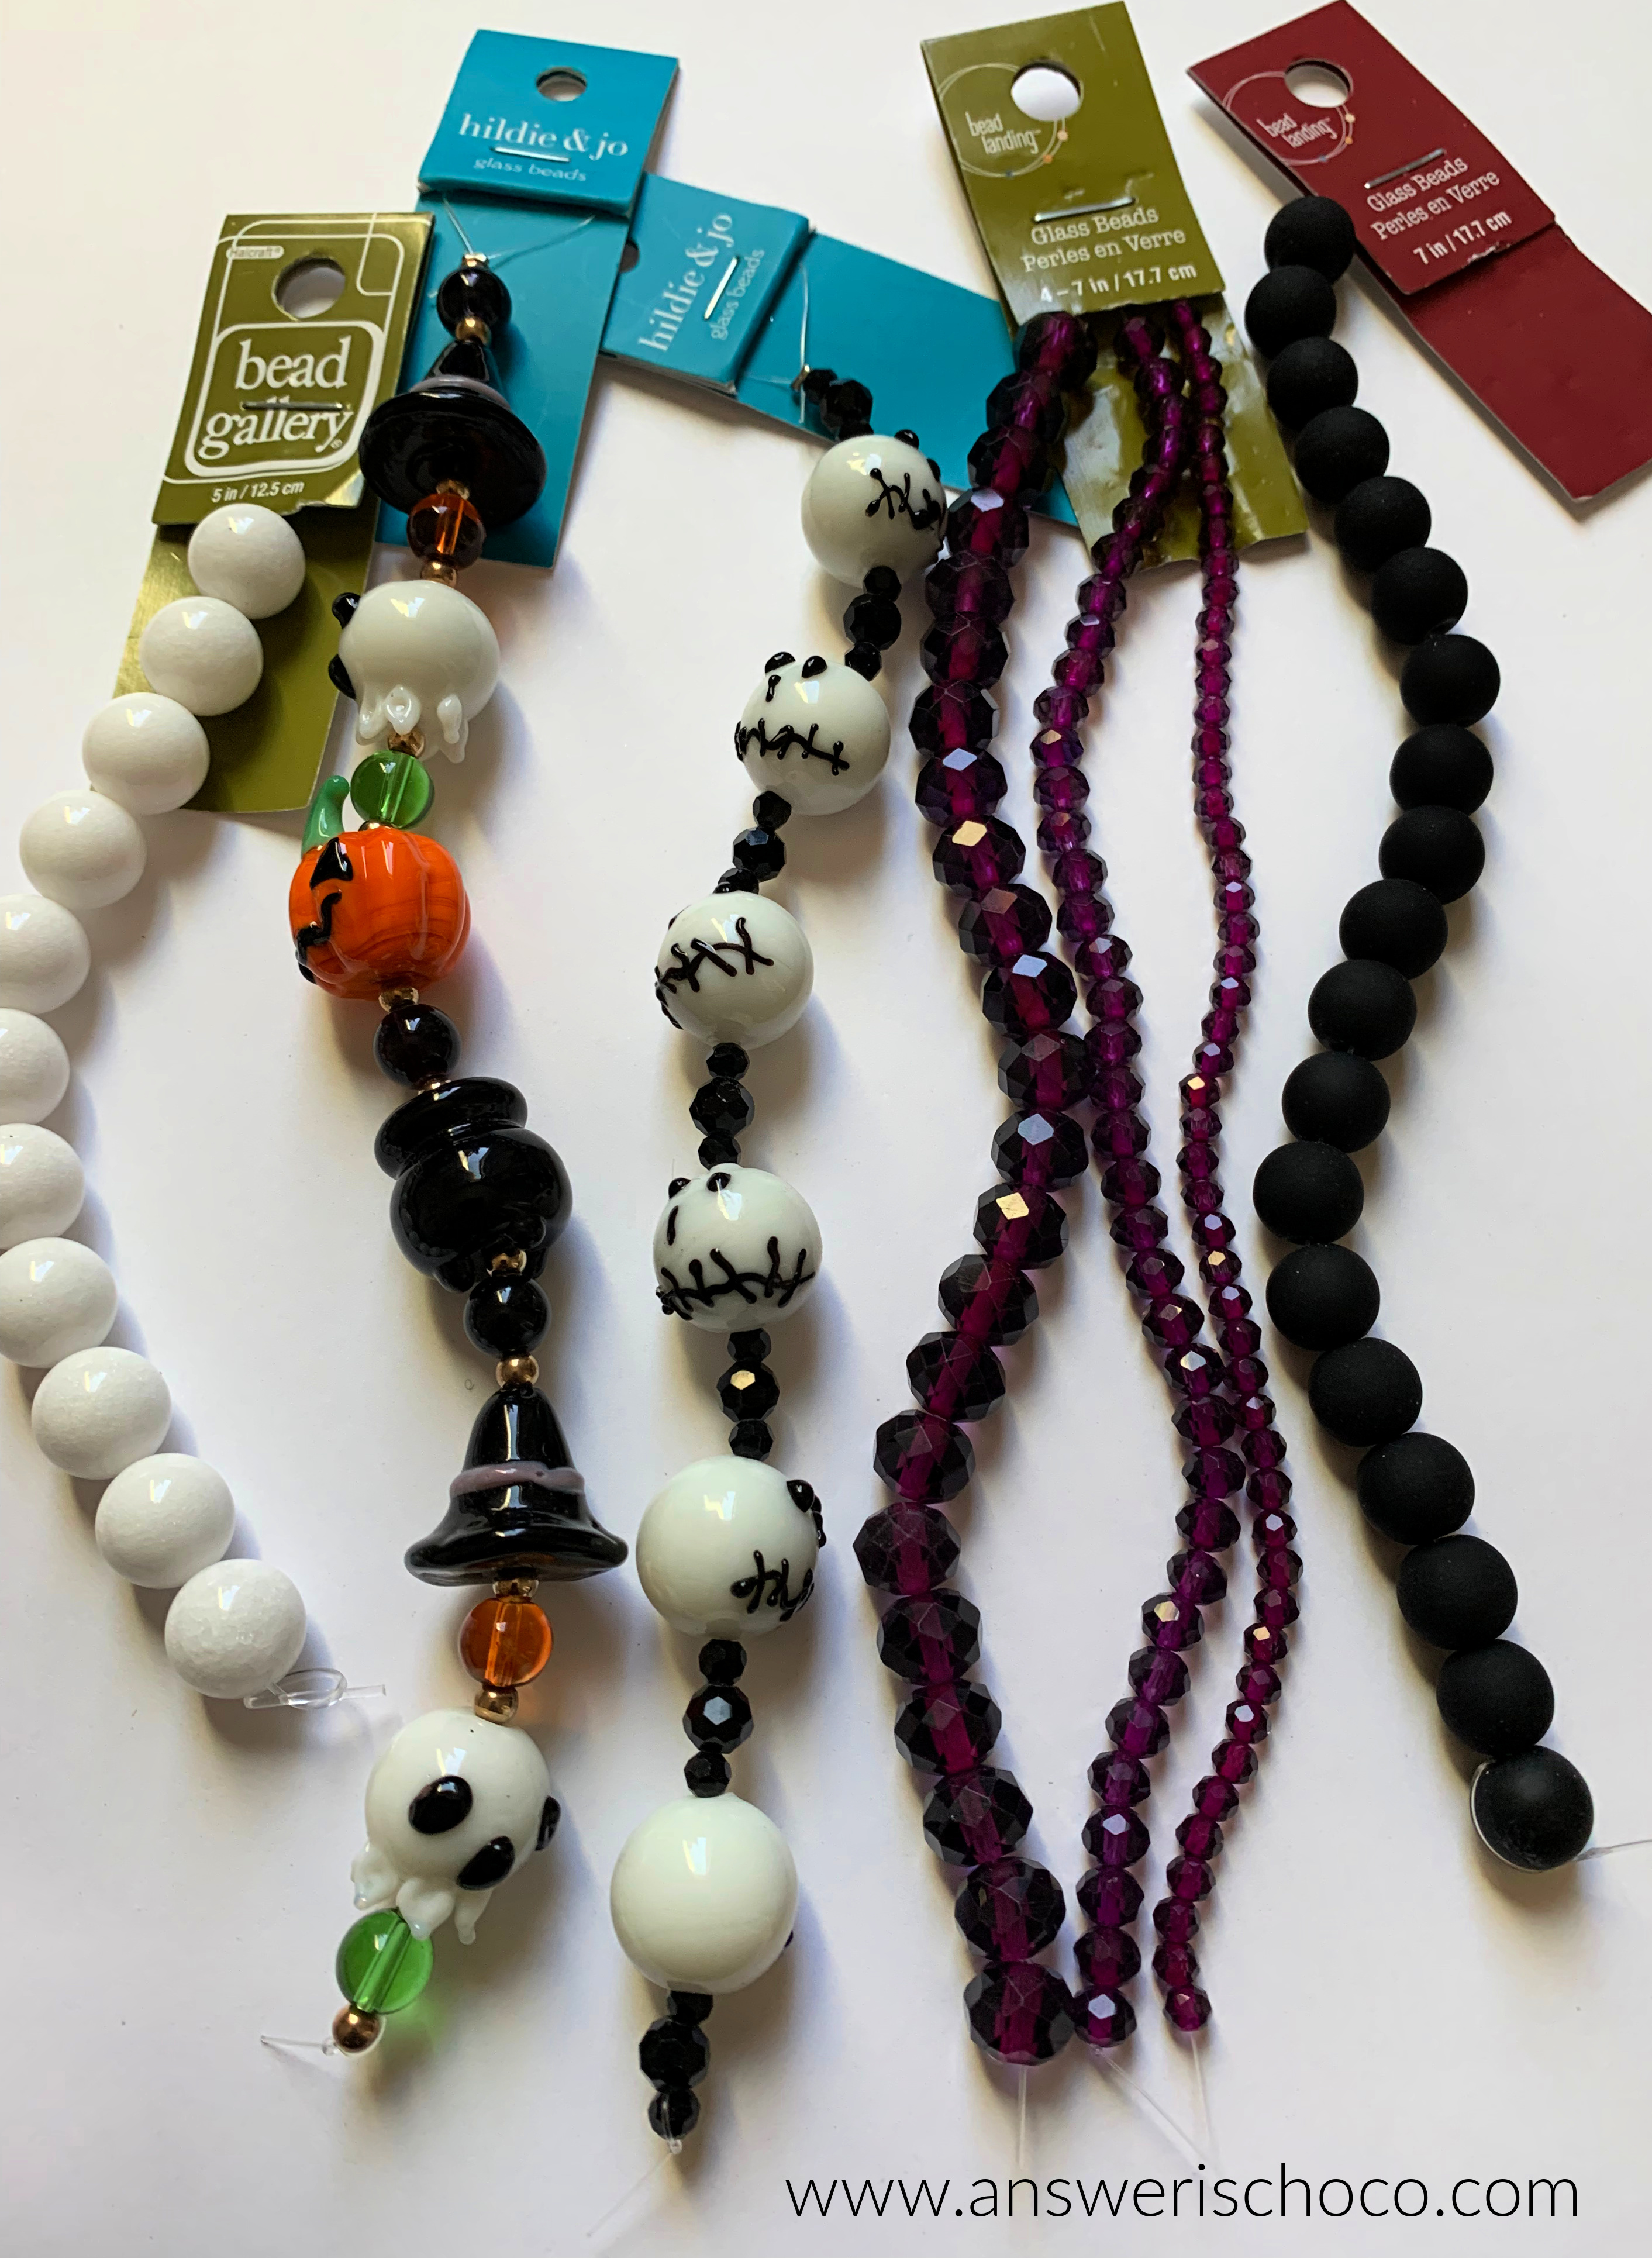
  • Hildie and Jo Witch and "Jack" Beads (JoAnn)
  • Bead Landing Coordinating Beads (Michaels)
  • Fish Hook Ear Wires (Michaels)
  • Jump Rings, Head Pins (Michaels)
  • Stretch Jewelry Cord (Michaels)
  • Jewelry or Super Glue (Walmart)


I found the Halloween-themed beads at JoAnn over the Summer and got them in the off-season. The other beads are ones I keep stocked in my stash. I hit the Michaels and JoAnn sales or use coupons! It's what we do, right? 

The process is the same for each set. 


For the earrings, string desired beads onto a head pin, then make a wrapped loop. There are a ton of tutorials on You Tube that can show you better than I can. I've linked one here but I find that I have to look for tutorials that make sense to my brain so watch a few different ones.  You will need a pair of small round nose pliers like the ones shown here which are available in jewelry sections of craft stores, bead stores, or online. 


Once you've completed your loops, attach to the ear wire using a jump ring (and here's another video on how to open and close jump rings) and you're done!


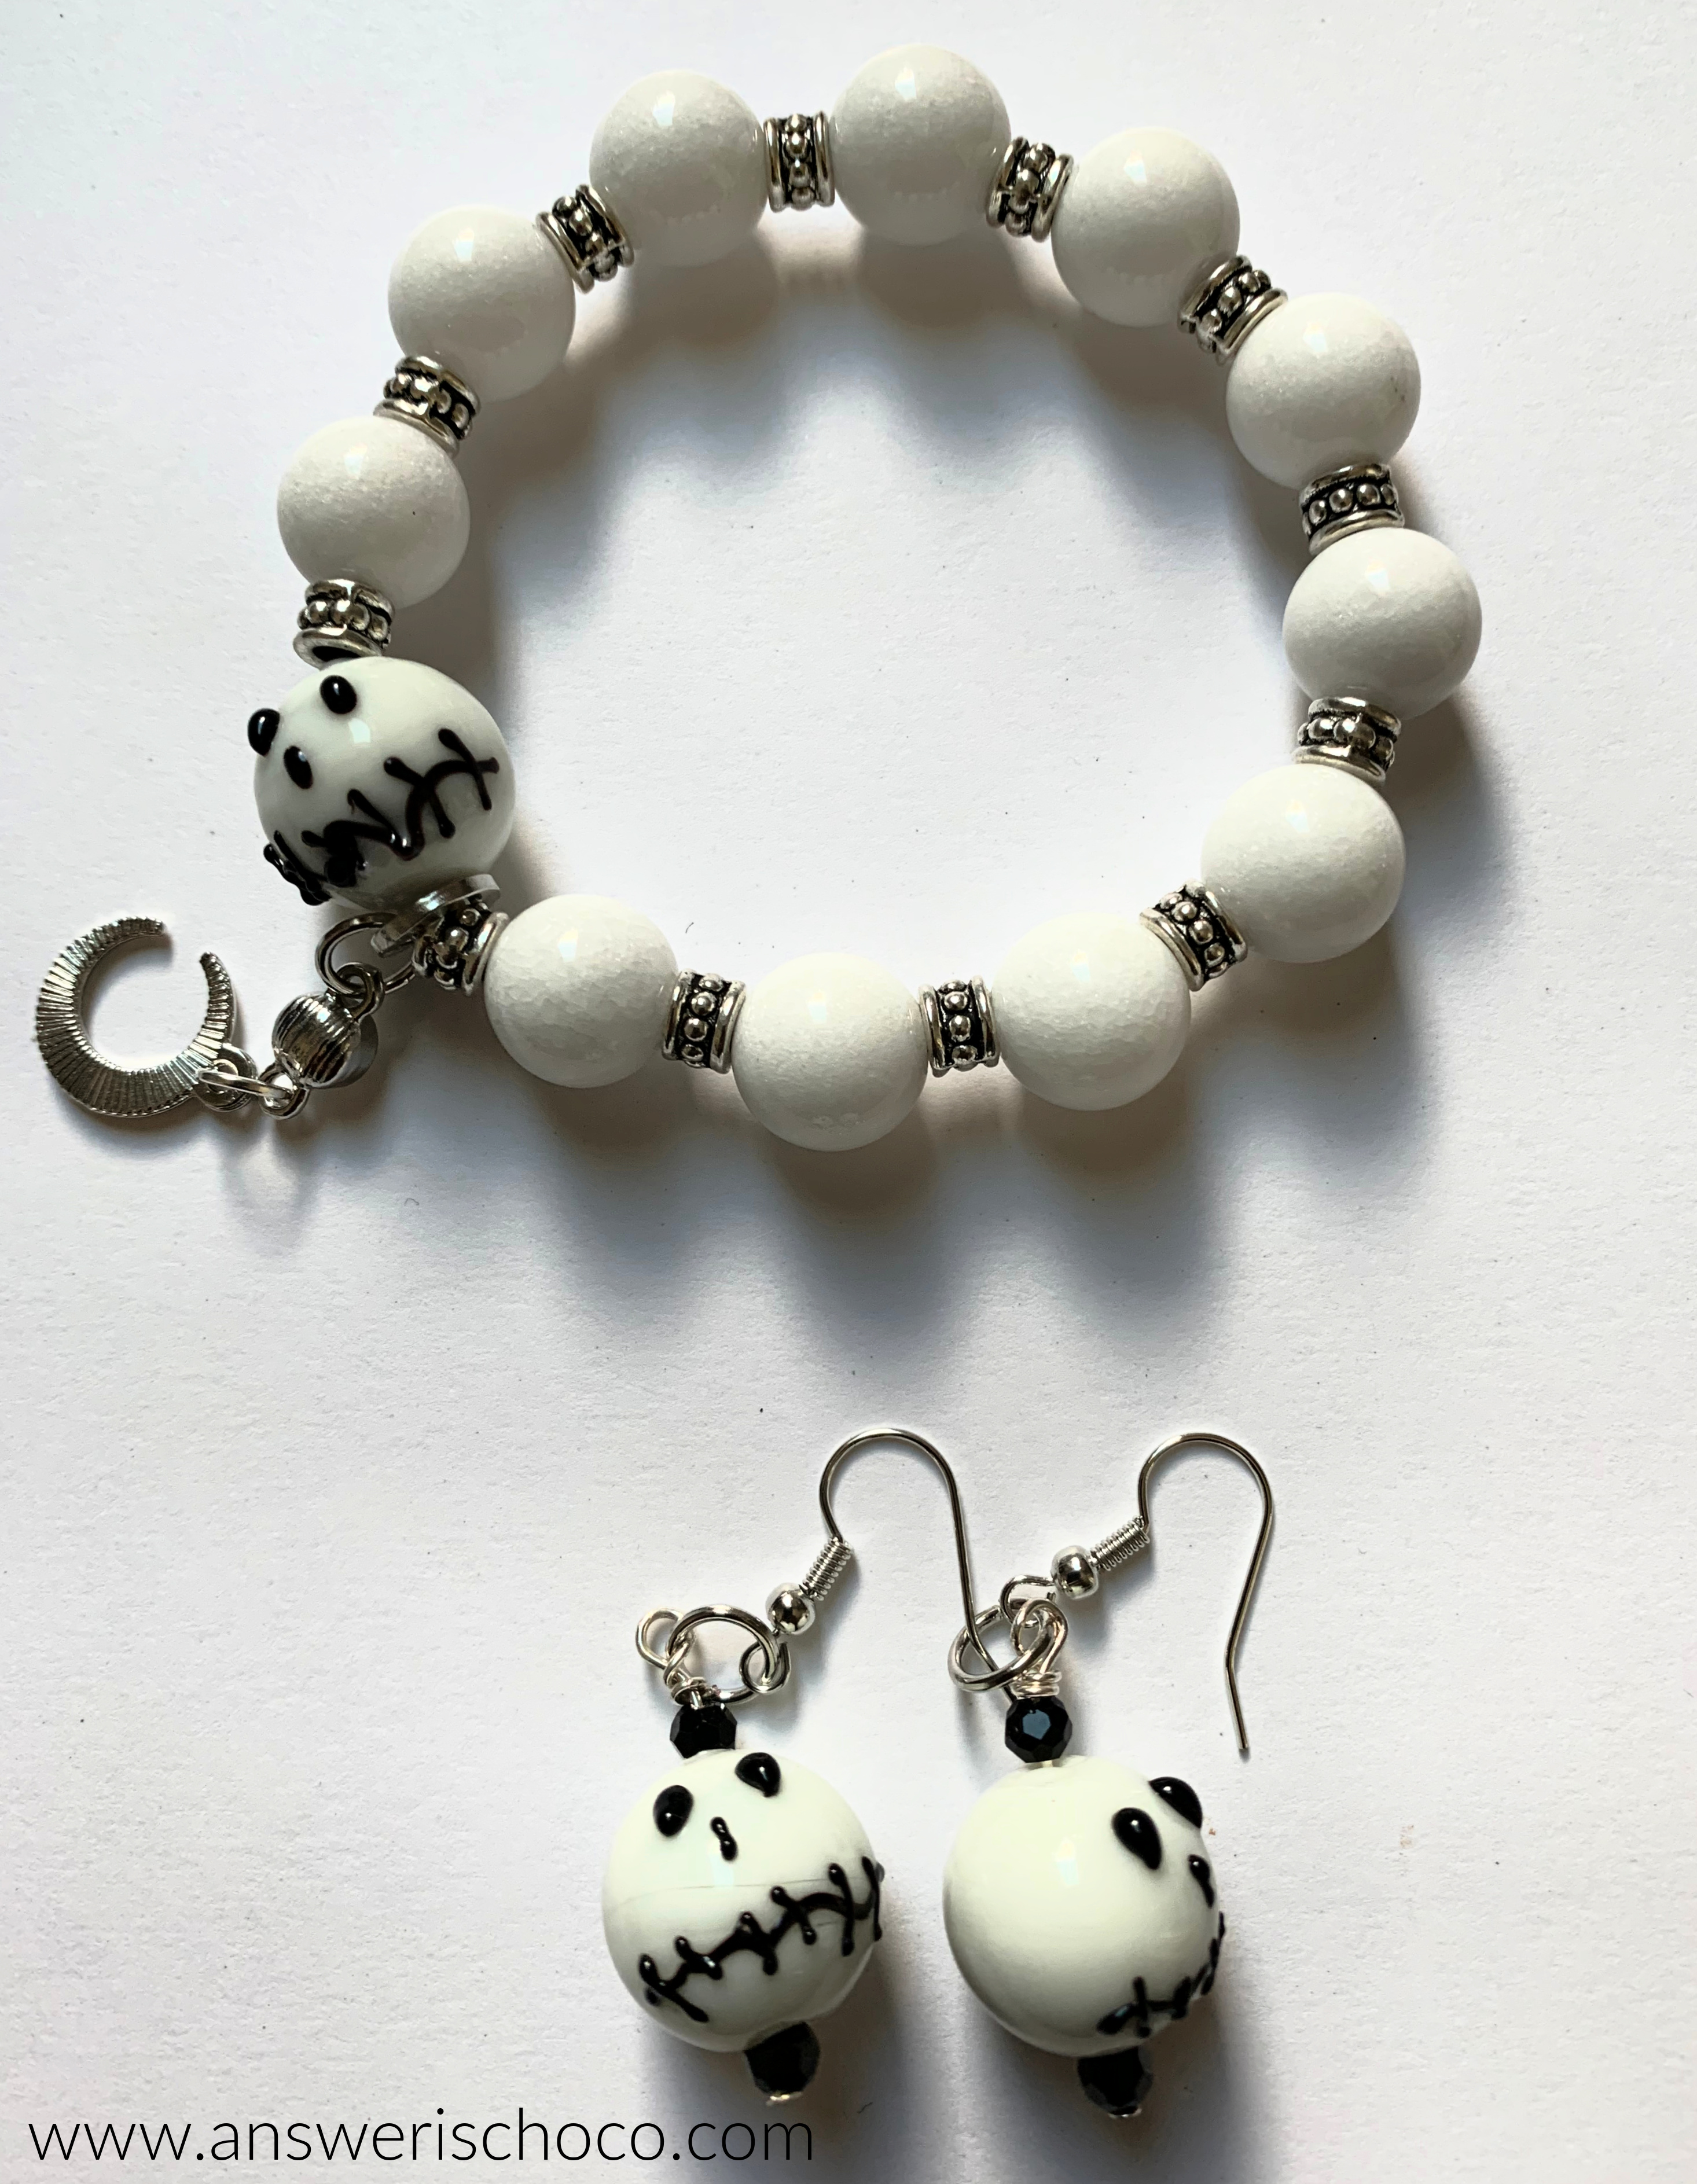
For the bracelets, cut a length of stretchy jewelry making cord longer than you need. Some people measure precisely. I don't. I cut about 12 inches for a bracelet because I like having the ends longer for knot tying. Use a clamp (they sell specific ones for jewelry...I use a binder clip or a cheap plastic clamp I found at Dollar Tree). String beads in whatever pattern you like. I just string, do a checkpoint aroung my wrist for size and when I'm good, tie a tight basic knot and add a tiny dab of jewelry glue or I like the gel formula super glue. 


This stuff is great and you really only need a tiny bit. I always make another knot with another dab. Give the glue a minute to dry then trim as close to the knot as possible with wire cutters or sharp scissors. 


I used extra beads and related charms to add a little dangle to my bracelets. String the bead on the head pin as shown for the earrings, close the loop, use a jump ring to attach to the bracelet. Same with the charm. 


Happy Haunting! 

Sharing At: 

Featured At: 


Thursday, October 13, 2022

BFF Open House


Yikes! Eeek! We're halfway through October already. For me, the time just speeds up now. I've been busy attending some craft summits and signing up for more and realize I should be sharing those! The next one I'll be on the lookout to sign up for will be done by Craft With Sarah who is still doing a daily Halloween SVG freebie for Halloween projects. She just announced today that she'll have a Holiday one starting in November so if this is something you think you'd be interested in, get on her mailing list now. 

Last week was another great week of inspiration with projects and recipes "to die for" mwaaahhhh.

Let's take a look at a few. 


With the popularity of Disney's Hocus Pocus 2, it's been fun seeing all the creative ways people are celebrating the movie. Penny's Treasures is no exception with her Bad Apple Brewery vignette! 


My French Twist shared this clean and modern take on a Fall staple, dried wheat, with these Color Wrapped Wheat stalks. I love the simplicity and modern Fall color palette. 


Coffee, specifically "Iced Venti Nonfat No Whip Mochas" are my love language! If you have a coffee lover in your life, why not whip up a fun gift like these Wood Coffee Blocks from Drug Store Divas?

Finally, this Apple Pear Fall Sangria from Our Tiny Nest is a wonderfully fresh taste on a classic drink. What a great Fall dinner party drink and I think it could easily be adapted as non-alcoholic.

Thank you as always to everyone who linked up. I do look at all of them! 

Now time to see what everyone's been "brewing up" this week! 


You are invited to the Inlinkz link party!

Click here to enter

Thursday, October 6, 2022

BFF Open House

Happy Friday Eve all and I hope Florida Creative Peeps are doing OK and hanging in there. So much devastation, it's incomprehensible and I know that's an understatement compared to living through it. 

October proceeds and Spooky Season is in full swing. I got my Halloween Tree up and dropping this year's Halloween cards in the mail to special family and friends today. 

As always, there were great projects shared at last week's party so let's take a look at a few! 


How fun are these Witch Hat table favors from Thrifting Wonderland? Perfect to set a spooky table and/or send home with guests! 


These Concrete Pumpkins from Saved By Salvage are just GORGEOUS and she has all the details on how to make! 

How cute is this Book Witch from The Apple Street Cottage


Finally, these Brownie Parfaits from The Kitchen Is My Playground would be perfect on a Halloween part dessert table or for any time! 

Thank you to everyone who shared their creations and let's take a look at what you've all been up to this week! 


You are invited to the Inlinkz link party!

Click here to enter

Wednesday, October 5, 2022

Halloween: Spooky Season Layered Bat and Moon Cards


Halloween cards just may be my favorite cards to make. I love using non-traditional colors and for this year's, I went with a brilliant royal blue as a color accent to go with shiny silver and gold.  

Supplies:
  • Black 110lb Cardstock (Recollections,Michaels)
  • Metallic Blue,Silver,Gold Cardstock (Recollections,Michaels)
  • Foiled Halloween Scrapbook Paper (Spook Hill, Michaels)
  • Layered SVGs (Bat is from Creative Fabrica Moon is Cricut Design Space)
  • Digital Cutting Machine
  • Adhesive Tape Runner
  • Coordinating Sequins
  • Self-adhesive Rhinestones
  • Dimensional Glue (Glossy Accents, Ranger)


I selected the foiled skull and stars papers from the Spook Hill stack I had from last year. When I'm making multiples, I like to have my cards and panels all cut ahead of time, as well as any images I'm using. That way when it's time to assemble, I'm just focused on that. 

Card Size: 5x7 so cut 7x10 and score in the middle. 
Blue Panel: 4.75x6.75
Foiled Papers: 4x6

After deciding on my images, I brought into Cricut Design Space and then cut everything out. 


The Bat SVG comes with four layers but I went with three. Black base, white middle, gold top. For the moon, I used the offset option in Cricut Design Space to create the gold layer and cut the image from silver paper. 


I used spray adhesive to attach the Bat layers and then foam dots to attach the silver layer to the gold layer for the moons. 


I assembled the cards as shown and then used double-sided tape to attach the moon and foam tape to attach the bat. To finish, I used bright gold sequins and clear rhinestones to decorate the moon and bat. 


The blue reminds me of the night sky!


Tuesday, October 4, 2022

Halloween: Black White and Purple Spooky Halloween Tree


I've been wanting to do a Halloween Tree for a while. Last year I thought I'd be happy with a lighted branch tree and I was but in our new house, it ended up permanently in our bedroom as ambient lighting so I needed a new one right? For once in my brain, I also remembered to look for it early enough and lucked out getting one from Wayfair for 50% off over the Summer. I just went to check for this post and they still have them but they're a little more expensive now. The decorations are all Dollar Tree and I shared the Jeweled Tarot Card Halloween tree skirt last week. 

Supplies:

I cleaned my Dollar Tree out of all of the Purple and Blak picks shown and this bat themed ribbon was perfect! 


I also picked up a bunch of these skull treat baskets and glitter spiders that went with my colors. 


I wanted a skinny tree and this was perfect. Of course it came in a super skinny box and needed to be fluffed out. 

It was also not pre-lit so I found some purple lights on Amazon and didn't even realize until I plugged them in that they have 8 different options. Steady, twinkle, flashing etc. I haven't strung lights on a treee in a few years since I've gotten used to pre-lit trees so that was fun. Once I got the lights on, it was time to decorate. I started with the ribbon after the lights and used pieces of wire to attach to the branches in some places. After that, I added the picks, skull baskets and spiders and to finish, used a creepy doll head I had leftover from a project last year which I wrapped in the black netting one set of the skull baskets came in!


Ooops! Forgot to take pictures of the eyeball and glitter ornaments also from Dollar Tree!

The spiders are just resting on and tucked into the branches. 


To finish, I wrapped the stand with my Jeweled Tarot Card Tree Skirt I shared last week. 


Sharing At: