Thursday, December 17, 2020

BFF Open House


Happy one week until Christmas Eve Friday Eve all! How on earth is it one week until Christmas? Although that puts us closer to the end of 2020 which isn't a bad thing. You've been busy elves so let's see what you've been up to. 


I love vignettes and how you can incorporate everyday decor items into seasonal decor. Mary Jo from Masterpieces of My Life shows exactly how to do that with her post on baubles in crates. Giving a wider view and a closeup view. 

You really need to check out the whole post to appreciate!


Artsy VaVa is back with another gorgeous painted and stenciled sign and the grain sack accent stripes and boxwood "O" really make it pop! 


Two Chicks and a Mom shared this bright and fun wreath made with supplies from one of my go to places, the Dollar Tree. Perfect to leave up all Winter! Not only is it fun and festive, it has a special story. Please read the whole post. 


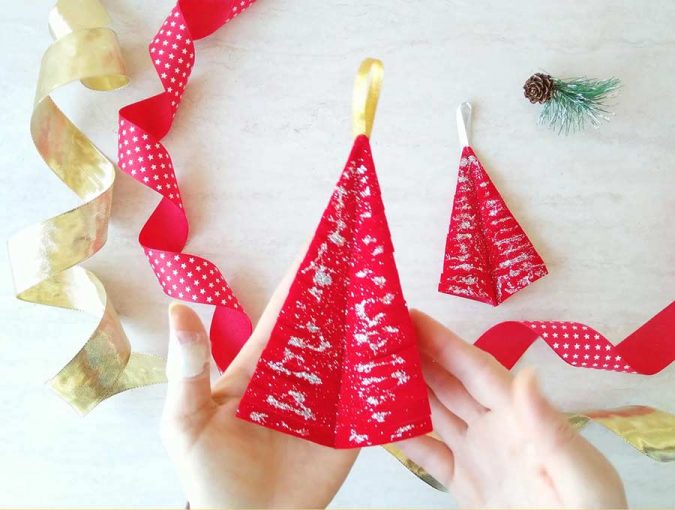
Naush from Doodlebuddies shared these Simple and Elegant Christmas trees you can still make for this year or pin for next. 

Thanks as always for sharing your creations here each week. I love seeing what you've all been up to even if I don't always have time to comment. 

OK let's see what you've been up to this week! 


You are invited to the Inlinkz link party!

Click here to enter

Tuesday, December 15, 2020

Holiday 2020: Gifted Cards


Like most Makers, I have a stash of supplies. Mr. Chocolate lovingly teases me about my paper addiction  which, as a result of its existence, has produced cards he's asked for "like that" ! And you know what? I make no apology! Because what it enables me to do is combine my love of making things with giving back. I wasn't even going to post these because I wasn't happy with the pics and I don't like to come off "look at me", but then I thought others might relate so here we go. 

Also like many Makers, I have moments of self doubt. "Do people really like what I make or are they just being polite?" Be honest. Have you felt like that?  Nonetheless, given the Pandemic That Stole 2020, my love of making things, and my paper stash, I risked the self doubt and decided to make some cards for my health care provider, The Mayo Clinic. 

No one has worked harder this year than Healthcare Workers. Doctors, nurses, admin staff, cleaning staff. EVERYONE! So I thought I'd make some cards to show my appreciation. Literally, beyond masking up and distancing, the least I could do. I made three dozen, packaged them up, and dropped them off, letting them decide whether to use them for patients, staff, volunteers...or at all! 

Last night, I got the nicest email validating I'd made the right decision not listening to that little voice that sometimes makes me doubt myself. The point of all of this? Trust your instincts. Have confidence in yourself. Know that doing something for others may be the one thing that day that helps them. 

I made sets based on white, green, and red cardstocks and coordinating papers: 


These pics don't do justice to the foiled goodness on some of the papers! 


I wish I'd bought more of these little wooden stickers I found at Dollar Tree!


Packaged them up with envelopes and put them in sealed bags. 


The email said they will be used for the staff which I absolutely love! 


Thursday, December 10, 2020

BFF Open House


Yikes! It's Friday Eve, the first night of Hanukkah, and almost the middle of December already. Blink and a week goes by. I'm loving that for the first time in 39 years, I'm neither working retail nor a corporate job where the words "year end" are a source of anxiety. I've been on a bit of an ornament making binge which you can see here: Paint Poured Hanukkah Ornaments, here: Paw-norments, and here: Pandem-ornaments

You've all been busy elves! Let's take a look at some of the wonderful creations from last week's party! 


If you have a bunch of mis-matched, scratched up, or just ornaments you want to change up your look, then this DIY Ornament Upcycle from Niky at House on Silverado is a post you want to check out. GORGEOUS transformation! 


Priyam from Simple Joys is back with her incredible paper cutting skills. These Paper Cut Candleholders are "simply" GORGEOUS! 


Another creative ornament idea was shared by Hello Sewing. Love these Pyramid Triangle Trees!


Maybe you're empty nesters like us. Or, with this year being "this year" maybe your holiday celebrations call for smaller desserts. Or, maybe you just want to make something special for yourself  (which everyone should do because YOU are worth it). For any and all of these reasons, you need to check out these Tiny Chocolate Cakes from Mantel and Table

Happy Weekend all! Let's see what you've been up to this week!


You are invited to the Inlinkz link party!

Click here to enter

Holiday 2020: Pandemic Humor Ornaments


My humor tends towards the snark side so when I saw this collection of Pandemic themed quotes on Designbundles.net it was perfect! This is actually what began my love of making Tile Ornaments. You can see more details here and here. Tis the season to make sure recipients who read your blog get them before you post! 

Supplies: 
  • Satori Arabesque Tiles (Lowes)
  • SVG File ( Designbundles.net)
  • Glossy Black Vinyl and Transfer Tape ( Cricut, JoAnn)
  • Ribbon
  • Glue Gun and Glue


  • Remove tile from backing, clean w/ alcohol or glass cleaner
  • Size and cut vinyl in your cutting machine's software...I used Design Space / Cricut Explore Air2
  • Weed vinyl and apply transfer tape
  • Apply to tile
  • Finish with ribbon hanger and bow


I kept these simple using black vinyl and black glitter ribbon. I was sending to different friends and black and white goes with any color theme. 


This one hits close to home since due to the pandemic, this will be the first Christmas we won't spend with our son because we are all in agreement about not traveling! So we each get one of these. I didn't include the laurels on his because he's kind of minimalist. Ours is on the tree. 


If you can't beat it, laugh at it! 


Tuesday, December 8, 2020

Holiday 2020: Dollar Tree "Frosty" Snowglobes


Today I'm sharing a super easy project to make for your own decor or to give as a gift. On my Dollar Tree outing last month, I picked up a few of their plastic Snowglobe kits. Similar ones can be found at Michaels, JoAnn etc. I did these dry because I didn't want to deal with any potential leaks as they're stored away. 

Supplies: 
  • Dollar Tree Snowglobe Kit
  • Mini Figurines / Trees
  • Faux Snow
  • Glitter
  • Jingle Bells
  • Sequins
  • Glue Gun and Glue
  • Ribbon

The Snowglobe bottom unscrews and then there's a plastic stand / seal that becomes the base. I had some of these snowman figurines and mini-trees in my stash but you can use any minis. The instructions recommend sanding the base to ensure better adhesion but I used big globs of hot glue since they'd be covered up by the snow anyway. Very sure nothing's going anywhere! If you are going to put liquid in them, I'd recommend using something like E-6000 glue. 

Glued down the snowman, tree and a few jingle bells as shown. And then in the globe itself, poured some of the "faux snow" (also Dollar Tree), some iridescent glitter flakes, sequins and tiny jingle bells. That way when you shake your snowglobe you get a little jingle with your jangle. Working upside down, attach the base to the globe and then screw on the rim. 


Flip your snowglobe right side up and then hot glue a strip of ribbon et voila! This started out as something to send our son since because of the pandemic, he won't be coming home for Christmas. Then, as is often the case with things I make, Mr. Chocolate asked "Who's THAT for?" because he never knows what I'm up to in my craft room. "Our boy!."  "Oh." Pout face pout face pout face. But I was a Girl Scout and I come prepared. I bought several of these kits so back to Santa's workshop and magic magic, another one. Plus now I like them with my own decorations so making yet another one. That's the way the snowball rolls in our house! 


The two I made shown here with another Dollar Tree find "Merry" sign which I showed here: Dollar Tree Sign-A-Palooza

Monday, December 7, 2020

Holiday 2020: Pet Lover "Paw-norments"


Our furbaby is such a huge part of our life! Huge, literally because she's over 120 lbs but huge in the place she has in our heart. I know this is true for others as well so I made a few of these "Paw-ornaments" aka "Pawnorments" for friends. They're actually frames so you can have your furbaby on your tree or wherever! 

Supplies: (All of these supplies are from Michaels) 
  • Wood Paw Ornament Frame 
  • Acrylic Paints
  • Mirror Sequins

Like so many Makers, I pick up things post-season when they're on sale. That's how I keep my stash replenished! 


The "Kids Crafts" at Michaels are some of my favorites. I found this post season last year. Simple and easy to alter or glam up! I've seen similar there this year. 


Pop out the center and you're ready to paint! 


I did a couple of coats of black Craftsmart paint, front and back.


Then added polka dots with white paint ( also Craftsmart). 


I love these Mirror Sequins! There's something about them being so bright and shiny! I added these around the paws. 


To finish, I used an extra large jump ring to attach a white glittered jingle bell and then printed a picture of my big girl sized to fit! 


It was hard not to get the glare but you get the idea! She was so good while I was decorating, just laying and watching what was going on. 

And of course, this would make a great kid's craft but since my kid is in grad school...


Saturday, December 5, 2020

Holiday 2020:Paint Poured Hanukkah Ornaments and Cricut Foil Transfer Cards


Happy Saturday! This week's BFF Open House link party continues here

Hanukkah starts on December 10 and every year I enjoy making a little something for friends. This year I went with a Paint Pour Ornament and coordinated card made using the Cricut Foil Transfer Tool. 

Supplies: 


For smaller projects, I like using this paint pouring medium by Artists Loft from Michaels. The ratio is 1 part medium to 5 parts paint so a little goes a long way for smaller projects. 


Ignore the pens because originally I thought I was going to do these w/ an alcohol ink technique and darn if my Sharpie wasn't as dry as the desert in which I live! The ornaments are the point here. I picked up a couple of these from Michaels not knowing at the time what I was going to do with them and of course now I'm kicking myself for not buying more because I LOVE THEM. They take the paint really well and aren't explicitly Christmas. 


Clean your ornaments with alcohol to remove any residue, fingerprints etc. Mix your paints with the medium per the instructions on the medium. Now you're ready for your pour! 


I did what's called a clean pour which means pouring each color individually vs a "dirty pour" where you can layer the paints in a cup before pouring. Pandemic takeout has been good for my craft supplies since I re-purpose the containers for craft projects! 

Start with any color, pour a little, then pour the additional colors in them middle as shown until your surface is covered. You want the paint to drip down the sides to continue the pattern. I placed the ornament on an upside down cup to give it drip space. 


Sorry this pic's a little blurry but you can still get the effect of the paints swirling together. This is why the medium is critical; it lets the paints flow so you get the coverage you need. 


I did the "Hanukkah" word in Cricut Design Space and cut from bright gold vinyl and applied to each ornament. To finish, I added a light blue ribbon with a silver bead. 

Card: 
For the card, I used a light blue cardstock, a navy and gold foiled scrapbook paper, gold glitter paper and blue cardstock which I foiled using the Cricut Transfer Tool. To finish, I added mirror gold sequins as shown. 

Wishing everyone celebrating Hanukkah, eight nights of lights, love, and latkes! 

You can check out some of my past Hanukkah projects below: