Monday, July 7, 2014

Mod Podge Collage Clay : Embellish EVERYTHING But I Did A Vase

Collage Clay Black and White Vase

If you are a reader of my blog, you know how much I love Mod Podge. Well the folks at Plaid just keep adding to the line of already fabulous Mod Podge products and I was so excited to have the opportunity to play with some of the newest. You may have seen these already at Michaels. Mod Podge Collage Clay, Mod Molds and Mod Melts.

Disclaimer: Plaid provided the products for this post at no cost to me. Project idea and opinions are my own.

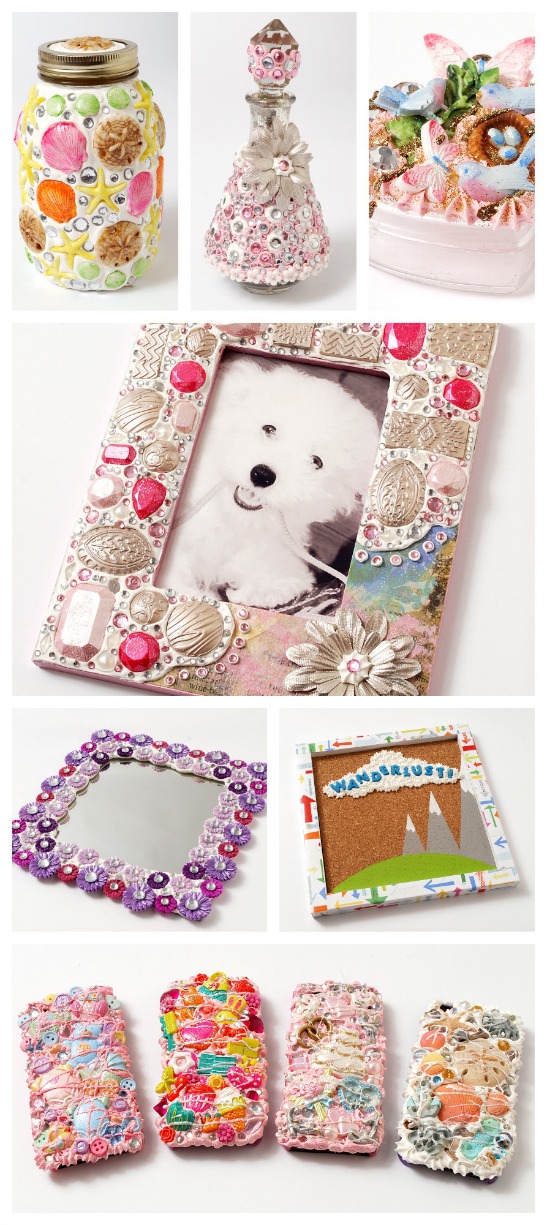
Here are the goodies I got to play with:

Mod Podge Decoden Supplies

The Collage Clay comes in a tube that looks like frosting, including the tips you use to pipe on the clay so  Collage Clay is not recommended for children ages 12 and under, and the product is not edible. Small parts are a choking hazard for children.” If you choose to show children involved in using the product, please make sure they are over 12 years old since the product is not recommended for children younger than this.
The clay can be painted after it's dry .

Collage Clay Decorating Tip

All of these products are great for a current trend called “Decoden” which is the art of decorating anything with trinkets, and "the more the merrier" is the name of the game in designing an over the top look in this 3D collage technique. Use Collage Clay with Mod Melts, trinkets, buttons, rhinestones, and anything else you can think of!

I decided to try my hand a decorating a vase. For this project you will need:
  • Plain glass vase
  • Vanilla Mod Podge Collage Clay
  • Mod Podge Melts Texture Mold
  • Mod Podge Melts ( gold)
  • Washi Tape
  • Rhinestones
  • Ribbon
I marked off a border using washi tape so I’d have a guide to apply my Collage Clay:

Collage Clay Vase

Using the tip shown above, I went around the vase making “dots” . It’s so much like cake decorating I’m sure you cake masters would love this!

Collage Clay Application


The iinstructions say you should let the clay dry anywhere from 1-5 days. I let mine dry for about 24 hours because I didn’t want it to be fully set when I applied some rhinestones . I also applied the Collage Clay to the bottom of the vase. Once dry, I removed the tape.

Mod Melt Mold Button

While my clay was drying I made the “buttons” using a gold Mod Melt stick ( you can run them through a high temp mini glue gun and filled the mold with the melted well, melt. It takes about 10 min to set and then pops right out of the silicone mold. Any little oops drips come right off of the silicone.

I dry brushed my buttons with white acrylic paint so the detail of the mold would really stand out.
Using some leftover ribbon I wrapped the vase and tied off as shown, then glued my “buttons” on.  The Collage Clay was set but not hardened so I was able to lightly press black rhinestones around the top.

Mod Podge Collage Clay Vase Top

You could make sets of these for centerpieces or just one standalone for fun. I had a lot of fun playing with the Collage Clay and the melts and can’t wait to do some more!

Mod Podge Clay Vase

Now who doesn’t love a chance to win something?


The folks at Plaid are giving you a chance to win your own set of these fun crafting goodies. Details are at their site here. You can also learn more about these and other fun Plaid  products here:

  • Check out The Plaid Palette blog: http://www.plaidonline.com/blog
  • Sign up for Plaid's newsletter: https://www.plaidonline.com/craft-newsletter-signup.aspx


  • Follow Plaid on Pinterest: http://www.pinterest.com/plaidcrafts
  • Like Plaid on Facebook: https://www.facebook.com/InspiredByPlaid
  • Follow Plaid on Instagram: http://instagram.com/plaidcrafts

  • Follow Plaid on Twitter: http://www.twitter.com/plaidcrafts
  • Watch Plaid on YouTube: http://www.youtube.com/plaidcrafts
  • Follow Plaid on Google+: http://plus.google.com/+PlaidOnline


Sharing At:


Here are what some other creative bloggers are doing:


Thursday, July 3, 2014

BFF Open House Link Party #165

The Answer Is Chocolate

Happy Friday Eve and Fourth of July Weekend! Hope everyone's had a great week and soccer fans are recovered from the nail biting USA-Belgium World Cup game.  I didn't set out to have all jewelry features ( well except for this week's chocolate feature) but think you'll agree they're pretty cool. 


Let's start with this ingenious creation from Mich in LA, the creative genius who can turn anything, and I do mean ANYTHING , into a gorgeous piece of jewelry. This is no exception. You'll have to check out her blog for the deets. 


Via Life With The Crust Cut Off, comes this wonderful bracelet idea by Michelle from Michelle Lea Designs. You will never guess how the bracelets are formed!


Another fun bracelet idea comes from an unexpected source: PVC pipe. Check out Do It Yourself Fun Ideas for the how to. 

This week's chocolate feature combines the classic flavors of chocolate and peanut butter. Is that ever a bad thing? 


Visit Some of This and That  for the recipe. 


Thursday, June 26, 2014

BFF Open House Link Party #164

The Answer Is Chocolate

Happy Friday Eve everyone. Can you believe it's the last weekend in June already? Even scarier, as of yesterday it's six months until Christmas! You know before we blink we'll be seeing Fall and Halloween supplies in the stores if they're not there already. 

But, it's still very much Summer and here are some ideas from last week's party to celebrate this fun season. 


How cute is this SUMMER painted block set from Home.Made.Interest complete with flip flops for the "U"? Think of all the color combinations. 


Complete a fun Summer outfit with this ombre striped clay pendant from The Crafty Scientist. Make one, give one. 


Summer is prime garage sale and flea market shopping season. While you're out and about, look for the components to make this fun suitcase table bar. I have seen suitcase end tables for around $1,200 which is way far away from the price Kim from Made In A Day paid for her table top. 

This week's chocolate feature: Chocolate Banana Muffins from The Pin Junkie. Great way to have your chocolate with some extra fiber and potassium and use up those inevitable extra ripe bananas. 


Let's see what you've been up to this week! 


Monday, June 23, 2014

Special Order and Everyday Note Cards

Pink Paislee Card

College boy texted me the other day asking if I would mind making a card for a friend of his. LOL.  Me? Mind making a card? Especially one that's a special order from my son in another state? HA.  His friend’s academic adviser had undergone some major surgery so I wanted to make it extra special.

I used a sheet of paper  from Pink Paislee and a coordinating torn scrap as the background, and added torn corners from an embossed scrap I had from a previous project. The paper is heavily patterned so I decided to accent what was already there with Stickles Liquid Pearls.

The wood spiral flower and grey paper roses were from some bargain finds at Michaels. To finish, I layered alphabet sticker letters to make the word “HI” onto punched squares of scrap cardstock and added a strip of washi tape.

Since I was mailing this to CB, I decided I’d send him some notecards that he could use as thank yous or whatever. I’ve always been a stickler about thank you cards, and despite some resistance along the way, now that he’s an adult he actually appreciates why.

Basic Grey Periphery

I used this paper pad from Basic Grey ( busting my paper hoarding stash) and these oversized We R Memory Keepers eyelets as my focals.

Enjoy Notecard

Each card has a flattened bottlecap with a sentiment sticker in the middle. “Enjoy”, “Live”, “Smile” , “Laugh”.

Smile Notecard


Live Notecard

Laugh Notecard

I finished each card off with a strip of printed washi tape. He's doing a Summer research project at school and has some opportunities to do some extra things via his Professors so these will come in handy.

Thursday, June 19, 2014

BFF Open House Link Party #163

The Answer Is Chocolate

Friday eve again already! Hope everyone had fun celebrating the dads in your lives and has had a good week. 

Lots of great ideas at last week's party and maybe because I have some bare walls, but several wall art projects caught my eye. 


I love the simplicity and boldness of this piece ( pieces?) by Julia from Always Ruetten . Inexpensive, easy, high impact. What's not to love?


Here's another on trend idea. Pallet art and a big ampersand. Not to mention the quote is timeless. See the details at This Silly Girl's Life.


Mirror mirror on the wall, from the Dollar Store came them all ( groan lol). But seriously, see what you can do with a few mirrors from the Dollar Store over at Mondo Mom

This week's chocolate feature brings the outside in. See a new twist on everyone's favorite campfire dessert with these S'mores inspired brownies from Life With the Crust Off


Now, let's see what you've been up to this week! 


Monday, June 16, 2014

My Paris Bathroom: Bathroom Makeover Using What You Already Have

Paris Bath Collage
Happy Monday ( OK fake it til you make it right? ) .  Thought I'd share a post I did for the blog Live Creatively Inspired where I post once a month. If you've never visited, you really should. It's a wonderful place with posts from some amazing bloggers , full of inspiring ideas.  I am so honored they let me post there!  

This is a bathroom makeover idea using things from around the house brought together in a new space. 

I didn't set out to have a Paris themed bathroom but I realized one day just how many Paris themed things I had, many of which I created. I went "shopping" in my house and brought several of them together in one of the bathrooms. 

Coffee Filter Wreath

This coffee filter wreath previously hung outside our laundry room. I decided it would look better on the door to the bathroom. This was a fun and easy project to create and you can find the details on my blog here.

Painted Frame and Vinyl Sign

This sign was originally created to hang in our master bath, ended up in the dining room and is now on a wall in the Paris bathroom!  The sign is made from a re-purposed frame, a piece of dropcloth and vinyl images cut on the Silhouette Cameo. Details on this project here.

Paris Themed Bath

The vintage candleabra was a bargain flea market find that I originally thought I'd paint but ended up leaving in its shabby chic state. The Paris plaque is Mod Podge and Scrapbook paper on a piece of wood found at the hardware store.  The chocolate sign was a gift from one of my best friends and what goes better with Paris than chocolate?!  The candle is an altered dollar store find. 

Paris Box

The Paris themed box ( originally intended as a gift for a friend but she ended up with something else) holds miscellaneous things a guest might need. It's a plain wood cigar box from the craft store, painted, Mod Podged and accented with a vinyl Eiffel Tower.  

I loved all of these pieces individually but I love them even more combined together in their new home!  Hope I've given you inspiration to look at some things around your home in a new way without spending a penny! 

Thursday, June 12, 2014

BFF Open House Link Party #162 Father's Day Edition

The Answer Is Chocolate

Friday eve again! And not only Friday eve but Father's Day weekend Friday eve! First, to all the Dads in your lives, Happy Father's Day.  In case you need some last minute inspiration , here are some Father's Day features that might come in handy ( or can always be pinned for when you need a guy idea throughout the year). 


My readers know I love to make cards. These, from the guys at Crafty Lumberjacks are just too perfect for Dad's day! 

If you can't find something at these next two roundup features, I'm not sure there's a gift out there for you!


This one from Crafty Journal (includes printables, things kids can make etc.) or 

this one from Lamberts Lately should have you covered!

For the Dad with a sweet tooth this week's chocolate feature should satisfy: 


Rocky Road doughnuts from Confectionalism !

OK now on to this week's party!