Showing posts with label scrapbook paper. Show all posts

Thursday, June 30, 2011

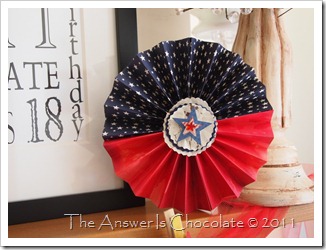
Patriotic Paper Pinwheels

Fourth Pinwheel (3)
I’m alliterative  among other things! These pinwheels aren’t a new idea but I’ve actually never made any! You can free fold  the paper accordion style or you can score it like I did using my Martha Stewart score and fold board. I love this thing! I use it for all my cards and anything I have to fold or score.

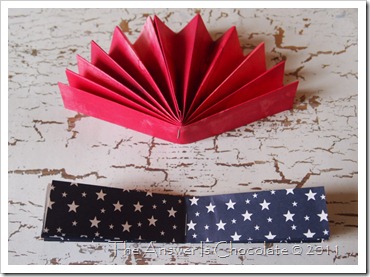
I thought it would be fun to use two papers together, So I cut 12x12 papers to 6x12, then scored and folded them at the one inch mark and joined the two different halves together.
Fourth Pinwheel How To
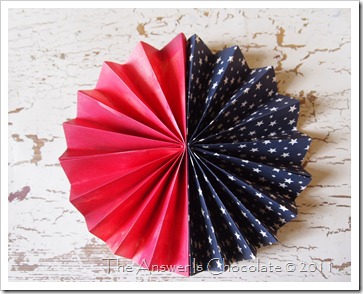
Once you’ve completed your accordion folding fold your folded piece in half and staple in the middle. STAPLE. You need to STAPLE. After you STAPLE stick the the two sides of each half together with your adhesive of choice ( I used my ATG gun) and then you’ll stick the two halves together:
Fourth Pinwheel How To
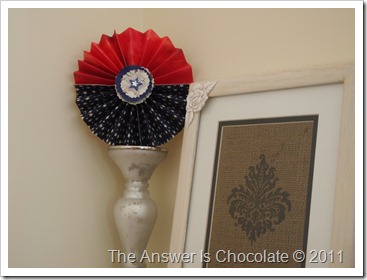
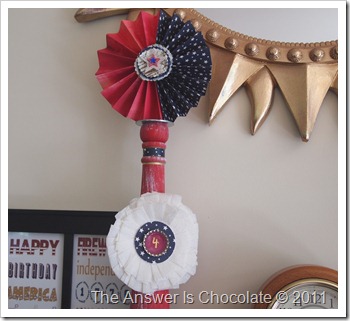
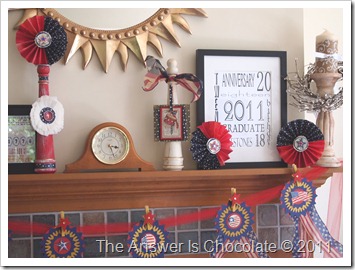
You could be done here. But that’s no fun now is it? So…I used some scrap paper and cut circles using a decorative edge scissor to make a layered flower center middle thingy and used leftover stickers from my medallion banner project to finish the centers. I just scatted these along my mantel for a little extra dose of Fourth of July flavor:
Fourth Pinwheel (2)
Candlesticks aren’t just for candles!
Fourth Pinwheel (4)
Fourth Mantle (2)
Or they can stand up by themselves!
Linking Up At: 


Paper Issues Blog Design
A Little Knick Knack

Tickled Pink at 504 Main


Friday, February 11, 2011

Last Minute V- Day Crazy Idea and Oops

I didn’t do tons of Valentine’s decorating but figured my cooking this weekend would be Valentine-y. So I thought hmmm…I should have a Valentine’s table and hmmm… don’t want to buy anything and I’m really not a tablescaper so hmmm….make some placemats. OK.
IMG_4912
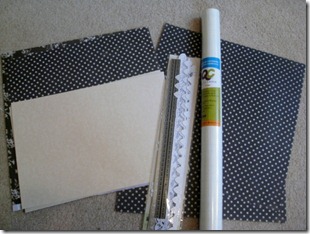
Naturally I used scrapbook paper because doesn’t everyone make placemats out of scrapbook paper? Some people do! I googled it. I thought this would be a perfect use for some “clear” contact paper I picked up on one of my Dollar Tree trips. More on that later. Here’s what I started with:
IMG_4898
Misc papers, K&Co self adhesive scrapbook borders, contact paper.
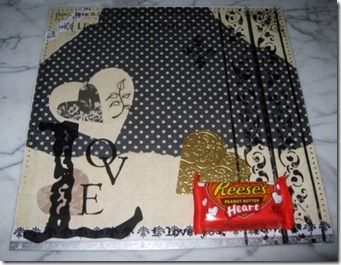
I played around like I was making scrapbook pages…tear here, border there, sticker here, use up some scraps etc. :
IMG_4902
Then the big plan was to cover each “pagemat” with CLEAR contact paper. One problem: what I thought was CLEAR was in fact…WHITE. Duh! So now what genius? To the stash!
Pulled out these that I’d picked up somewhere on clearance:
IMG_4900
Clear overlay transparencies! Take that contact paper.  I figured these would provide just as much wipeability as my “I thought it was CLEAR” contact paper, so I adhered them to my pagemats with my tape gun. And waste not want not, I used the white contact paper to cover the backs so they’re wipeable too! They won’t last forever but they’ll last long enough and then I’ll just cut them up for something else ‘cause that’s what we do!
Smooches
Oh yeah…if you click on the lip thingy, it’s a printable
Linking Up At:

Friday, October 8, 2010

Box o Cards

OK Blogger about drove me to dive head first into a vat of hot fudge but it appears to be cooperating now. Hot fudge is still an option though.

Here's something I did for a craft fair. Started off thinking I would make packages of notecards (4.5x5.5). then decided to use the scraps on tags, then decided hmmm maybe I'll make a coordinated set. I do things backwards so I'll show the evolution of this backwards too. And the last shall be first:
I love my Mom who gives me craft supplies as presents
I painted the whole thing in taupey/tan acrylic paint and then Mod Podged some scrapbook paper (Paper Pazazz) onto it, finishing it with K&Co scrapbook borders. Sealed the whole thing w/ more MP and then added a vinyl accent piece (one of my $.25 scores from JoAnn's). Finished the box with crumpled paper flowers, a button, and a rhinestone:
Here's what will go inside:
Papers: M&My Big Ideas and K&Co; self adhesive borders K&Co

Linking Up At:
The Girl Creative
 The Blackberry Vine

Wednesday, September 29, 2010

Stashbusting September Project #13: Last Project?

Welcome to those stopping in from :


The Two Savvy Sisters

I know tomorrow's  TODAY's the last day but I don't know if I'll finish anything tonight so this may or may not be the last Stashbusting September project. There may also be NO posts on Friday because as soon as I'm done with work, I will be running around Michaels and JoAnns like a Survivor contestant who's just been dropped off at a grocery store.

Just kidding. It hasn't been bad. Mr. Chocolate would say it's because the producers of "Hoarders" have our address and will be here soon. He'll probably hide my car keys on Friday.

In the meantime, I made this for a birthday gift, from my stash:

Chain and findings from Michaels; black onyx beads from Scottsdale Bead Supply
Half, ok 3/4 of the time I'm making jewelry I only have a general idea of what I'm going to use so I lay out what I think I'll use and then take it from there.
Stuff I thought I'd use

I literally just folder the chain in half and attached a jump ring to two links on either end. Attached the toggle clasp with another jump ring.
Bad pic, but cute locket w/ butterfly motif. It opens and is a little mirror 
Attached "Global Nomad" charm, put onyx and silver beads on head pin, made wire wrapped loop and attached all to center links of chain:
This goes with the card I posted last night so being a good stashbuster, I used a recycled box , a scrap piece of brown kraft paper I crumpled up to make it look textured, and scraps from the paper I used in the card which I cut into circles, crumpled up and made into a poppy. Added a paper flower, button and rhinestone:
One way to use scraps is to decorate the envelope to match your card
Linking Up At: 


Beyond The Picket Fence

Sunday, September 19, 2010

Stashbusting September Project #10: It's A Witch Thing

The "Open House" link party is still going on until midnight Pacific time. I've had so much fun seeing what's been linked up.

After busting open a package of wood plaques for an earlier Stashbusting project, I got an idea for a quick girlfriend gift for some friends I'm seeing this week. I also found I mean I knew I had ( I did!) a package of wood embellishments that I bought after last Halloween for like $1, if that. Forgot to take pics along the way but pretty basic.


  • Wood plaques and cutouts
  • Scrapbook paper scraps
  • Mod Podge
  • Cream acrylic paint
  • Printed sentiment ( again with the Avery clear label paper)
  • Wire
  • Ribbon scraps
Cover plaques w/ scrapbook paper using Mod Podge. Sand edges when dry. Paint / wipe off cream acrylic paint. Edge and stipple  w/ black ink. Adhered sentiment to finished plaque

Painted wood cutouts black and dry brushed w/ cream acrylic. Went over the top of those with some  Stickles iridescent to give a glitter effect (doesn't show up great in photos).  Super glued witch hats onto plaques. Drilled holes on either side and attached wire and to the plaques and then tied ribbon scraps on. 


Oh and let no surface be unblinged....dotted the "i's with gold adhesive rhinestones!

Linking Up At:


 All Thingz Related
 UndertheTableandDreaming

Tuesday, September 14, 2010

Stashbusting September Project #8: Owl Scare You

This was a relatively quick project...the longest thing was waiting for the Mod Podge to dry and I probably never wait as long as I'm supposed to. The minute it's touchable, I'm back messing with it. This started out as something else which I still plan to do so I'm not saying what. But then Karen, the wonderfully sparkly and generous Graphics Fairy ( I think she really does have wings) put this up, and that was that!

I'd already started with this:
Canvas Art Board, Scrapbook Paper
and Mod Podged the paper to the canvas board. It was too "clean" so I stippled some black stamping ink around the edges and then wiped some cream acrylic paint on and off.

Still needed something so I plopped on some gold paint ( I just use my wadded up paper towel from having rinsed my Mod Podge brush).  And it still needed something else, so I went to the Bin o Scraps and added a paper scrap. Then I imported / resized the pic from The Graphics Fairy and printed on to Avery clear label paper. On a BSB ( Before Stash Busting) trip to Michaels ( I'll be back...I promise...wait for me!) I'd picked up a vinyl embellishment on clearance and it screamed at me "pick me..pick me" so I did. I trimmed around the graphic and I was ready to put it all together:

Ready to put it all together but never finished without some bling! So Mr. Owl needed some gold rhinetones for his eyes, and his perch needed some clear ones ( they just don't show up well in the pic) and I had some Magenta Peel offs I added to the corners. Oh and a "BOO" leftover from another project. Thank you Graphics Fairy! 
Linking Up At:


Tuesday, September 7, 2010

Stashbusting September Project #3: Getting Scrappy With It

I have a slight problem with paper. Not quite ready for the Hoarders people to come visit ( Mr. Chocolate might disagree) but what can I say, I love paper! I also hate throwing the scraps away. So I've done everything from keeping zip-loc bags of scraps by color to my current solution...one bin for anything smaller than 12" in length and one for 12" long scraps. It made sense at the time.
Bin O Scraps
I needed to make some cards and since I'm doing the Stashbusting September challenge, decided I shouldn't cut up brand new paper (except for the card itself). To the scrap bin Batman! Picked out some complementary colors for each card:
Went to one of my ( hangs head in shame) sticker binders ( plural) and pulled out some "Magenta Peel Offs" ( ghosts of stamp shows past) and put them on scrap pieces to become the focal of the cards:
Trimmed, mounted with coordinating scraps, and then used other scraps to make the background for the card. Dug around in my embellishment bin and found some vellum tags, self adhesive rhinestones, and here are the two cards:
Eleventy-bajillion scraps left to go.