Showing posts with label Papercrafting. Show all posts

Monday, November 14, 2022

Papercrafting: Copper and Berry Layered Pumpkin Thanksgiving Cards


Cardmaking has always been and probably will be my first love. I should probably have kept track of the number of cards I've made! And I love making Thanksgiving cards to send to friends and family. This year, I went with copper and berry for my colors. Technically, the "copper" is considered rose gold but it's copper to me! 

Supplies:
  • Scrapbook Papers (I had these on hand. Craftsmith, Craftsmart, and Recollections from Michaels.)
  • Layered Pumpkin SVG (I used one from Creative Fabrica)
  • Digital Cutting Machine (I used my Cricut Explore 2)
  • Tape Gun and Spray Adhesive
  • Iridescent Sequins


The great thing about "building up a paper collection" (or what Mr. Chocolate calls "How can you possibly need MORE paper?") is how you can pull out different stacks and mix and match. It's also a  great way for me to find inspiration. These were the stacks from the stash I used. 


I downloaded the image, imported into Cricut Design Space and used 3 of the 4 layers. (Orange, Pink, and Grey).


This is the first layer. 


Second layer.


Layers one and two. I used a 3M Spray Adhesive to attach each layer since they're so delicate. 


And finally, all three layers combined! For the cards, I used a 110lb cream cardstock (Recollections) and then cut panels from the paper stacks I'd selected. 


I used foam tape to attach the layered pumpkin to the cards just to give things a little depth. To finish, I grabbed some iridescent sequins from my stash and used a dimensional glue to attach. 


Sharing At: 


Monday, September 19, 2022

Papercrafting: When Supplies Collide. Black White Metallic Handmade Paper Cards


As I've said before, I love it when a plan you didn't have comes together. I can't be the only one who picks up things as I see them, not specifically having a plan in place about what I'm going to do with them, right? RIGHT? I did that with a package of handmade paper scraps at Blick Art Materials a while back and then on my last trip to Dollar Tree, I found two sets of epoxy stickers that coordinated perfectly. The timing was perfect since I needed to make a couple of cards. 

Supplies: 
  • Handmade Paper Scraps (Blick Art ...can't remember the price but around $5 I think)
  • Epoxy Stickers (Dollar Tree) 
  • White 110lb cardstock (Recollections, Michaels)
  • Black and White Scrapbook Paper (Michaels)
  • Black Cardstock Scraps
  • Foam Tape
  • Adhesive Tape Runner 


I couldn't have coordinated these if I'd tried! 

I cut the white cardstock to 7x10 for 5x7 cards. Then I selected the handmade papers I wanted to use along with a sheet of black and white scrapbook paper from my stash, cut in panels as shown and adhered to the card. 


I selected a trio of stickers from the gold and silver sheets and mounted on squares of black cardstock scraps. Then mounted these using foam tape down the center of the cards as shown. 


For the silver stickers, I chose a handmade paper with glittered silver polka-dots. 

For the gold stickers, I chose a piece of black, gold, and white handmade paper. 

This is a great cardmaking project if you don't have a cutting machine and/or if you're a beginning cardmaker! 


Monday, August 8, 2022

Papercrafting: Birthday Magic


I've been busy with updating and making home decor. I was thankful that a friend had a birthday so I had a reason to make a card, my first love!

Supplies: 
  • Recollections Paper Stack, Spring Inks (Michaels)
  • Recollections White Cardstock 110 lb (Michaels)
  • Black and White Polka Dot Paper
  • Capitol Chic Designs Die Cuts (Michaels)
  • Crafter's Square Embellishments (Dollar Tree)
  • Foam Tape
  • Tape Gun


I pulled out some supplies from my stash. The Capitol Chic Designs die cuts,a while I picked up at Michaels awhile ago when they first came out. It's great having more diversity in crafting supplies and I love their work! I chose a couple of images to use as the focal for the card. I also love that Dollar Tree has increased and expanded their craft supplies and find a lot of embellishments there. 

I chose a foiled-marble paper from the stack that coordinated with the die cuts, and them made a card from white cardstock (5x7) and cut a panel (4.75x6.75) from the polka dot paper. 


I've had this Martha Stewart scoreboard forever and use it for all of my cards. I scored the 10x7 cardstock panel down the middle to create the 5x7 card, then applied the marbled panel and die cuts using foam tape to mount.


I skipped the cupcake stickers and just went with the rhinestones in coordinated colors to embellish. 


Et Voila!


Wednesday, May 4, 2022

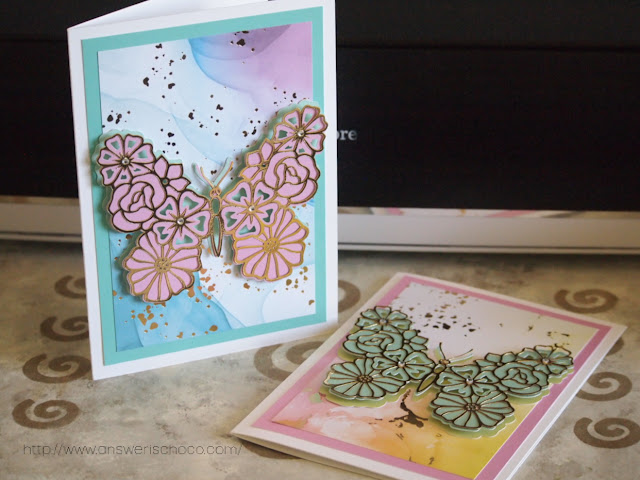
Papercrafting: Layered Butterfly Mother's Day Cards


I always wait for confirmation from recipients that they've received my cards before sharing them. Maybe it's silly, but...


I always make Mother's Day cards for special women in my life. The Mumster, aunt, friends. And since I discovered layered cut files, I continue to be obsessed by them. These Layered Butterflies from Creative Fabrica are no exception! 

Disclosure: I am a Creative Fabrica Affiliate so if you decide to purchase  this collection and use this link, I do receive a small compensation. 


Supplies:

  • Spring Inks Paper Stack (Recollections,Michaels)
  • Shimmer Paper Stack (Recollections,Michaels)
  • White 110lb Cardstock (Recollections, Michaels)
  • Gold Foil Cardstock (Recollections, Michaels)
  • Foam dots and Spray Adhesive
  • Cut File and Digital Cutting Machine (Cricut Explore 2)


I already had the Shimmer Stack on hand but found the Spring Inks on a recent trip to Michaels and love that many of the Recollections stacks coordinate. No idea if this is intentional but they do! 

My cards as almost always 5.x7 so I cut the white cardstock to size, then cut panels of the Shimmer and Spring Inks papers to fit and layer. For the butterflies, I cut two layers from the solid papers and layered using foam dots. 


I did different color combos to coordinate with the variations in colors of the Spring Inks papers. 


The star of these cards though, is the top gold layer! The Recollections metallic cardstock cuts intricate details BEAUTIFULLY! 


They're so ethereal! Given how delicate this layer is, I used a spray adhesive to adhere these to the layered butterflies. 

The  gold top layer picked up the foiling in the papers so perfectly! 


Between the detail in the butterflies and the beauty of the marbled and foiled papers, the only embellishments I added were some tiny rhinestones on the wings. 


Sharing At: 


Sunday, November 21, 2021

Christmas Decor: Layered Christmas Stocking


"It's the most wonderful of the year" also the busiest but definitely fun! As a Maker, it's definitely my favorite. And another favorite this making season continues to be layered cut files that so many Makers keep coming up with and sharing, I can hardly keep up! For this project I used one from a collection of Layered Ornaments from one of my favorite creators, Kimberly from Sweet Red Poppy. Whether you sew, do papercrafts or just love pretty things, you really need to check out her blog! 

NOTE: This project assumes familiarity with how to use your machine's software. 

Supplies: 
  • Layered SVG Files (I used the stocking from this collection by Sweet Red Poppy)
  • Cutting Machine (I used my Cricut Explore 2. These also work for Silhouette)
  • Gold Foil, Cream, Silver Glitter cardstock (All, Recollections from Michaels)
  • Background Paper ( I used sheets from the White Christmas stack, Michaels)
  • Display Case Frames (Michaels)
  • Foam Dots
  • Embellishments (I used Wood Stars from Dollar Tree)


For the smaller stocking, I used a silver display case frame from my stash. I pick these up whenever they're a buy one get one at Michaels. The 8x8 frames come 3 to a package and the 12x12 come two to a package so when they're a BOGO it's a great deal! For the 12x12, I thought I had silver but alas, no so to the craft paints! Here's where what some might call a craft fail, I prefer to call a happy accident! I took the frame apart since I was going to paint it. Set the glass and insert aside. 


You might think I used a crackle medium. Nope! I took out some silver chalk paint and apparently it's a wee bit old and had separated. Oops. I stirred and shook it but when I applied it it crackled itself! While I thought I was going to go with a solid silver finish, as I watched this happen I was actually quite happy. Ergo, happy accident! 


The next step was to prepare my layers. The stocking comes in five layers but I wanted it simpler so I hid two of the layers and used the ones shown sized to 6 inches tall for the smaller stocking and 10 inches for the larger. 


Once you've sized your layers, cut them on your machine. Here are my completed and cut layers. 


Once you have all of your layers assemble using foam dots/squares/tape. For the top layer I cut the squares in half to fit the more narrow border. 


Working from the back of your layers, place the foam squares around the cutout, then flip and attach to your base layer. Repeat with the top layer. 


The reason I only did three of the layers is because I'd chosen a star background paper and was excited to use these wood stars I found at the Dollar Tree ( once again..."why didn't I buy more of these?!") because I went back and gone, baby, gone. I put small drops of glue (Ranger, Glossy Accents) on the back and applied to the stockings as shown. 


Squeal! I instantly fell in love with this White Christmas Hot Buy stack at Michaels. This week (11/21-11/27) they're my favorite...buy one get two free so get thee to a Michaels if you are looking for some pretty holiday scrapbook paper. I chose the paper I wanted for my background and cut one sheet to fit the 8x8 and trimmed the other to fit the 12x12 and then adhered to the inside of the frame back using double sided tape. Then I adhered the stocking using more double sided tape and assembled the frames. 


I am so happy with how they turned out! The color combinations are endless. I am so addicted to these beautiful and intricate layered files. 


Sharing At